background image


49 


Encoder User Manual


Icon 

Description 

Icon 

Description 


Close: Select an image and click 
this button to close the image.   


Close all: Click this button to close 
all images. 


Save:  Click this  button to select 
the path for saving the image on 
the PC. 


Save all: Click this button to select 
the path for saving all pictures on 
the PC. 


Fit size: Click to fit the image on 
the screen. 


Actual  size:  Click  this  button  to 
display  the  actual  size  of  the 
image. 


Zoom  in:  Click  this  button  to 
digitally zoom in. 


Zoom  out:  Click  this  button  to 
digitally zoom out. 


Slide  show  play:  Click  this 
button  to  start  the  slide  show 
mode. 


Stop: Click this button to stop the 
slide show.   


Play speed: Play speed of the slide show. 


5.2


Video Search 

5.2.1


Local Video Search 

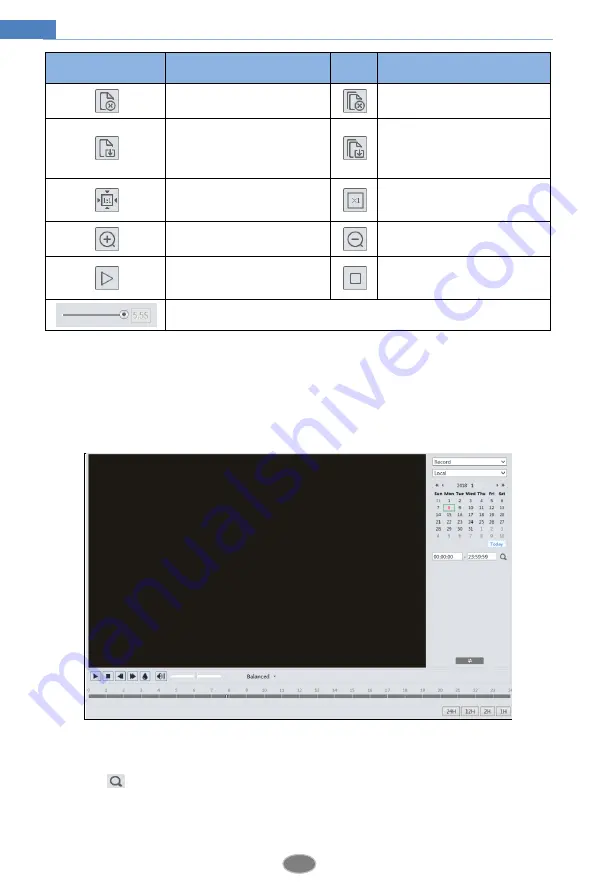
Click Search to go to the interface as shown below. Videos were recorded locally to the PC can 
be played in this interface. 


1.


Choose “Record”—“Local”. 

2.


Set search time: Select the date and choose the start and end time. 

3.


Click 

  to search the images. 

4.


Double click on a file name in the list to start playback. 


Summary of Contents for TE-100-4M

Page 1: ...TE 100 4M Xcel Series Encoder USER MANUAL...

Page 2: ...ower supply are beyond the limited stipulations Keep away from heat sources such as radiators heat registers stove etc Do not expose the product to the direct airflow from an air conditioner This is p...

Page 3: ...g from illegal operations Regulatory Information FCC Marking The products have be tested and found in compliance with the council FCC rules and regulations part 15 subpart B Operation of this product...

Page 4: ...splay Configuration 14 4 2 2 Video Audio Configuration 16 4 2 3 OSD Configuration 17 4 2 4 Video Mask 18 4 2 5 ROI Configuration 19 4 3 PTZ Configuration 20 4 4 Alarm Configuration 20 4 4 1 Motion Det...

Page 5: ...2 Online User 43 4 7 3 Block and Allow Lists 43 4 7 4 Security Management 44 4 8 Maintenance Configuration 44 4 8 1 Backup and Restore 44 4 8 2 Reboot 45 4 8 3 Upgrade 45 4 8 4 Operation Log 46 5 Sea...

Page 6: ...and reliable This product is widely used in banks telecommunication systems electricity power departments law systems factories storehouses uptowns etc In addition it is also an ideal choice for surve...

Page 7: ...he Xcel IP Utility is installed in the PC from the CD Double click the Xcel IP Utility icon on the desktop to run this software as shown below Modify the IP address The default IP address of this devi...

Page 8: ...rator and click Modify button to modify the setting Double click the IP address and then the system will pop up the web browser to connect the device Download the plug in and run it in your computer i...

Page 9: ...255 255 255 0 Gateway 192 168 226 1 HTTP 80 Data port 9008 You may use the above default settings when you log in the device for the first time You may directly connect the device to the computer thro...

Page 10: ...uter if it is the first time for you to log in Enter the default username and password 2 2 WAN Access through the router or virtual server Make sure the device is connected via LAN and then log in the...

Page 11: ...ual Server Router Setup Open the web browser and enter its WAN IP and http port to access Access through PPPoE dial up Network connection You may access the device through PPPoE auto dial up The setti...

Page 12: ...r detail information Open the web browser and enter the domain name and http port to access Access through static IP Network connection The setting steps are as follow Go to Config Network Port menu t...

Page 13: ...Appropriate size Zoom out Auto COC Full screen PTZ control Start stop live view Scene change indicator icon Start stop two way audio Abnormal clarity indicator icon Enable disable audio Color abnorma...

Page 14: ...n keys to select the menu and click button to confirm The device can be installed in a compatible external PTZ enclosure through RS485 Click the PTZ icon to reveal the PTZ control panel The descriptio...

Page 15: ...User Manual Select preset and click to call the preset Select and set the preset and then click to save the position of the preset Select the set preset and click to delete it Light Radom scan Group s...

Page 16: ...Information In the Basic Information interface the system information of the device is listed Some versions may support device ID and QR code Having been enabled P2P see Network Configuration P2P the...

Page 17: ...corded files 4 1 4 Storage Go to Config System Storage to go to the interface as shown below SD Card Management Click the Format button to format the SD card All data will be cleared by clicking this...

Page 18: ...e Record and set the schedule Weekly schedule Set the alarm time from Monday to Sunday for a single week Each day is divided in one hour increments Green means scheduled Blank means unscheduled Add Ad...

Page 19: ...umber Supposing the occurrence time of an alarm event is less than the time of capturing pictures the actual quantity of snapshots is less than the set quantity of snapshots Timing Snapshot Enable tim...

Page 20: ...rough Increasing the value will make the noise reduction effect better but it will reduce the image resolution Video Mode Auto TVT AHD or CVBS can be selectable Frequency 50Hz and 60Hz can be optional...

Page 21: ...justable Resolution The size of image Frame rate The higher the frame rate the video is smoother Bitrate type CBR and VBR are optional Bitrate is related to image quality CBR means that no matter how...

Page 22: ...lient system is able to decode H 265 Profile For H 264 Baseline main and high profiles are selectable Send Snapshot How many snapshots to generate for an event Video encode slice split If this functio...

Page 23: ...ll not exceed 200 200 or it cannot be uploaded 4 2 4 Video Mask Go to Image Video Mask interface as shown below A maximum of 4 zones can be set up To set up video mask 1 Enable video mask 2 Click the...

Page 24: ...5 ROI Configuration Go to Image ROI Config interface as shown below 1 Check Enable and then click Draw Area button 2 Drag the mouse to set the ROI area 3 Set the level 4 Click Save button to save the...

Page 25: ...s shown below Set the protocol address and baud rate according to the PTZ 4 4 Alarm Configuration Alarm configuration includes four submenus Motion Detection Alarm In Alarm Out and Alarm Server 4 4 1...

Page 26: ...ction and save the images on an SD card Trigger SD Recording If selected video will be recorded on an SD card on motion detection Trigger Email If Trigger Email and Attach Picture are checked email ad...

Page 27: ...le setup steps of the motion detection are the same as the schedule recording setup See Schedule Recording 4 4 2 Other Alarms SD Card Full 1 Go to Config Alarm Anomaly SD Card Full 2 Check Enable and...

Page 28: ...elow 2 Click Enable and set the alarm holding time 3 Trigger alarm out When the IP address of the device is in conflict with the IP address of other devices the system will trigger the alarm out Cable...

Page 29: ...sor alarm The setup steps of the schedule are the same as the schedule recording setup See Schedule Recording 4 4 4 Alarm Out Go to Config Alarm Alarm Out Alarm Out Mode Alarm linkage manual operation...

Page 30: ...rface as shown below Set the server address port heartbeat and heartbeat interval When an alarm occurs the device will transfer the alarm event to the alarm server If an alarm server is not needed the...

Page 31: ...Object Removal interface as shown below 1 Enable object removal detection and then select the detection type Enable Left Detection Alarms will be triggered if there are items left in the pre defined...

Page 32: ...to 5 seconds 3 The defined area cannot be covered frequently and continuously like people and traffic flow 4 It is necessary for object removal detection that the drawn frame must be very close to the...

Page 33: ...r details 3 Click Save button to save the settings 4 Set the sensitivity of the exception detection Click Sensitivity tab to go to the interface as shown below Drag the slider to set the sensitivity v...

Page 34: ...4 5 3 Line Crossing Line Crossing Alarms will be triggered if someone or something crosses the pre defined alarm lines Go to Config Event Line Crossing interface as shown below 1 Enable line crossing...

Page 35: ...ng Configuration of camera and surrounding area 1 Auto focusing function should not be enabled for line crossing detection 2 Avoid the scenes with many trees or the scenes with various light changes l...

Page 36: ...he interface as shown below Set the alarm area number on the right side Up to 4 alarm areas can be added Click the Draw Area button and then click around the area where you want to set as the alarm ar...

Page 37: ...detected objects should not be more than 1 8 of the entire image 6 Make sure cameras can view objects for at least 2 seconds in the detected area for accurate detection 7 Adequate light and clear scen...

Page 38: ...et up Trigger FTP when the IP address of the device is changed the new IP address will be sent to FTP server that has been set up 4 6 2 Port Go to Config Network Port interface as shown below HTTP Por...

Page 39: ...the system will automatically allot a device ID Please check it in the CMS VMS 3 Enter the above mentioned server address server port and device ID in the corresponding boxes Click Save button to save...

Page 40: ...using the SNMP please download the SNMP software and set the parameters of the SNMP such as SNMP port trap address 1 Go to Config Network SNMP 2 Check the corresponding version checkbox Enable SNMPv1...

Page 41: ...6 Encoder User Manual 4 6 6 802 1x IEEE802 X which is an access control protocol The setup steps are as follows To use this function the device shall be connected to a switch supporting 802 1x protoco...

Page 42: ...player Multicast Address Main stream The address format is rtsp IP address rtsp port profile1 transportmode mcast Sub stream The address format is rtsp IP address rtsp port profile2 transportmode mca...

Page 43: ...e the video cannot be played 5 If the coding format of the video of the main stream is MJPEG the video may be disordered at some resolutions 4 6 8 UPNP If this function is enabled the device can be qu...

Page 44: ...e motion alarm event is triggered and then another motion detection alarm event is triggered after 60 seconds two emails will be sent When different alarms are triggered at the same time multiple emai...

Page 45: ...sers don t want to use the default one Click Delete to cancel the default certificate Then the following interface will be displayed If there is a signed certificate click Browse to select it and then...

Page 46: ...k P2P interface 4 6 13 QoS QoS Quality of Service function is used to provide different quality of services for different network applications With the deficient bandwidth the router or switch will so...

Page 47: ...sions as an Administrator except for user backup settings factory reset and upgrading the firmware 5 Enter the MAC address of the PC in Bind MAC textbox If this option is enabled only the PC with the...

Page 48: ...new access level Delete user 1 Select the user to be deleted in the user configuration list box 2 Click the Delete button to delete the user Note The default administrator account cannot be deleted 4...

Page 49: ...failure after trying six times will make the login interface locked The device can be logged in again after a half hour or after the device reboots For some specified versions anonymous login with a...

Page 50: ...ort Setting button Default Settings Click the Load Default button to restore all system settings to the default factory settings except those you want to keep 4 8 2 Reboot Go to Config Maintenance Reb...

Page 51: ...e specified models online upgrade is available The setting steps are as follows If no such function please skip the instruction 1 Create the upgrade file location and save it 2 Check the latest versio...

Page 52: ...ce as shown below Images that are saved on the SD card can be found here Local Image Search 1 Choose Picture Local 2 Set time Select date and choose the start and end time 3 Click to search the images...

Page 53: ...rd 2 Set time Select date and choose the start and end time 3 Choose the alarm events at the bottom of the interface 4 Click to search the images 5 Double click a file name in the list to view the cap...

Page 54: ...actual size of the image Zoom in Click this button to digitally zoom in Zoom out Click this button to digitally zoom out Slide show play Click this button to start the slide show mode Stop Click this...

Page 55: ...up Watermark display Enable disable audio drag the slider to adjust the volume after enabling audio 5 2 2 SD Card Video Search Click Search to go to the interface as shown below Videos that were reco...

Page 56: ...table can be shown in 24H 12H 2H 1H format by clicking the corresponding buttons Video clip and downloading 1 Search the video files according to the above mentioned steps 2 Select the start time by...

Page 57: ...Encoder User Manual Click Set up to set the storage directory of the video files Click Open to play the video Click Clear List to clear the downloading list Click Close to close the downloading windo...

Page 58: ...rator to get the correct port number D Exclude the above reasons Recover default setting by Xcel IP Utility Q Xcel IP Utility cannot search devices why A It may be caused by the anti virus software in...

Page 59: ...Encoder User Manual Q No sound can be heard why A Audio input device is not connected Please connect and try again B Audio function is not enabled at the corresponding channel Please enable this funct...

Page 60: ...through client or web browser ROI Support Interfaces Network RJ45 Auido MIC IN 1 SPK OUT 1 Storage Support micro SD card slot up to 128 GB RS485 Support Alarm 1CH alarm input 1 CH alarm output Local...

Reviews: