NuTech 22920 Operating Instructions Manual Download Page 26

English   

- 25 -

When  you  are  in  DTV  Mode  and  press  “ ”  or 
“ ”  button,  the  Information  of  the  previous  or  next 
programme is displayed. To switch to the displayed, 
programme just press 

OK

 button.

Mute Function

Press “

” button to disable sound. Mute indicator will 

be displayed in the upper side of the screen.
To cancel mute, there are two alternatives; the 

 rst 

one is pressing the “

” button and the second one 

is increasing the volume level.

Picture Mode Selection

By  pressing 

PRESETS

  button,  you  can  change 

Picture  Mode

  settings  in  accordance  with  your 

viewing requirements. Available options are Dynamic, 
Natural and Cinema.

Note

: This feature cannot be set while in PC mode.

Freezing Picture

You can freeze the picture on the screen by pressing 
the  “

OK

”  button  on  the  remote  control.  Press  the 

OK

”  button  to  freeze  picture.  Press  again  to  quit 

freeze mode.

Note

: This feature will not be available while in PC 

mode or watched movie from DVI source .
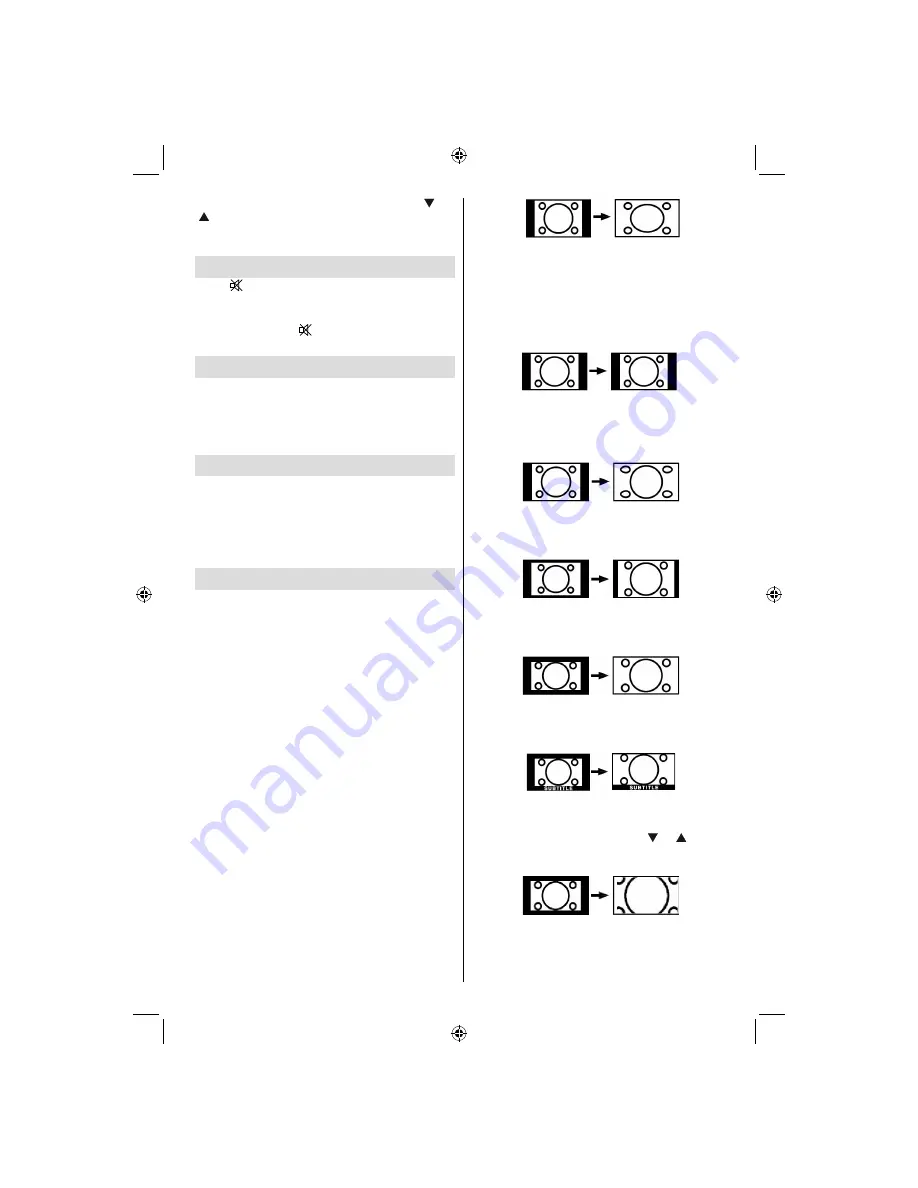
Zoom Modes

You can change the aspect ratio (image size) of the TV 
for viewing the picture in different zoom modes.
Press “

SCREEN

” button to directly change the zoom 

mode.
Available zoom modes are listed below.

Note

In 

YPbPr

 and 

HDMI

 modes, while in 720p-1080i resolutions, 

only 16:9 mode is available.
Zoom mode cannot be changed while in PC mode.

Auto

When a 

WSS (Wide Screen Signalling)

 signal, which 

shows the aspect ratio of the picture, is included in 
the broadcast signal or the signal from an external 
device,  the  TV  automatically  changes  the 

ZOOM


mode according to the 

WSS

 signal.

• When the 

AUTO

 mode does not function correctly 

due to poor 

WSS

 signal quality or when you want to 

change the 

ZOOM

 mode, change to another 

ZOOM


mode manually.

16:9

This uniformly stretches the left and right sides of a 
normal  picture  (4:3  aspect  ratio)  to 

 ll  the  wide TV 

screen

.

•  For  16:9  aspect  ratio  pictures  that  have  been 

squeezed into a normal picture (4:3 aspect ratio), 
use  the 

16:9

  mode  to  restore  the  picture  to  its 

original shape.

4:3

Use to view a normal picture (4:3 aspect ratio) as this 
is its original size

.

Panoramic

This  stretches  the  left  and  right  sides  of  a  normal 
picture (4:3 aspect ratio) to 

 ll the screen. The top and 

bottom of the picture are slightly cut off.

14:9

This zooms up the wide picture (14:9 aspect ratio) to 
the upper and lower limits of the screen.

Cinema

This zooms up the wide picture (16:9 aspect ratio) to 
the full screen.

Subtitle

This  zooms  up  the  wide  picture  (16:9  aspect  ratio) 
with subtitles to the full screen.

Zoom

This option zooms to the picture.Note: You can shift 
to screen up or down by pressing “ ” / “ ” buttons 
while picture zoom is selected as panaromic, 14:9, 
Cinema or Subtitle.

MB45_[GB]_3902UK_IDTV_BRONZE11_22920W_LED_POWER SAVE MODE_10068917_50168693.indd   25

MB45_[GB]_3902UK_IDTV_BRONZE11_22920W_LED_POWER SAVE MODE_10068917_50168693.indd   25

04.06.2010   17:15:06

04.06.2010   17:15:06

Helpline number: 0845 

199 1574

Summary of Contents for 22920

Page 1: ...OPERATING INSTRUCTIONS 22920 FHD LED COLOUR TELEVISION WITH REMOTE CONTROL Helpline number 0845 199 1574...

Page 2: ...isconnecting the Device 4 Headphone Volume 4 Installation 4 LCD Screen 4 Warning 4 Environmental Information 5 Repair Information 5 Overview of the Remote Control 6 LCD TV and Operating Buttons 7 View...

Page 3: ...ep timer Child lock Automatic sound mute when no transmission NTSC playback AVL Automatic Volume Limiting When no valid signal is detected after 5 minutes the TV switches automatically to standby mode...

Page 4: ...for disposal Don t try to recharge batteries Danger of explosion Replace batteries only with the same or equivalent type Preparation For ventilation leave a free space of at least 10 cm all around th...

Page 5: ...Do not leave your TV in standby or operating mode when you leave your house The Standby On button doesn t separate this device completely from mains Moreover the device consumes power in the standby o...

Page 6: ...reduce energy consumption Disconnect power when going away for longer time Note that annually using the TV set in Power Save Mode has more power ef ciency than disconnecting the TV from the mains plu...

Page 7: ...p 12 Info Reveal in TXT mode 13 Mute 14 Volume Down 15 Programme Down Page up in DTV mode 16 Electronic programme guide in DTV mode 17 Programme Up Page down in DTV mode 18 Sleep Timer 19 Picture Mode...

Page 8: ...s component output Connect the YPbPr to PC cable between the PC INPUT on the TV and the component video outputs of your device YPbPr cable is not supplied HDMI 3 HDMI input HDMI Input is for connectin...

Page 9: ...ote If you connect a device to the TV via the VIDEO or PC YPbPr cable YPbPr cable is not supplied you should also connect your device with an audio cable to the AUDIO INPUTS of the TV to enable audio...

Page 10: ...device before making any connections Note Cables shown in the illustration are not supplied If your DVD player has an HDMI socket you can connect via HDMI When you connect to DVD player as illustrate...

Page 11: ...ensure the correct polarity is observed and replace the battery cover Note Remove the battery from remote control when it is not to be used for a long period Otherwise it can be damaged due to any le...

Page 12: ...the following sections Volume Setting Press V button to increase the volume Press V button to decrease the volume Avolume level scale slider will be displayed on the screen Programme Selection Previo...

Page 13: ...locked you must enter the correct four numeric code to view the channel Enter PIN will be displayed on the screen in such a case Electronic Programme Guide EPG Some but not all channels send informat...

Page 14: ...be viewed in a number of formats Press the SCREEN button repeatedly to change screen format When Auto is selected the format being displayed is determined by the picture being broadcasted PLEASE NOTE...

Page 15: ...tton moves to the previous next character Pressing or button toggles the current character i e b character becomes a by and c by Pressing the numeric buttons 0 9 replaces the highlighted character wit...

Page 16: ...ns for other users You can save the adjustments by pressing theGREEN key or cancel the process by pressing theRED button You can edit the list via GREEN key and delete with the RED button Conditional...

Page 17: ...ed Scan Encrypted Channel feature will always be ON after performing rst time installation When this setting is on search process will locate the encrypted channels as well If it is set as OFF manuall...

Page 18: ...se or buttons to change the Time Zone between GMT 12 or GMT 12 Current Time on the top of the menu list will then change according to the selected Time Zone Audio Description Optional Audio descriptio...

Page 19: ...anguage determines the on screen menu language Audio Language is used for selecting the soundtrack of channels Primary settings are the rst priority when multiple choices are available on a broadcast...

Page 20: ...ight First Time Installation menu item and press OK button then you will be asked whether or not to delete the settings Selecting Yes by pressing OK button while Yes is highlighted will delete the exi...

Page 21: ...o Picture Mode Contrast Brightness Sharpness Colour and Colour Temp settings will be invisible and disabled while Game Mode is on Note Picture mode selection button on the remote control will have no...

Page 22: ...can only be controlled by the remote control In this case the control panel buttons will not work except for the Standby On button When Child Lock is activated you are able to switch the TV into Stan...

Page 23: ...choose desired source from source menu and turn On to EXT Out from feature menu Ext Out should be On in order to use Timers function in the DTV mode Install Menu Program Press or button to select Pro...

Page 24: ...button By navigation buttons move the selected programme to the decided programme space and press theGREEN button again Delete To delete a programme press the YELLOW button Pressing the YELLOW button...

Page 25: ...nd side of the screen Select H Position item by using or button Use or button to adjust the value V Vertical Position This item shifts the image vertically towards the top or bottom of the screen Sele...

Page 26: ...spect ratio of the picture is included in the broadcast signal or the signal from an external device the TV automatically changes the ZOOM mode according to the WSS signal When the AUTO mode does not...

Page 27: ...Persistence Please note that ghosting may occur while displaying a persistent image LCD TVs image persistence may disappear after a short time Try turning off the TV for a while To avoid this do not...

Page 28: ...ESA 4 800 600 56 35 2 VESA 5 800 600 60 37 9 VESA 6 800 600 70 43 8 7 800 600 72 48 1 VESA 8 800 600 75 46 9 VESA 9 832 624 75 49 7 MAC 10 1024 768 60 48 4 VESA 11 1024 768 70 56 5 VESA 12 1024 768 72...

Page 29: ...z O 1080P 24Hz O 1080P 25Hz O 1080P 30HZ O 1080P 50HZ O 1080P 60HZ O X Not Available O Available Note In some cases a signal on the LCD TV may not be displayed properly The problem may be an inconsist...

Page 30: ...rt compliant with ISO IEC 135818 6 and UK DTT pro le Frequency range 474 850 MHz for UK models 170 862 MHz for EU models Transmission standard DVB T MPEG 2 Demodulation COFDM with 2K 8K FFT mode FEC a...

Page 31: ...with the letter N or coloured Black The wire which is coloured brown or red must be connected to the terminal which is marked with the letter L or coloured Red For continued protection against risk of...

Page 32: ...igital tuner will continue to broadcast all of these channels and more If you are using this product to watch broadcasted TV you should ensure that your Aerial set up is ready for the changes To do th...

Page 33: ...50168693...

Reviews: