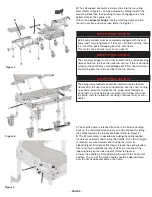
Figure 8
Reconfigure the multiCHAIR 6000Tilt, 6200Tilt,
6000Tilt P1, and 6000Tilt P2
with the Tub Section on
the user’s left side (Refer to Figures 6 and 7)
The roll-
in section and tub section frames are identical. To change
slide direction do the following:
A
Unbolt the sheet metal calf support plate using a large
Phillip head screw driver and a small Crescent wrench and
then reinstall it on the other frame.
B
Move the latch stops as shown using the 5/32” Allen
wrench that is provided with the slider
C
Move the complete leg assemblies and the side suction
cups from one frame to the other.
D
Relocated the tilt system crank handle from one side of
the shuttle frame to the other side
E
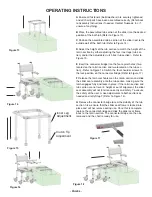
Adjustments to the “Tilt Assembly” (Refer to Figure 5 on
page 2 and Figure 7 this page) need to be made as fol-
lows: Remove the “crank handle” by removing the socket
screw with an 1/8” Allen wrench. Remove the cap from the
opposite side of the frame, again using an 1/8” Allen
wrench, and install it on this side. Reinstall the crank han-
dle on the opposite side of the frame. NOTE: position the
seat in the horizontal position and the crank handle should
be approximately covering the flat head socket bolt on the
frame.
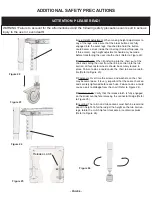
F
Move the slider latch to the opposite side of the tilt
assembly:
1) Remove the 1/4-20 Flat Head Socket Screw with the
5/32 Allen wrench that is provided with the slider.
2) The second 1/4-20 Flat Head Socket Screw is bolted to
a nylon insert lock nut. Therefore a small crescent wrench
or a 7/16” open end can be used to hold the nut while turn-
ing the screw.
3) Position the latch on the opposite side of the frame and
reinstall.
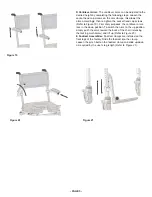
Cantilever Arms
: If desired, the cantilever arms can be
removed from the backrest assembly for storage during
traveling. This can be accomplished by unscrewing the
socket head cap screws that attach the arms to the back-
rest posts using the 5/32” Allen wrench. Then remove the
arm assemblies from the posts and re-insert the socke
head cap screws into the arm assemblies, so they are not
lost. To re-install the cantilever arms, simply follow the
steps above in reverse (Refer to Figure 8).
ADDITIONAL ASSEMBLY INSTRUCTIONS
Figure 7
Release Latch Assembly: Do not attempt to unscrew the inner
slotted screws. Doing so can cause the entire latch assembly to
come apart, rendering it useless (There is no tool provided for this
operation) .
- PAGE 3 -
NOTE!
Figure 6
A
B
D
C
E
F


