- PAGE 1 -
A
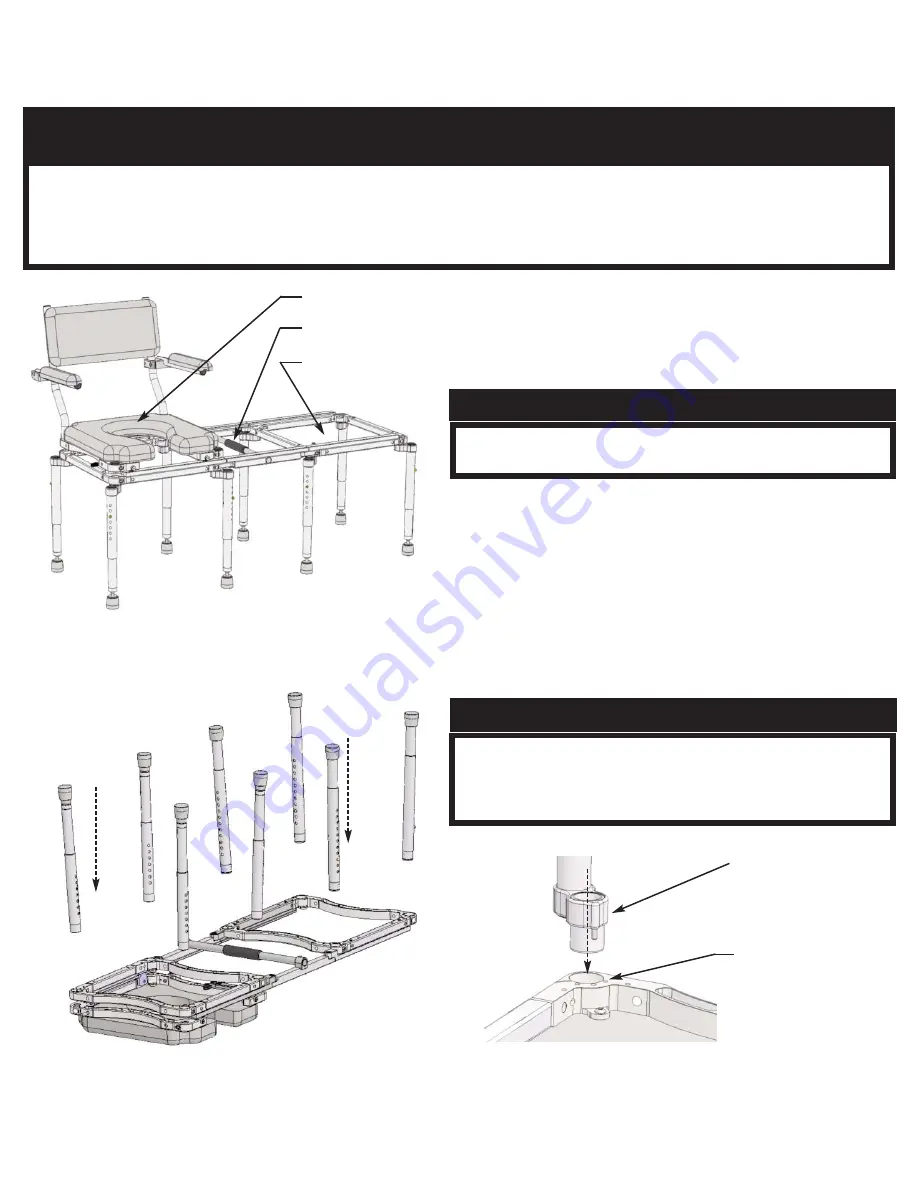
The multiCHAIR 5000, 5100, and 5200 (Refer to Figure 1) are
composed of a shuttle with back and fold-back cantilever arms,
lower frames with legs & adjusting feet.
B
Unpack all parts from the shipping carton. Remove all tape
and/or packing from the chair. Keep shipping materials for future
use. Note the location of padding materials and sheet-plastic which
protects parts of your chair.
C
Position the frames upside down and install the legs (Refer to
Figure 2)
D
Position the legs so that the brass buttons point outward (Making
it easier for future leg height adjustment). Make sure that the legs
slide “home” into the socket of the seat frame. Use the included ¼”
Allen wrench to securely tighten the bolts located at the corners of
the frame (Refer to Figures 2 & 3).
!ATTENTION: PLEASE READ!
ASSEMBLY INSTRUCTIONS
Please see LIMITED WARRANTY of these instructions. If the warranty is not acceptable, contact Nuprodx, Inc. for information
about returning the chair for a refund (Restocking fees and shipping charges will be applied). This chair is designed and intended
for indoor shower and bathroom use. It is not designed for outdoor use and will void the warranty if used in this fashion. If thresh-
olds, shower curbs or barriers are encountered that exceed ½” in height, the area in question should be brought within the code for
disabled accessibility.
NOTE!
If you need to position the chair so the tub is on the user’s right
side, refer to ADDITIONAL ASSEMBLY INSTRUCTIONS (Page 3)
Figure 3
SAFETY PRECAUTION!
If any of the legs are not fitted correctly into the socket of the seat
frame or are not securely tightened there is an extreme risk of the
legs dislodging completely from the chair. This could cause seri-
ous injury or even death!
Commode Section
Connector Bridge
Tub Section
Figure 1
multiCHAIR 5000
Figure 2
offset leg with
pin
seat frame


