background image

Nuovo  

Operating instructions for use 

EB EASY-PRINTER


Eggland’s Best, Inc. Operating Standards Manual- EB Easy Printer Manual 

16/001 

Confidential. Do not reproduce without permission                                                                            December 6, 2016   

11 

7  Trouble Shooting 


  If a malfunction occurs, the following list should be reviewed. 

  Before the elimination of malfunctions and repairs, the safety regulations are to be followed. 

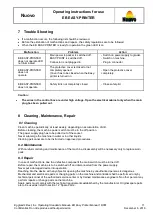
  When the EB EASY-PRINTER is ready for operation the green LED is on. 


Malfunction 

Problem 

Action 


EB EASY-PRINTER 

does not operate LED 

not illuminated 

Main power to packer is switched off. 
EASY-PRINT is switched off. 
Connector is not plugged in. 

- Switch on power supply to grader. 

-

 Switch on machine. 

-

 Plug in connector. 


EB EASY-PRINTER 

does not 

operate 

The protective cover is closed or not 

completely opened. 
(Cover has to be closed when the Easy-

printer is turned on 

 
- Open the protective cover 

completely. 


EB EASY-PRINTER 

does not operate 

 
Safety lid is not completely closed. 

 
- Close safety-lid. 


Caution: 


The wires in the control box are under high voltage. Open the electrical cabinet only when the main 

plug has been pulled out. 


8  Cleaning, Maintenance, Repair 

8.1 Cleaning 

Clean machine periodically, at least weekly, depending on accumulation of dirt. 

Before cleaning, the machine power switch must be in the off position. 

The power supply plug has to be pulled out of the socket. 

Never submerge the machine in water or in other liquids. 

Cleaning personnel are to be instructed on approved procedures. 

8.2 Maintenance 

With careful monitoring and maintenance of the machine, disassembly will be necessary only to replace worn 

parts. 

8.3 Repair 

In case of malfunctions, due to a defective component the main switch must be turned off.  

Before repair, the machine is to be switched off and disconnected from the power supply. 

Never put a damaged device into operation. 

Reaching into the device with any object or opening the machine by unauthorized persons is dangerous. 

Mechanical and electrical repairs or changing parts on the machine and controller shall be performed only by 

technical personnel of the authorized service center or by trained maintenance engineers. No other person may 

perform repairs or change parts on the machine.  

Spare parts must comply with the technical requirements established by the manufacturer. Original spare parts 

are to be used as listed in section 12 ‘Spare Parts’. 


Summary of Contents for EB Easy-Printer

Page 1: ...Operating Manual EB Easy Printer Omnia PX 530 NO 350 Dorpsstraat 84 NL5471 NA Loosbroek Tel 31 0 413229180 Fax 31 0 413229158 Special systems for Egg handling info eggprinting com ...

Page 2: ...tion of Nuovo AG Representation of Nuovo AG General office Nuovo BV Dorpsstraat 84 NL 5471 NA LOOSBROEK Ph 0031 0 413 229180 Fax 0031 0 413 229158 Email info nuovo ch www nuovo ch Advice Sales Service Customer Service ...

Page 3: ... Place of use of the machine 4 4 2 Electrical connection 4 5 Description of the machine 4 5 1 Function 4 5 2 Electrical system 4 5 3 Protective cover Safety switch 4 6 User manual 5 6 1 Machine description 5 6 2 Power up Power down 5 6 3 Print delay 6 6 4 Electrical connection 6 6 5 Electrical overview Easy Print 7 6 6 Electrical connection power supply 8 6 7 Positioning the imprint heads 9 6 8 As...

Page 4: ...idential Do not reproduce without permission December 6 2016 1 10 Disposal 12 11 General technical data 12 12 Spare parts 13 12 1 Stamping head 13 12 2 Ink reservoir 13 12 3 Complete stamping bar 14 12 4 Parking station 14 12 5 Connection Box parts 15 12 6 L Brackets 17 13 Filling the egg stamp Replacing the pad 18 14 Consumables 19 ...

Page 5: ...work should be performed only by qualified technical personnel Unauthorized changes to the machine are disallowed Any use other than stamping EB product is considered as improper The manufacturer will not be liable for resulting damages Relevant safety regulations are to be followed Delivery of replacement parts requires an order specifying serial number and year of installation number or name of ...

Page 6: ...f instructions for use The Instructions for use should be available to supervisory and maintenance personnel in plants 3 3 User requirements Operating personnel The EB EASY PRINTER is to be operated only by trained personnel under the control of plant management and a designated line supervisor 3 4 Performance of work on the machine Personnel authorized to maintain or repair the machine must under...

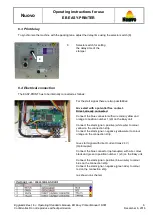
Page 7: ...ly 4 2Electrical connection Make sure signal power supply and especially the ground are in order The EB EASY PRINTER has to be wired for the type of packer it is going to be used on Power supply unit 110 230 Volt and 50 60 Hertz Caution Components within the machine are under high voltage Only remove the cover when the power supply has been disconnected An incorrect or malfunctioning power supply ...

Page 8: ...off the machine close the protective cover and turn off the machine using the power switch The protective cover must be closed to operate the machine If the power switch is turned on with the protective cover open the machine will not operate and the green LED will not illuminate To activate the machine close the protective cover As soon as the safety guard 5 is opened the machine automatically st...

Page 9: ...ies Give start with a potential free contact Direct already connected Connect the blue connector with wire colour yellow and orange to position number 1 x0 on the Easy unit Connect the start signal positive white wire to colour yellow on the connection strip Connect the start signal negative yellow wire to colour orange on the connection strip Give start signal with direct current max 24 V Optocou...

Page 10: ... belt ON OFF Pin 1 Pin 2 Signal Pin 3 GND Output X3 Sealing off lit Pin 1 24VDC Pin 2 Signal Pin 3 GND Pin 4 5VDC Output X6 5VDC for Egg counter Pin 1 Pin 2 Signal Pin 3 GND Pin 4 5VDC Output X4 5VDC LED green Pin 1 Pin 2 Signal Pin 3 GND Pin 4 5VDC Output X5 5VDC LED red Pin 1 Pin 2 Signal Pin 3 GND Pin 4 5VDC Input X2 Safety Guard Pin 1 24VDC Pin 2 Signal Pin 3 GND Pin 4 5VDC Output A0 Stamper M...

Page 11: ...R Eggland s Best Inc Operating Standards Manual EB Easy Printer Manual 16 001 Confidential Do not reproduce without permission December 6 2016 8 A Potentiometer for adjustment DC voltage Default settings 24 Volt 6 6 Electrical connection power supply A ...

Page 12: ...016 9 6 7 Positioning the imprint heads To position the stamp to the centre of the eggs release the fixing bolts 5 and center the imprint heads Fixing bolts 6 8 Assembling and disassembling the ink reservoirs To detach the ink reservoir hold the spring turn the ink reservoir anti clockwise and remove To install the ink reservoir turn it counter clockwise until it snaps into place 1 2 1 1 2 ...

Page 13: ...achine To remove the stamping bar from the EB EASY PRINTER machine 1 Move the lower part of the bar in the direction of the arrows number 1 2 Move the complete bar in the direction of the arrows number 2 6 10 Service bracket The service tool set to position 3 is used to service clean or refill the imprint heads Optional To use the service mounting tool to store printer assemblies place the printer...

Page 14: ...as been pulled out 8 Cleaning Maintenance Repair 8 1Cleaning Clean machine periodically at least weekly depending on accumulation of dirt Before cleaning the machine power switch must be in the off position The power supply plug has to be pulled out of the socket Never submerge the machine in water or in other liquids Cleaning personnel are to be instructed on approved procedures 8 2 Maintenance W...

Page 15: ...dry area at a moderate temperature After lengthy storage of the machine all internal parts must be inspected for corrosion or other damage before operation Clean or replace defective or corroded components 10 Disposal At the end of its lifetime the machine must be returned to Eggland s Best Inc or a designated agent 11 General technical data Egg Stamper Stamp head mounting For 5 or 6 stamps produc...

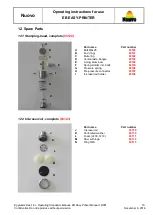
Page 16: ...120 12 2 Ink reservoir complete 03123 A C D E F I H G B K L M Part name Part number A Bolt M6x20 03100 B End ring 03101 C Mute ring 03102 D Vertical axle 6angle 03103 E Lining Aluminum 03104 F Spring Holder incl bolts 03105 G Pressure spring 03106 H Pre pressure connector 03107 I Ink reservoir holder 03108 Part name Part number J Ink reservoir 03109 K Perforated washer 03110 L Foam d 30 h 10 03111...

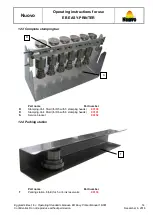
Page 17: ...o not reproduce without permission December 6 2016 14 12 3 Complete stamping bar 12 4 Parking station R S Part name Part number R Stamping Unit 5fold for R5 with 5 stamping heads 03130 R Stamping Unit 6fold for R6 with 6 stamping heads 03131 S Service bracket 03132 T Part name Part number T Parking station 6fold for 5 or 6 ink reservoirs 03133 ...

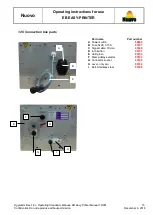
Page 18: ...ial Do not reproduce without permission December 6 2016 15 12 5 Connection box parts Part name Part number A Power switch 00652 B Fuse 5x20 3 15A 03157 C Signal cable Omnia 03320 D Inch button 03151 E LED green 03153 F Stamp delay selector 03152 G Connector socket 03159 H Lever only alu 03154 I Bolt Stainless steel 03168 A F B D C G E I H ...

Page 19: ...sy Printer Manual 16 001 Confidential Do not reproduce without permission December 6 2016 16 L J Part name Part number J EasyUnit10 Microprocessor 03300 K Power supply unit 10 03310 L Electrical engine incl gearbox i 16 03149 K Part name Part number M Proximity switch break 00844 N Contra spring 03143 M N ...

Page 20: ...ber 6 2016 17 Part name Part number O Safety Lid Omnia complete 03326 P Proximity switch For safety guard open or close detection 00844 Q Closing magnets for Safety Guard 03161 R Protective cover 03275 S Proximity switch For protective cover open or close detection 03290 12 6 Bracket Omnia standard T Bracket Omnia standard left 03187 T Bracket Omnia standard right 03188 P O Q T R S ...

Page 21: ...y ring Fix the ink reservoir with the assembly ring Locate and secure the ink reservoir until the sealing is visable see next picture Remove the excess lubricate Weigh the complete ink reservoir on the weighing scale Empty weight 54 5 gram Fill the egg stamp with ink 8 9 gram Total weight maximum 63 gram Purge the ink reservoir with the air syringe until the ink flows through the ink pad Note the ...

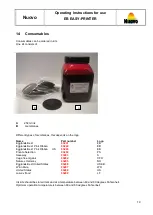
Page 22: ...1 EB Egglands Best Pink Ribbon 03246 EB Egglands Best Pink Ribbon US 03249 EB Private Selection 03202 PS Saveway 03203 S Cage free organic 03204 CFO Natures Harmony 03205 NH Egglands Best United States 03206 USEB Winn Dixie 03207 WD United States 03208 US Lowe s Food 03209 LF Ink kits should be stored dark and at a temperature between 60 and 90 degrees Fahrenheit Optimum operation temperature is b...

Page 23: ... number Color Nuovo 94 250ml 03053 Red Nuovo 28 250ml 03055 Green Nuovo 68 250ml 03069 bright Red Nuovo 89 250ml 03059 Blue Nuovo 75 250ml 03061 pink Ink kits should be stored dark and at a temperature between 60 and 90 degrees Fahrenheit Optimum operation temperature is between 60 and 80 degrees Fahrenheit 20 ...

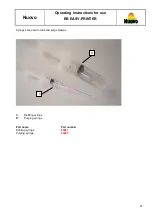
Page 24: ...o Operating Instructions for use EB EASY PRINTER Syringes are used to refill and purge stamps C Refilling syringe D Purging syringe Part name Part number Refilling syringe 03087 Purging syringe 03085 D C 21 ...

Reviews: