background image

14

www.numatic.co.uk

Changing the Floor Tool Blades

Lower the floor tool then unscrew the retaining knobs and slide it off the holding bracket.

Rinse the floor tool assembly with clean water and refit. 

Periodically the floor tool blades should be examined and checked for wear and damage.

Replacement is a reversal of the removal process.

4

2

3

1

5

Floor Tool Overview

1. Retaining pins x 4 

2. Rear blade

3. Blade carrier

4. Front blade (slotted)

5. Floor tool main body

Always ensure that the machine is switched off prior to any maintenance.

!

!

NOTE: The blades are designed to be 

reversible, thus extending their useful 

working life.

Remove floor tool.

Remove four retaining pins.

Turn the floor tool over.

Separate the blade from the carrier.

Peel away blades.

Summary of Contents for TGB2120

Page 1: ...Warning Read instructions before using the machine Owner Instructions TGB2120 2128 RIDE ON SCRUBBER DRYER www numatic co uk TGB 2120 TGB 2128...

Page 2: ...ages 18 19 Specifications Page 18 Rating Label Personal Protective Equipment Recycling Page 20 Safety Precautions Page 21 Recommended Spare Parts Page 22 Schematic Diagram Page 22 Battery Wiring Page...

Page 3: ...6 5 4 2 1 3 12 13 14 15 16 17 18 10 9 8 7 11 Machine Overview...

Page 4: ...d Reverse Switch 3 Service Indicator 10 LED Status Indicator 4 Brush Pressure Load Indicator 11 Maximum Speed Control 5 Run Time Selection Button 12 Horn Button 6 Battery Charge Level Indicator 13 Eme...

Page 5: ...ove transit block from pallet PLEASE READ BEFORE COMMENCING ANY OPERATION AFTER THE REMOVAL OF ALL THE PACKAGING CAREFULLY OPEN AND CHECK THE CONTENTS Fit the battery fuse Switch on the machine Set le...

Page 6: ...orporates a safety knock off feature this allows it to safely disengage from its mounting should it become caught on an obstruction during forward movement Make sure you do not over tighten the retain...

Page 7: ...t lift the brush deck until the brush has stopped revolving or the brush will release Make sure you raise the brush deck before driving to the cleaning site Safety Gloves are recommended for the chang...

Page 8: ...clip This can be found at the rear of the machine Machine Set up Guide Always ensure that the machine is switched off before making any adjustments Filling the Clean Water Tank The TGB 2120 2128 is e...

Page 9: ...ue to run there is an audible difference in the sound when the shut off system operates For more details on checking and cleaning the shut off system see page 13 Machine Operation IMPORTANT Do not ope...

Page 10: ...at the front are designed to prevent the machine tipping in the event of the operator turning sharply The buffers are designed to be replaceable when worn Set desired traction speed as required depen...

Page 11: ...ime with the floor tool lowered If your machine leaves streaks on the cleaned floor either clean the floor tool blade or adjust blade height for optimum performance Machine Operation Machine in Use Do...

Page 12: ...h clean water NOTE The separator can be hung from either side of the top tank while you maintain the machine using the clip on the front of the lid A B C When refitting the separator make sure you eng...

Page 13: ...not to spill any liquid on to the batteries Rinse using clean water and refit refitting is reversal of removal NOTE Any Spills should be wiped up before tank is lowered Machine Cleaning Always ensure...

Page 14: ...ear and damage Replacement is a reversal of the removal process 4 2 3 1 5 Floor Tool Overview 1 Retaining pins x 4 2 Rear blade 3 Blade carrier 4 Front blade slotted 5 Floor tool main body Always ensu...

Page 15: ...rge indicator display lights will flash in unison and the machine will not operate NOTE Charger viewing panel only available on certain models Always ensure that the machine is switched off prior to c...

Page 16: ...tage Protection Output Short Circuit Battery Reverse Polarity 2 flashes between pause Over Temperature Protection 3 flashes between pause Charge Time has exceeded 10 hrs during phase 1 or 2 4 flashes...

Page 17: ...r has a short circuit to a battery Motor will not operate Check all connections and leads between the motor and controller 4 Flashes with pause Battery Lockout The battery charge level has fallen belo...

Page 18: ...water tank page 8 Remove and clean 13 Adjust as desired Page 9 Lower brush deck page 7 Machine just stops while operating Too much load on the brush system Reset the machine using the key and decrease...

Page 19: ...hine will not operate Battery leads and connections Charge batteries Replace battery if cell damaged VAC OVER CURRENT Vacuum motor fault Debris entering vacuum motor Water ingress Machine disabled Res...

Page 20: ...er suitable for use must be separated collected and sent for recovery in an environmentally friendly manner Ear Protection Safety Footwear Head Protection Safety Gloves Dust Allergens Protection Eye P...

Page 21: ...al The use of other brushes may impair safety A full range of brushes and accessories are available for this product Only use brushes or pads which are suitable for the correct operation of the machin...

Page 22: ...Complete Assembly Part No TOP TANK 208827 Strainer Black Top 903542 Grit Filter Basket 208889 Extended Strainer 50 Mesh Screen 208861 Air Filter 208830 Strainer Gasket 208980 TGB Foam Pad 208890 68Mm...

Page 23: ...s Ref E31 SLD G ST 205112 TGB 2128 Less Battery MK Battery 98A h Stud Terminal Gel Type Suppliers Ref E31SLD G ST 205112 For optimum performance Numatic International Ltd recommend the use of the foll...

Page 24: ...24 T 01460 68600 Warranty...

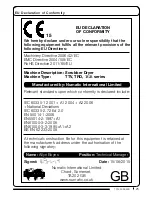
Page 25: ...ations IEC 60335 2 72 Ed 2 0 EN 55014 1 2006 EN55014 2 1997 A1 EN61000 3 2 2006 EN61000 3 3 1995 A1 A2 BS EN 62233 2008 A technical construction file for this equipment is retained at the manufacturer...

Page 26: ...26 T 01460 68600 Notes...

Page 27: ...27 T 01460 68600 Notes...

Page 28: ...SAS 13 17 rue du Valengelier 77500 CHELLES FRANCE Tel 01 64 72 61 61 www numatic fr BeNeLux Distribution Numatic International BV Postbus 101 2400 AC Alphen aan den Rijn NEDERLAND Tel 0172 467 999 ww...

Reviews: