Numark TT500 Operating Instructions Manual Download Page 6

CONTROLS continued 

 
9. Pitch Fader 

This slide control allows the pitch of the playback source to be changed. In the center position the pitch is at 0%. Moving 
the fader knob closer to you will increase the pitch. The Pitch Slider is enclosed in an Interchangeable/Replaceable 

Cartridge. 

 
10.  Pitch Button 

This button allows the turntable pitch range of the pitch fader to be adjusted. 
 

11. Quartz Button 

This button locks the pitch at 0% using Quartz Motor Control when it is pressed. 
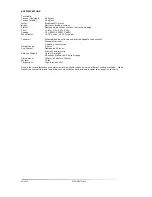


Tone Arm Parts 


12. Counterweight and Scale Ring and S-Weight  
The Counterweight is used to balance the head shell and 

cartridge assembly so that the proper amount of stylus 
pressure is applied to the record. The S-Weight should be used 

in most cases when the S-Shaped tube is used. It is fastened to 
the tonearm by threading it into the rear weight balance shaft. 

The S-weight can be stored below the counterweight in the top 

cabinet while not in use. 
 

13. Height Adjust Ring 
Turning this ring counter-clockwise raises the tonearm up to 

6mm to accommodate for different Slipmat thicknesses. This 

ring can not be adjusted unless the Height Lock Lever (12) is 
unlocked. 

 
14. Height Lock Lever 

Turning this lever towards the direction of the arrow (clockwise) 

unlocks the Height Adjust Ring (11) so that the tonearm height 
can be adjusted. 

 
15. Anti-Skate Adjustment 

This knob is used to compensate for inward tracking forces. See 

tonearm setup for more details on its settings. 
 

16. Secondary Tube Lock Collar 
This collar is used to secure the tonearm tubes (straight or s-

shaped) to the tonearm assembly.  

 
WARNING: 

DO NOT OVERTIGHTEN THIS LOCK COLLAR! 
 

WARNING: 

CONNECTING HEADSHELLS TO THIS COLLAR MAY DAMAGE 
THE INTERNAL PIN HEIGHTS OF THE CONTACTS! ONLY 

CONNECT NUMARK TUBES TO THE SECONDARY TUBE LOCK 
COLLAR. 


17. Arm Clip 
This specially designed arm clip secures the tone arm while it is 

being transported or not in use. The arm clip has been designed 
to remain in the up position while unlocked. 

 
18. Tonearm Cue System 

This cueing system allows the tone arm to be positioned at a 

certain point above the record and slowly engaged. When the 
lift lever is in the up position the tone arm should rest on the 

armrest. When the lift lever is lowered, the tone arm is slowly 
lowered until the stylus is resting on the record. 


19. Tone Arm Lock Nut 
This Aluminum nut is used to secure the 

head shell and cartridge assembly to the 
tone arm tube. See cartridge setup for more 

details. 


12

15

14

18

19

17

13

16


CONTROLS

PAGE 5


Summary of Contents for TT500

Page 1: ...roduct s enclosure that may be of sufficient magnitude to constitute a risk of electric shock to persons NOTICE The exclamation point within an equilateral triangle is intended to alert the user to the presence of important operating and maintenance servicing instructions in the literature accompanying the appliance CAUTION TO PREVENT THE RISK OF ELECTRIC SHOCK DO NOT REMOVE COVER OR BACK NO USER ...

Page 2: ...ACCESSORIES Do not place this product on an unstable cart stand tripod bracket or table The product may fall causing serious injury to a child or adult and serious damage to the product Use only with a cart stand tripod bracket or table recommended by the manufacturer or sold with the product Any mounting of the product should follow the manufacturer s instructions and should use a mounting access...

Page 3: ...TRY Never push objects of any kind into this product through openings as they may touch dangerous voltage points or short out parts that could result in a fire or electric shock Never spill liquid of any kind on the product SERVICING Do not attempt to service this product yourself as opening or removing covers may expose you to dangerous voltage or other hazards Refer all servicing to qualified se...

Page 4: ...nt damage to the turntables and to reduce unwanted system noise Mixer 85 mm Mixer Setup Style 1 traditional Best For Long mixes and blending techniques Mixer Setup Style 2 battle style scratching Best For Scratching cutting and aggressive mixing techniques Mixer There are many variations of these setups Find the best setup that works for your mixing style by experimenting with different turntable ...

Page 5: ...on direction of the turntable platter 5 Strobe Target Light and Power Jack This aluminum light can be rotated depending on the head shell position and the amount of light required on the vinyl record surface The light also strobes against the platter edge making the pattern appear to stand still when the Pitch Range is at 0 6 33 and 45 RPM Buttons These buttons control the RPM of the turntable pla...

Page 6: ...ocked 14 Height Lock Lever Turning this lever towards the direction of the arrow clockwise unlocks the Height Adjust Ring 11 so that the tonearm height can be adjusted 15 Anti Skate Adjustment This knob is used to compensate for inward tracking forces See tonearm setup for more details on its settings 16 Secondary Tube Lock Collar This collar is used to secure the tonearm tubes straight or s shape...

Page 7: ...115V 230V and 240V The turntable should be shipped with the proper voltage setting for your region Check that the switch is in the proper voltage before connecting the IEC power cord to prevent damage to the turntable 23 IEC Power Terminal This IEC Power Terminal can be used with any IEC power cable but it is recommended that the supplied IEC power cable be used 24 RCA Output These stereo output j...

Page 8: ... and resting it on its side NOTE The turntable must be supported because it is not stable in this position 2 Next connect the Red Right Angle RCA Plug to the Red RCA jack with the R indication 3 Then connect the White Right Angle RCA Plug to the White RCA jack with the L indication 4 Finally connect the IEC power cord to the IEC Power terminal It should only fit in the Terminal one way 5 Rest the ...

Page 9: ...ly install the platter onto the center spindle and motor assembly making sure that the Numark logo and the two holes are aligned parallel with the front of the turntable 4 The two locking pins should drop into the top of the spindle assembly for a stable and secure fit If they do not grasp the center spindle with one hand while rotating the platter with the other until the locking pins drop into p...

Page 10: ...g style 1 Power off the turntable and any connected mixers amplifiers or monitoring devices 2 Remove the Cartridge from the tonearm tube that is currently installed on the tonearm tube by rotating the locking collar counter clockwise 3 Unclip the tonearm tube from the armrest 4 Remove the tonearm tube by rotating the locking collar counter clockwise 5 Insert the desired tonearm into the tonearm as...

Page 11: ...exactly 0 grams of stylus pressure 4 With the counterweight in its new position further away from tone arm pivot point grasp the scale ring of the counter weight and rotate it until 0 is in the vertical position 5 Finally rotate the counterweight and scale ring clockwise towards the pivot point until the desired amount of weight is reached If the scale rotates 360 degrees beyond the zero point the...

Page 12: ...ed with the optimum position mark on the Head shell Numark HS 1 Head shell and Numark Cartridges only Moving the both screws to a mark away from the optimum position indicated on the head shell may increase or decrease performance depending on the cartridge used For safe vinyl record treatment the screws should always be aligned perpendicular to the head shell any angle may increase record burn 6 ...

Page 13: ...able or a VOIDED WARRANTY OPERATION This turntable was designed to accommodate a variety of different mixing styles Here are some general operation guidelines to optimize the performance of the turntable 1 Do not place the turntable on or near a speaker or subwoofer This may cause unwanted noise depending on the environment conditions 2 ALWAYS use the included Slip Mat during record playback This ...

Page 14: ... interchangeable tube system Diecast aluminum 3 bearing construction Height range 0 6mm Cue System Dampened lift lever Arm rest and arm clip Balance Weight 7 gram S weight Aluminum plated w 0 3 5gram range Dimensions 370mm x 460mmx 135mm Weight 19 lbs Target light High intensity LED Note other manufacturers may claim lower wow flutter specs by using different testing methods We ve tested the compe...

Page 15: ... from most Numark Retailers The RCA audio cord is damaged If the RCA cord is frequently connected and disconnected it may have become damaged and needs to be replaced The output sound is very distorted The Cartridge is not properly wired NOTE Static electricity and or other external interference may cause this unit to malfunction To reset the unit to its normal condition turn the power off and the...

Page 16: ...aight Tonearm 1 Anti Drag Aluminum Platter 1 S Shaped Tonearm Tube 1 S Tube Tonearm Weight 1 IEC Power Cable 1 Service Tool 1 RCA Cord 1 Slipmat INSIDE THE BOX 1 Headshell 1 Counter Weight 1 Target Light 1 45 RPM Adapter ...

Reviews: