background image


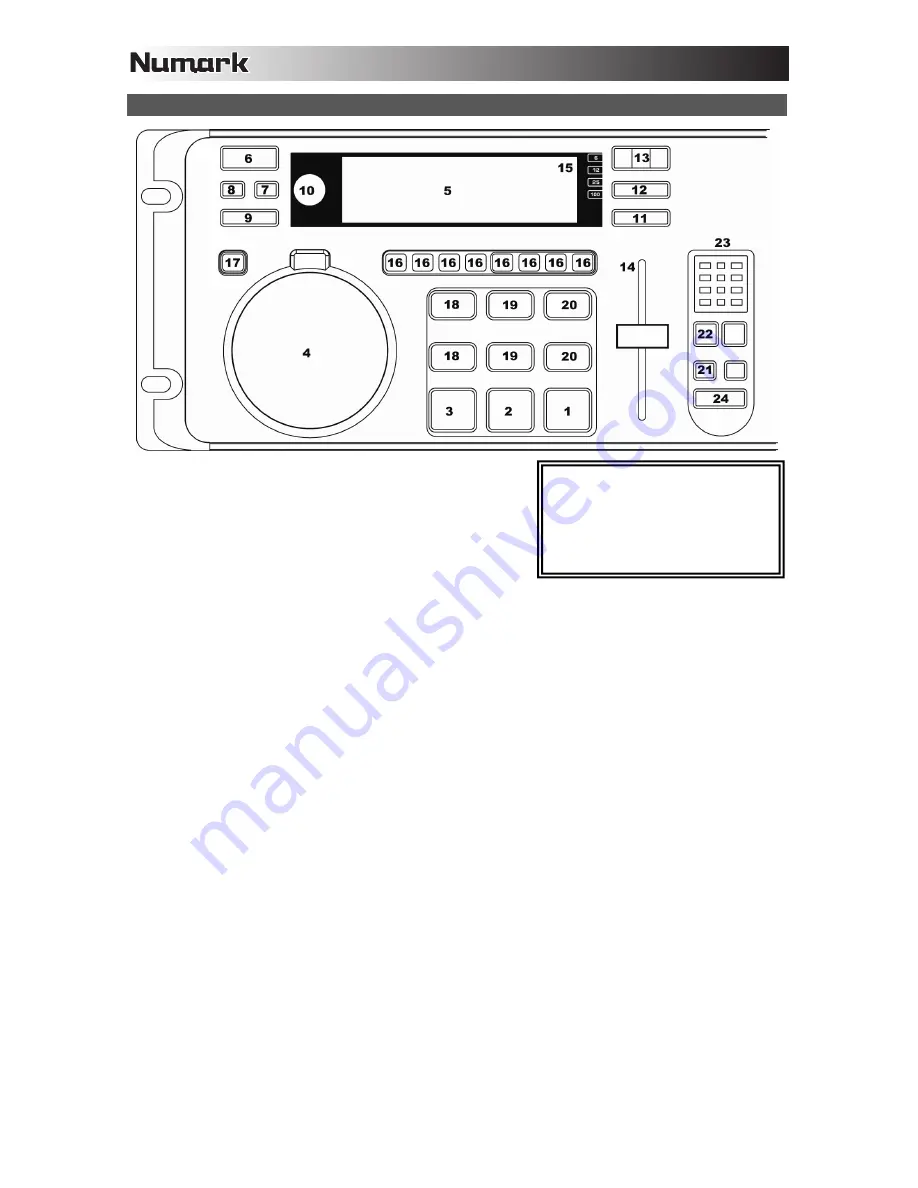
 FRONT PANEL FEATURES 


1.


PLAY / STUTTER –

 To start the music from the initial cue point.  

2.


PAUSE


 To pause the music.  

3.


CUE


 To move the music to the cue point and preview the 

selection. 

4.


JOG WHEEL


 Used for various functions such as cueing, 

scratching, pitch bend, searching, and effect control. 

5.


LCD


 Indicates all the functions, as they are occurring, with the CD. 

6.


EJECT –

 Pressing will open or close the disc tray on the transport.  

7.


SNGL –

 To set play mode in single or continuous play. 

8.


TIME –

 Switches the time display between elapsed playing time and remaining time on the track and remaining time on 

the entire CD. 

9.


PROGRAM –

 Used for setting track order and various special commands.  Depress this button and the unit will stop and 

the program indicator will light.  Select each track to be programmed and press the PROGRAM button between 
selections.  You can program up to 30 tracks.  Press PLAY to start the program.  To exit and erase program, either hold 
the program button down for more than 2 seconds while the unit is stopped, open the disc tray, or turn off the power. 

10.


TRACK SELECT / SEARCH –


y


Rotation – selects tracks 

y


Pressing while rotating – selects 10 

y


Pressing once - Puts JOG WHEEL in Search Mode. 

11.


KEY LOCK –

 While Key Lock is enabled, adjusting the pitch of the music playing on the deck will only influence its 

tempo independent of its musical pitch. 

12.


PITCH RANGE –

 Activates and sets PITCH SLIDER range. 

13.


– /+


 –

 Works as pitch bend and controls key and pitch functions. 

14.


PITCH SLIDER –

 The pitch can be changed by pressing the PITCH button so a PITCH LED is lit, then moving the 

sliding fader.  The pitch will not be changed if the PITCH LED is off. 

15.


PITCH RANGE LED –

 Indicates current pitch range of the PITCH SLIDER. 

16.


EFFECT BUTTON –

 Used to determine desired effect. 

17.


EFFECT HOLD –

 Used to set effect buttons to an alternate position. 

18.


LOOP IN –

 Used for setting a start loop point and new cue points during playback. 

19.


LOOP OUT –

 Used for setting the end loop point and releasing the loop action. 

20.


RELOOP –

 Used for either repeating a previously set loop or seamlessly stuttering on the last set cue point. 

21.


AUTO START –

 Used for setting alternating play start (relay play) between attached units. 

22.


TAP – 

Tap this button in time with the beats of the music on that deck.  This will enter a new BPM ("beats per minute") 

reading for that track.  Tap this button once only to reset the downbeat of the music at that point without entering a new 
BPM.  Holding the button for 4 seconds will cause the BPM counter to reset and recalculate. 

23.


MARCHING BAR GRAPH –

 Tracks the beats and measure position of music. 

24.


INTERLOCK –

 Links both players for beat alignment. 

Note:

  When playing MP3 CDs, CDN88 

MP3 will display all MP3s on that disc by 
their file names and in a single list (i.e., not 
in their folders/subfolders).  When creating 
an MP3 CD for use with CDN88 MP3, we 
recommend placing them in only one folder 
on the disc and properly naming the files. 

Summary of Contents for CDN-88

Page 1: ...DN88 MP3 Professional Dual CD MP3 Player QUICKSTART GUIDE ENGLISH 3 5 GU A DE INICIO R PIDO ESPA OL 6 8 GUIDE D UTILISATION RAPIDE FRAN AIS 9 11 GUIDA RAPIDA ITALIANO 12 14 KURZANLEITUNG DEUTSCH 15 17...

Page 2: ......

Page 3: ...TS section are included in the box 2 READ SAFETY WARRANTY INFORMATION BOOKLET BEFORE USING THE PRODUCT 3 Study the connection diagram in this guide 4 Place mixer in an appropriate position for operati...

Page 4: ...RANGE Activates and sets PITCH SLIDER range 13 Works as pitch bend and controls key and pitch functions 14 PITCH SLIDER The pitch can be changed by pressing the PITCH button so a PITCH LED is lit the...

Page 5: ...and main CD unit together 30 RCA AUDIO CONNECTORS Connect your CD player to your mixer from this line level output 31 REMOTE START CONNECTOR Use this connector to plug into your fader start compatible...

Page 6: ...udie el diagrama de conexi n incluido en esta gu a 4 Coloque el mezclador en una posici n adecuada para su funcionamiento 5 Aseg rese que todos los dispositivos est n apagados y que todos los faders y...

Page 7: ...tempo independientemente del pitch musical 12 PITCH RANGE Activa y establece las limitaciones del resbalador Pitch PITCH SLIDER 13 Funciona como Pitch Bend y controla las funciones llave y pitch 14 PI...

Page 8: ...ol remoto y a la unidad de CD 30 LOS CONECTORES AUDIO RCA conecte a su lector de CD con su mezclador de esta l nea salida 31 CONECTOR DEL REMOTE START utilice este conector para tapar en su mezclador...

Page 9: ...GARANTIE AVANT D UTILISER LE PRODUIT 3 Examinez le sch ma de connexion de ce guide 4 Placez la console de mixage en position de fonctionnement 5 Assurez vous que tous les appareils sont hors tension...

Page 10: ...pendant de la tonie musicale 12 PITCH RANGE Actionne et programme la radio du PITCH SLIDER 13 Fonctionne comme pitch bend et contr le les touches et les fonctions pitch 14 PITCH SLIDER Contr le la vit...

Page 11: ...l unit de contr le avec l unit de lecteur CD 30 CONNECTEURS AUDIO RCA Branchez votre CD player au mixer de ces sorties 31 CONNECTEURE POUR COMMANDE DISTANCE Utilisez ce connecteur pour brancher votre...

Page 12: ...DI SICUREZZA PRIMA DI UTILIZZARE IL PRODOTTO 3 Studiare con cura lo schema dei collegamenti fornito nella guida 4 Sistemare il mixer in una posizione adeguata all uso 5 Assicurarsi che tutti i dispos...

Page 13: ...pitch musicale 12 PITCH RANGE Mette in funzionamento e stabilisce i limiti per il cursore pitch PITCH SLIDER 13 Funziona come pitch bend e controlla le funzioni chiave e le funzioni pitch 14 PITCH SLI...

Page 14: ...it principale CD 30 CONNETTORI AUDIO RCA collegare il lettore CD al mixer tramite questa uscita a livello di linea 31 CONNETTORE FADER START Utilizzare questo connettore per introdurlo nell apparecchi...

Page 15: ...in dieser Anleitung an 4 Stellen Sie den Mixer in einer f r den Betrieb geeigneten Position auf 5 Achten Sie darauf dass alle Ger te ausgeschaltet sind und dass alle Fader und Gain Regler Ihres Mixer...

Page 16: ...dem Pitch Fader ndern 12 PITCH RANGE aktiviert den Pitch Slider und seine Einstellungen 13 funktionieren als Pitch Bend und zur Kontrolle von Tasten und pitch Funktionen 14 PITCH SLIDER kontrolliert...

Page 17: ...RCA TONANSCHL SSE Schliessen Sie Ihren CD Spieler von diesen Line Pegelausg ngen an Ihr Mischpult an 31 FERNBEDIENUNGSSTARTVERBINDUNG benutzen Sie diese Buchse f r den Anschluss an Ihren Fader Start...

Page 18: ...PONSE 20 Hz 20 kHz THD N 0 005 SNR IHF A 82 dB DYNAMIC RANGE 80 dB OUTPUT LEVEL 1 2 V RMS START TIME 0 006 seconds PITCH CONTROL RANGE 6 12 25 or 100 PITCH BEND 50 rotary 16 buttons DIMENSIONS Control...

Page 19: ......

Page 20: ...www numark com MANUAL VERSION 1 1...

Reviews: