background image

Installation and Maintenance  

OPUS 12V (R rangr)

2

Installation 

(continued)

It is assumed that a solid non-reverberant mounting posi
tion has been selected, and the necessary passages for 
ductwork, from outlet  spigot and to subsidiary inlet 
spigot (if a second  room is to be ventilated) as well as the 
electrical connection prepared.  It is also assumed that 
compatible ductwork is already installed.

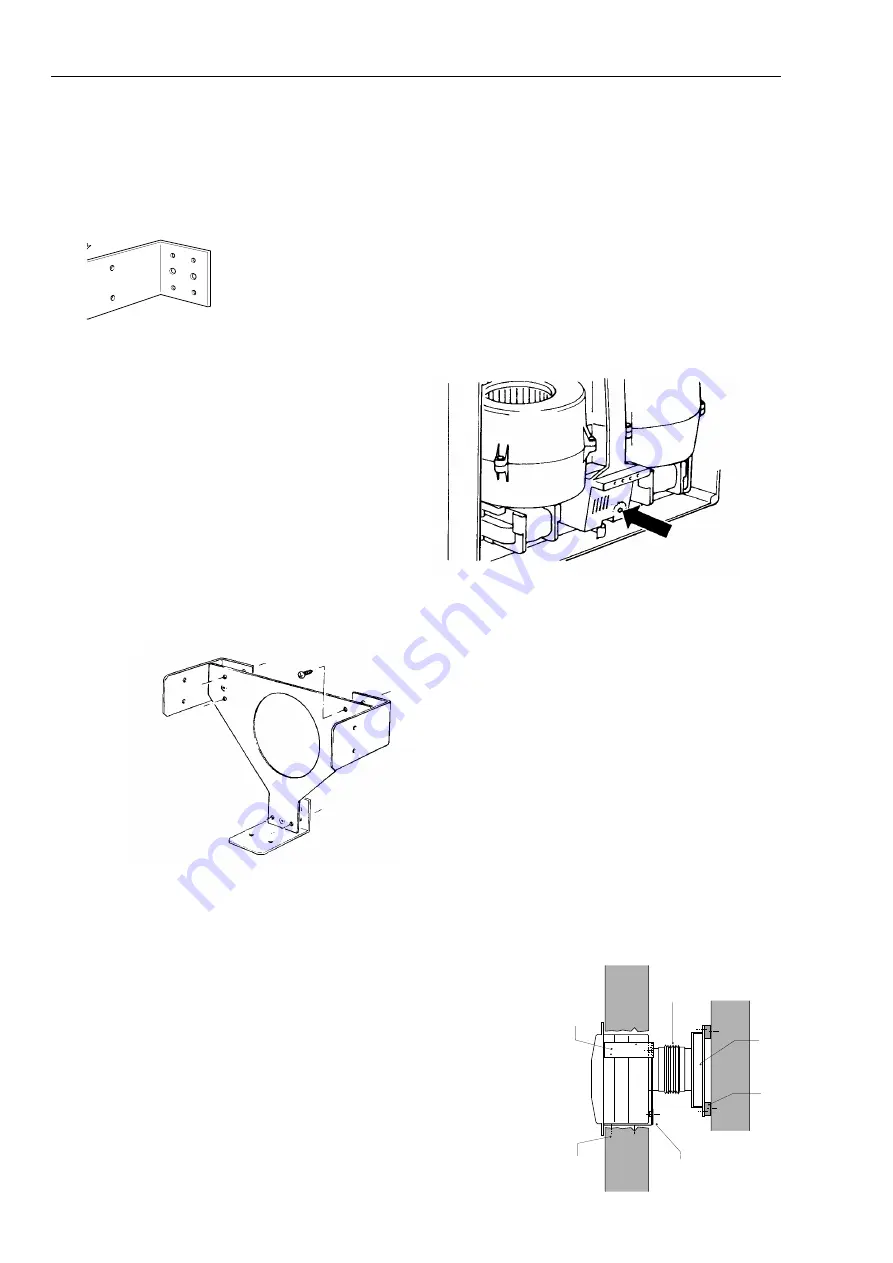
b)

Mounting brackets are supplied with all OPUS fans but, 
depending on the type of unit, may need to be shortened. 
The bracket has a series of notches, one of  which is suit
able  for your unit. Offer up the bracket to the unit (small
leg of  bracket to back of unit) and note the notches which
correspond with the back of the skirt. Using a hacksaw 
cut the bracket to length. Similarly prepare the two 
remaining brackets. (Fig.3).
Attach the three brackets to the large 'Y' shaped plate 
using the self tapping screws supplied to form a mounting
frame. (See fig. 4).
Position the mounting frame in the prepared aperture so 
that the ends of the three cut brackets are flush with the 
surface of the wall. Secure the mounting frame with suit
able fixings.

c)

Unclip and remove the fan module. 
Knock out a suitable cable entry hole in the rear face of 
the case.

If a second room is to be served remove the appropriate weak-
ened area from the case, and, working from the inside fit the the
subsidiary inlet spigot by passing it through the case and turning
quarter of a  turn to lock in position. 

d)

Offer up the casing to the mounting frame feeding the 
supply cable through the entry hole. Engage the outlet  
spigot(s) in the ductwork and fix the casing to the frame 
using the three screws supplied.

e)

Connect the wiring to the internal terminal  block / socket.

Fig.3. Selecting bracket length.

Fig. 4. Mounting frame assembly.

f)

Fit the fan module to the case, mating it's plug fully  with 
the internal socket. Secure in position with the two spring 
clips.

g)

Fit the front cover to the unit using the four screws sup
plied. Insert the filters into the rebates in the cover.
Test / run the unit.

Adjusting the run on timer .

Remove cover. Locate the Time Delay adjustmewnt screw on
the plastic box found directly between and under the fan scroll
mouldings (see fig 5). integral with the fan module. Reset
against the graduated scale. Refit the cover. 

Fig. 5.  Timer adjustment.

Installing the unit into flatduct.

It is assumed that the flatduct is already fitted with a plenum
section incorporating 100mm dia. spigot in the area of the 
proposed extract fan.

a)

Proceed as in steps (a), (b) & (c) above.

b)

Feed the 100mm flexible ducting (supplied) through the 
rear of the mounting frame and fit to the spigot on the flat
duct  plenum.

c)

Offer up the casing to the mounting frame and join the 
other end of the flexible ducting to the outlet spigot using 
tape (not supplied). Fig. 6.
Feed the electrical supply cable through the entry hole and 
fix the case to the mounting frame using the three screws 
supplied.

Continue as in (e) to (h) above.

Fig. 6  Installation 
into flatducting

Mounting frame

Flexible
ducting

9" x 1" 
flatduct

Timber
battens

Wall fixings
through mtg
frame

Side bracket

Summary of Contents for OPUS 30 R Series

Page 1: ...hrough filters located on the front cover of the unit and which can easily be removed for leaning Units can be fitted with a selection of controls which enable them to be linked to light switches either directly or through run on circuits Coding RS12 Single fan unit incorporating a run on circuit 2RAS12 Twin unit incorporating both run on and fan failure detection change over circuits Installation...

Page 2: ... in position d Offer up the casing to the mounting frame feeding the supply cable through the entry hole Engage the outlet spigot s in the ductwork and fix the casing to the frame using the three screws supplied e Connect the wiring to the internal terminal block socket Fig 3 Selecting bracket length Fig 4 Mounting frame assembly f Fit the fan module to the case mating it s plug fully with the int...

Page 3: ...92 22 5 Filters 255 98 O D 337 FIXING 230 ctrs 225 FIXING 158 ctrs VIEW ON REAR showing fixing points Dimensions Optional ancillaries Outlet Baffle Roof Cowl 50mm Subsidiary spigot Wall Cowl 50mm Inlet grille 160 230 230 146 165 dia 98 o d Birdguard 148 134 98 O D 32 125 125 13 5 15 110 fix ctrs 50 O D 4 x 3 7 dia fix holes 50 o d 30 7 ...

Page 4: ...d assist in installation SPLASH ZONE The Splash Zone can be considered to be an area within a bathroom or shower room where a person using the bath or shower can effectively reach An arms reach is defined as 0 6 metres from the edge of the bath or shower up to a height of 2 25 metres Procedure 1 Remove two screws securing the cover and remove the cover 2 Position the base enclosure on mounting sur...

Page 5: ...d Maintenance OPUS 12V R range 5 Installation Notes WIRING SIZES It is important to note that the size of wire used between the transformer and the fan unit can have an adverse effect on the units performance if the following table is not adherred to Mains supply 240v 0 5mm sq TRANSFORMER TO FAN Cable run max 10m Cable size Up to 2m 0 75mm sq Up to 4m 1 00mm sq Up to 6m 1 50mm sq Up to 10m 2 50mm ...

Page 6: ...L Switch Room light Remote fail LED Remote fail LED 3 1 N L 2 Fuse 2 Amp max C RS12 Unit ventilating two rooms using run on circuit 2RAS12 Unit ventilating two rooms using run on circuit 2RAS12 Unit ventilating two rooms no run on timer Wiring details for remote indicator Fan terminal block Remote indicator panel N L Fuse 2 Amp max Switches double pole Room light C C N L N L 240v 12v Transformer 3...

Page 7: ...Voltage Directive Applied Harmonised Standards E50081 1 EN50082 1 EN60204 1 EN60335 2 80 Basis of Self Attestation Quality Assurance to BS EN ISO 9001 BSI Registered Firm Certificate No FM 149 Signature of manufacture representatives Name Position Date 1 C Biggs Technical Director 3 3 00 2 W Glover Manufacturing Director 3 3 00 NuAire Limited Western Industrial Estate Caerphilly Mid Glamorgan CF83...

Page 8: ...craper Wash the cover in warm soapy water Dry thoroughly Refit the fan module followed by the cover Test run Adjusting the run on timer Remove cover Locate the Time Delay Adjustment at the plastic box integral with the fan module Re set against the graduated scale Re fit the cover Warranty The plastic control box integral with the fan assembly is a sealed component Breaking the plastic sealing tie...

Reviews: