NTT Advanced Technology R-Talk 800EX User Manual Download Page 16

16

Connecting to a Personal Computer Using a USB Cable 

(R-Talk 800EX, R-Talk 800PC)


To Personal Computer

a

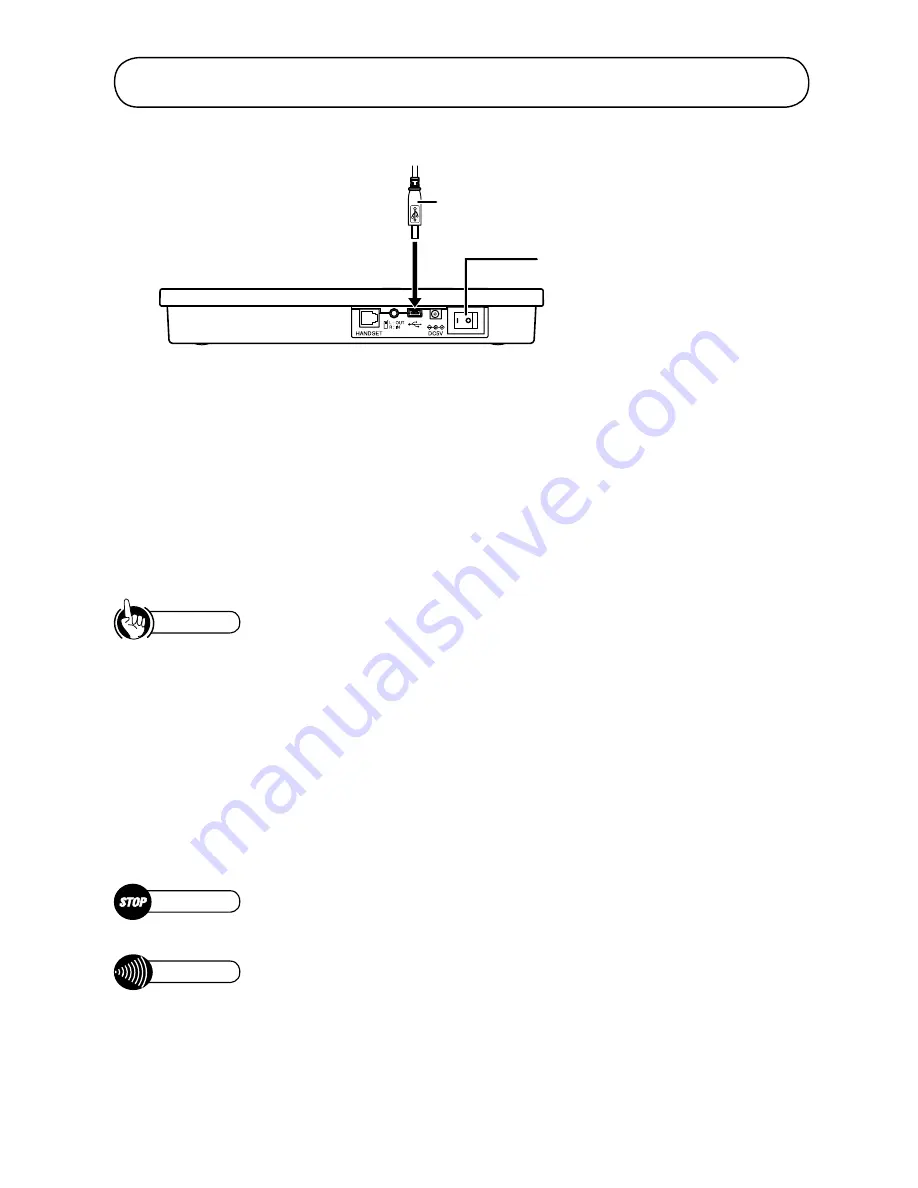
Connect the USB port of the personal computer 
to the USB port of the main unit using the USB 
cable that came with the product.

b

Press the “|” symbol on the 
power switch (POWER) to 
turn the unit on.

Tip

If the other party’s voice is too loud or too faint:

Adjust the speaker volume of  the personal computer in order to attain the appropriate volume.
• Using Windows 7/Windows Vista (see p. 18)
• Using Windows XP (see p. 19)
If  no adjustment is possible on the personal computer, adjust the speaker volume of  the main unit (see p. 10).
The other party’s voice level can be monitored via the status lights (see p. 11).

If the other party says your voice is too loud or too faint:

Adjust the microphone volume of  the personal computer in order to attain the appropriate volume.
• Using Windows 7/Windows Vista (see p. 18)
• Using Windows XP (see p. 20)
If  no adjustment is possible on the personal computer, adjust the microphone volume of  the main unit (see p. 10).

The power source when connected to a personal computer via USB

The power is supplied to the main unit via USB. You do not need to connect the power adapter or insert batteries.

Caution

Do not allow your computer to enter the standby, sleep or shutdown mode during a conversation.

Note

Connecting the USB cable to the personal computer in step 1 above causes the main unit to be recognized as an audio 
device of  the computer even when the power of  the main unit is off. 

If  the batteries are contained in the main unit, and you turn off  the personal computer when the power of  the main unit 
is on, the power source is switched to the batteries and they start to discharge.

For details on using your Web conferencing application or VoIP telephone software, please see the manual that was 
included with that software.

To protect the speaker, the speaker output may turn off  when the excessive signal is sent to the main unit. In this case, 
you need to turn the main unit off  and on again.

c

 When the connection process is complete, go to “Checking the Settings of  Personal Computer (Windows 7/

Windows Vista)” (see p. 17) or “Checking the Settings of  Personal Computer (Windows XP)” (see p. 19).

d

 Start the Web conference application or VoIP phone software on the personal computer, and then connect to 

the other party.

e

 Speak into the main unit.

Summary of Contents for R-Talk 800EX

Page 1: ...User s Manual First Edition December 1 2011 Audio Conferencing System NTT Advanced Technology Corporation...

Page 2: ...1 Connecting to a Land Line Phone R Talk 800EX 12 Connecting to a Cell Phone Using Cables R Talk 800EX R Talk 800PC 13 Connecting to the Cell Phone via Bluetooth R Talk 800EX 14 Performing Pairing Reg...

Page 3: ...o event shall NTT Advanced Technology be liable for any indirect special incidental consequential or similar damages including but not limited to lost profits or revenue inability to use the product o...

Page 4: ...ur nickel hydride batteries Otherwise they may leak heat up or burst and then may cause fires electric shocks burns and injuries When inserting dry cell batteries or nickel hydride batteries ensure th...

Page 5: ...when disconnecting the power adapter from the power outlet when any problems mentioned below are detected Do not pour water on the product or its power adapter nor operate the product or connect disc...

Page 6: ...devices office machines and other magnetized equipment nor in locations where electromagnetic rays are generated e g microwave ovens speakers television sets radios fluorescent lamps inverter air cond...

Page 7: ...mergency vehicle A wireless LAN device a TV video computer etc A fire alarm system A medical microwave device An automatic door or other automatically controlled device An amateur radio station A Blue...

Page 8: ...th Approximately 2 m One USB Cable Approximately 3 m One 2 5 mm Jack 3 5 mm 4 Pin Plug Cable for Smartphone Approximately 10 cm One If there are any missing components in this package or if there are...

Page 9: ...ncluded in the package of R Talk 800EX Two cables are contained in this package You may choose one which is compatible with the cell phone you use Checking the Package of R Talk 800PC Be sure you have...

Page 10: ...Bottom Open the battery cover and insert four AA dry cell batteries or four AA nickel hydride batteries Battery Holder Make sure that the batteries are correctly positioned Volume Adjustment Button VO...

Page 11: ...e ON Blue Blue Blue Blue Level is appropriate ON Purple Purple Purple Purple Slightly loud ON Red Red Red Red Too loud Either get away from the microphone or speak softer to attain the appropriate vol...

Page 12: ...the phone to connect to the other party To prevent damage to the telephone or the main unit of this product due to thunder use a thunder guard for protection To protect the speaker the speaker output...

Page 13: ...r R Talk optional see p 9 Select the cable type which is compatible with the cell phone you use g Dial a number on the cell phone to connect to the other party h Speak into the main unit Tip If the ot...

Page 14: ...etooth device is paired registered you can reconnect them only by connection operation see p 15 1 Turn on the main unit aInsert the DC plug of the power adapter into the connection terminal for the po...

Page 15: ...cedure again Depending on the environment a conversation may be cut off even when using cell phone within 5 m from the main unit In this case you need to put the cell phone closer to the main unit Whe...

Page 16: ...computer via USB The power is supplied to the main unit via USB You do not need to connect the power adapter or insert batteries Caution Do not allow your computer to enter the standby sleep or shutd...

Page 17: ...Windows Vista The check procedure for the settings of personal computer is described below Screenshots are the images of Windows 7 The display may vary depending on the personal computer Checking the...

Page 18: ...nge into dClick OK to close the screen 8 Click at the upper right of Sound screen to close it 9 Click Adjust system volume in Hardware and Sound screen 10 Adjust the speaker volume aMaximize the Speak...

Page 19: ...d Audio Devices 3 Click Sounds and Audio Devices 4 Check the Audio screen aClick the Audio tab bCheck that R Talk is selected as Default device for Sound playback cCheck that R Talk is selected as Def...

Page 20: ...bMaximize the Microphone volume If the microphone volume is too high lower the volume cCheck that Mute in Microphone is unmarked Unmark the checkbox if it is marked dClick at the upper right of the s...

Page 21: ...Use the External Microphone When the internal microphone does not pick up sound well in a large space such as a conference room use the external microphone The internal microphone picks up sound even...

Page 22: ...Range 100 Hz 14 KHz Echo Cancellation Time 128 ms Standards RoHS compliant Power Source AC100 240 V 50 60 Hz Dedicated power adapter 4 AA alkaline nickel hydride batteries Wattage Maximum 6 W When us...

Page 23: ...Power Source AC100 240 V 50 60 Hz Dedicated power adapter 4 AA alkaline nickel hydride batteries Wattage Maximum 6 W When using dedicated power adapter Outside Dimensions Approx 226 mm W Approx 134 mm...

Reviews: