background image

NTI RACKMUX-V17-N-8USBHD-IP  RACKMOUNT DRAWER WITH USB KVM SWITCH AND KVM ON IP 


22


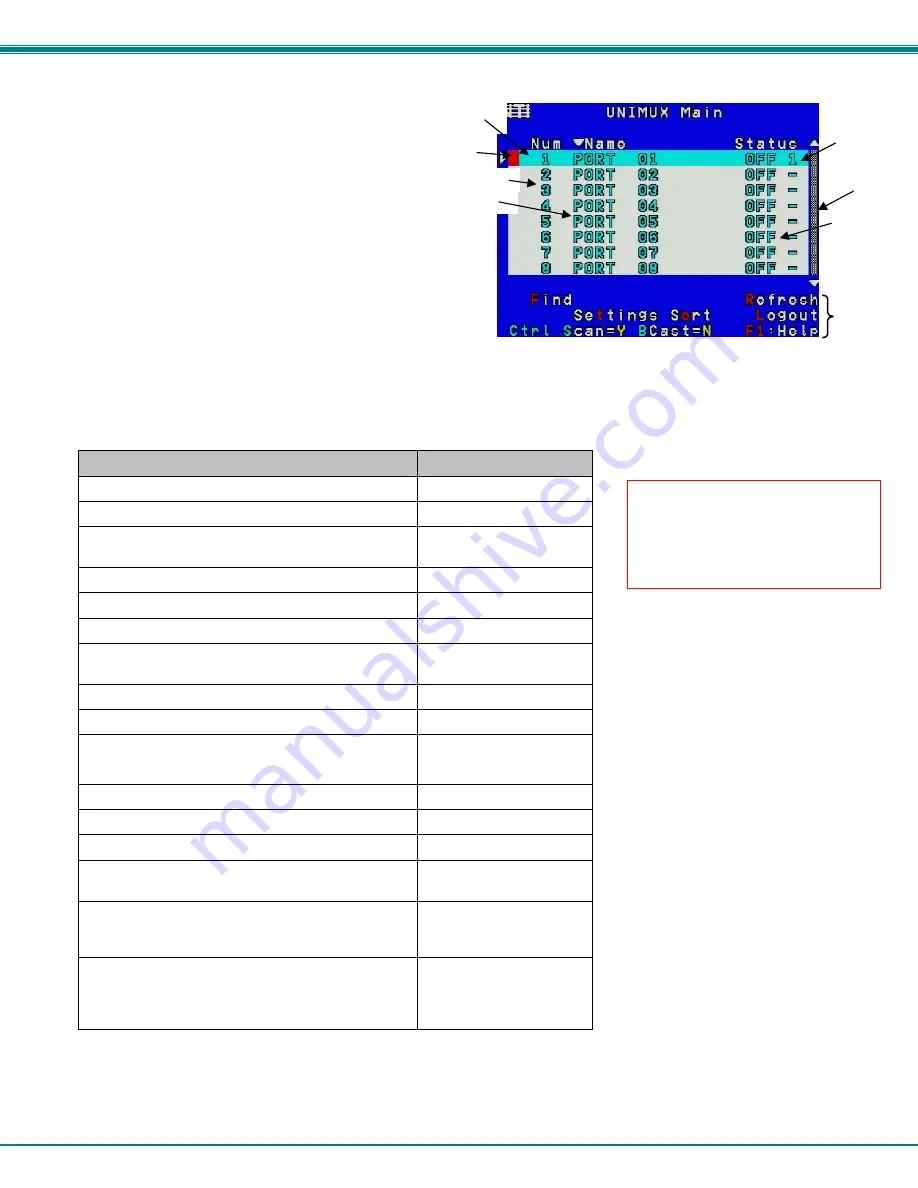
An arrow to the left of a port number in the list indicates 
 the port the user is currently connected to. From 
 left to right, the columns display the following:  


Port Number 


Port Name 


Power Status of the CPU (ON/OFF)  

 Note:  “NAC”  indicates a non-accessible  
computer for that user 


The actual user number (1-8) connected to the CPU. 


If no user is connected to a CPU, the user number is   

       replaced by a "–" (dash). 


Figure 21- Command Mode main menu-User


Note: While in Command Mode, the numbers on the NUM PAD on the keyboard are not active. If numbers are required 
while in Command Mode, use the numbers on the main key bank. 

The list below describes the command functions available from the keyboard within the OSD mode of control after entering into 
Command Mode:    

Function 

Keystroke 

Select the previous port 

up arrow 

Select the next port 

down arrow 

Go to specific port- Press any valid number from 1-
1024 to connect to a desired port.   

port # - Enter 

Increases the ports listed by 1 page 

Page Down 

Decreases the ports listed by 1 page  

Page Up 

Enter “Settings” menu 

Toggle ports listed to view by port number or 
alphabetically by port name 

O (letter, not     
number) 

Enable/disable Scan Mode 

Ctrl + S 

Enable/disable Broadcast Mode 

Ctrl + B 

Enter Administrator menu 

(only available if the Administrator is logged in) 

Select the first port on the switch 

Home 

Select the last port on the switch 

End 

Display Help menu 

F1 

Global Help- display window navigation tips used 
throughout all menus 

F2 

Display port information- when pressed, a window 
displays the port name and its position in the 
configuration structure by level and port number 

F3 

Update configuration- use to update the information 
describing the structure of the cascaded switches.     
Use if a slave is powered-ON or OFF at any time after 
initial startup 

R  or F5 


Note:  The user must exit 
Command Mode to type to a CPU. 
    
To exit Command Mode press 
<Esc> on the keyboard.    

Port Number

Power 
Status

User 

Scroll Bar

Cursor

Port Name

Menu 
Items

Selection 
Bar 

Summary of Contents for RACKMUX-V17-N-4USBHDU

Page 1: ...129 Rev Date 7 2 2014 RACKMUX V17 N 8 4USBHDU IP Rackmount KVM Drawer with Built In High Density USB KVM Switch and KVM on IP Installation Manual RACKMUX Series RACKMUX V17 N 8USBHD IP Front and Rear View ...

Page 2: ...t of Network Technologies Inc 1275 Danner Drive Aurora Ohio 44202 CHANGES The material in this guide is for information only and is subject to change without notice Network Technologies Inc reserves the right to make changes in the product design without reservation and without notification to its users Typographic Conventions The following table describes the typographic changes used in this inst...

Page 3: ...eypad Option 17 PS 2 USB Keyboard Mouse Mode 18 USING THE UNIMUX USB KVM SWITCH 19 Basic Operation 19 OSD Control 19 OSD CONTROL 20 Guidelines for Navigating OSD Menus 20 Security Option 20 Initial startup 21 User Access Functions 21 Command Mode 21 Settings 23 OSD Settings 24 Find Mode 24 Help Mode 25 Scan Mode 25 Broadcast Mode 26 Normal Mode 26 Security 27 Enabling Security 27 Password and User...

Page 4: ...nterface Test Program 44 Main Options 44 Matrix Operations 44 Setup Options 44 RMTEST RS232 Interface Test Program 45 SUN RAY SUPPORT 46 FIRMWARE UPGRADE PROCEDURE 47 Requirements 47 Preparation For Upgrade 48 Upgrade Procedures 49 Start the Bootloader 49 Update the User Controller Firmware 50 Update the HID Port Controller Firmware 50 Update the Vendor Specific Port Controller Firmware 51 Read th...

Page 5: ...gs menu 23 Figure 24 OSD Settings screen 24 Figure 25 Find Mode in use 24 Figure 26 Main Menu help screen 25 Figure 27 Scan List 25 Figure 28 Broadcast List 26 Figure 29 User login screen 27 Figure 30 Administrator s main menu 27 Figure 31 User Login screen with security disabled 28 Figure 32 Administration Mode Menu 28 Figure 33 System Configuration menu 29 Figure 34 Port Configuration menu 29 Fi...

Page 6: ...t heavy duty tactile keyboard with 17 key numeric keypad Drawer locks into place when open to prevent it from sliding in and out of the rack o Front quick release latches for pushing the drawer back into the rack Rugged steel construction with durable powder coat finish LCD auto shutoff in closed position Optional KVM on IP requires no client software Secure connections can be made with any browse...

Page 7: ...all items necessary to install the specific RACKMUX model see the manual that accompanied your RACKMUX drawer including the following hardware unique to the Single Person hardware installation 10 10 32 cage nut 2 10 32 x 1 2 flat head machine screw 8 10 32 x 3 4 pan head machine screw To install the rails you will need only a tape measure and Phillips screwdriver 2 Unpack the left and right rail a...

Page 8: ...only the center screw through the rail flange to the rack support and cage nut using the 10 32 x 1 2 flat head machine screw provided See image below Do not tighten at this time Install the left rail assembly in the same fashion The end with the label Left Front mounts to the front rack support 5 Install two 10 32 x 3 4 pan head screws in the rear of each rail assembly as shown below Do not tighte...

Page 9: ...rails 7 Lineup the rail guides on the RACKMUX drawer with the slots in the front of the left and right rails and slide the drawer into the rack The rail guides should be positioned such that the wide lip of the guide is on the backside of the rail Slide the drawer in completely View of rail guide from the front of the rack support View of rail guide from the backside of the rail Figure 5 Rail guid...

Page 10: ... rails into the cage nuts in the rack supports Tighten each securely Figure 6 Apply remaining screws to complete installation 9 Tighten securely the four screws applied to the rear rail flanges in step 4 10 Make your cable connections according to your RACKMUX Drawer instructions Your NTI RACKMUX Drawer is now installed and ready for use Apply two more screws on each side There should be a total o...

Page 11: ...D yellow male cable end of the HDUSBVEXT xx MM cable to a yellow CPU x port on the USB KVM switch See Figure 7 Figure 7 Connect each CPU using a HDUSBVEXT xx MM cable 2 Power ON the CPUs The CPUs can be powered at any time although if a CPU needs a keyboard and or mouse at power ON it should be powered after connecting to and powering ON the RACKMUX Note The order in which the CPUs and switch are ...

Page 12: ...ure 8 USB KVM Switch OSD Splash Screen If security is enabled and you are prompted for a name and password login as the administrator Password and User Name The factory settings are default user name root default password nti Note The username for the administrator cannot be changed from root Figure 9 User login screen After login the Command Mode menu will open and the USB KVM Switch will be read...

Page 13: ...Connect CAC Card Reader If the RACKMUX you have purchased includes the USB port option RACKMUX V17 N 8USBHDU then it supports the connection of a CAC card reader When used the CAC card reader will connect to the PC attached to the selected CPUx port Figure 10 Install CAC card reader ...

Page 14: ...red with an IP of 192 168 0 xxx where xxx is any number except 70 You may need to configure the Ethernet port network information on the PC such that it can connect to the KVM on IP device in the USB KVM switch Note Connecting to the KVM on IP requires the installation of the Java Runtime Environment A link to the web page from which it can be downloaded and installed in addition to a Windows comp...

Page 15: ... settings in case you need them later 7 With the settings updated press Apply to implement the changes in the KVM on IP Your browser connection to the KVM on IP is no longer valid 8 To restore connection to the KVM on IP change the IP address on the PC back to an address compatible with your network and now also compatible with the KVM on IP Having configured the KVM on IP to be compatible with yo...

Page 16: ...ting the USB KVM Switch can be found on page 19 Note When using the OSD menu to control the USB KVM switch from the remote PC use only the keyboard to navigate the menus The mouse will work as described in the UNIMUX USBV xHD manual when used from the RACKMUX based keyboard but it is not reliable when used through the KVM on IP connection If the remote connection is closed while in the KVM on IP m...

Page 17: ... 11 LCD Display for viewing the video signal from the connected CPU 12 Auto Shut OFF switch automatically shuts OFF the LCD display when the monitor is folded down 13 3 button mouse for controlling mouse movements on the monitor and controlling the computer 14 Keylock to prevent unauthorized use of the RACKMUX 15 Keyboard for manual data entry and computer control 16 IEC Connector for attachment o...

Page 18: ...tons are used to navigate through the menus Move the cursor up or down as desired to highlight an item for selection Once an item is highlighted pressing the Menu button will select it Figure 15 OSD Controls The Select button is used to make selections within the OSD menus when the OSD menu is ON When the OSD menu is OFF the Select button will act as an Auto Adjust button to keep the user from hav...

Page 19: ...the LCD display With the RED GREEN or BLUE sections highlighted use the Up or Down Arrow to move between them press the Select button to choose the option to adjust Then use the Up or Down Arrow to adjust the setting Select EXIT when finished to return to the Main Menu Position Menu Selecting the Position menu will bring up a screen in which the user can select AUTO ADJUST to automatically adjust ...

Page 20: ...me the user can be idle before the OSD menu automatically exits adjustable from 10 to 60 seconds LANGUAGE the language that the OSD menus will be presented in With the item highlighted use the Up or Down arrow to move between them press the Select button to choose the option to adjust Then use the Up or Down Arrow to adjust the setting as needed Select EXIT when finished to return to the Main Menu...

Page 21: ...ock the Function key press the Fn key twice quickly double click The Fn LED will illuminate To turn OFF unlock the Function key press the Fn key twice quickly again The Fn LED will turn OFF Note The Fn key will also operate similar to the shift key with only momentary effect Press and hold the Fn key prior to pressing the special function key The Fn key will remain active as long as it is depresse...

Page 22: ...lish keyboard with numeric keypad Figure 19 U K English keyboard with numeric keypad Esc F1 F2 F3 F4 F5 F6 F7 F8 F9 F10 F11 F12 PrtSc Delete SysRq Pause Break Scroll Lock Backspace 0 9 8 7 6 5 4 3 2 1 Tab Caps Lock Shift Ctrl Alt Fn AltGr Insert End Page Down Shift Z X C V B N M A S D F G H J K L Q W E R T Y U I O P Page Up Home Home PgUp PgDn End Del Ins Num Lock Enter 7 8 9 4 5 6 1 2 3 0 Enter E...

Page 23: ...se their ability to function Toggle back to USB mode to restore functionality 1 To toggle the keyboard to USB mode depress and hold the Fn key Fn LED will illuminate and the T key for at least 7 seconds Release both keys 2 To toggle the keyboard back to PS 2 mode press and hold the Fn and T keys again for at least 7 seconds Release both keys Note In the event of a power failure the RACKMUX will po...

Page 24: ... controlled by two methods OSD Control via keyboard using the RACKMUX RS232 control see page 40 OSD Control OSD control of the UNIMUX can be achieved using OSD Command Mode Command Mode is operated using the keyboard and mouse in conjunction with OSD menus superimposed onto the monitor By pressing Ctrl accent key the user can enter Command Mode Once in Command Mode typing a series of commands will...

Page 25: ... functions cyan or light blue for CPUs The scroll bar can be used by clicking on the corresponding up and down arrow above and below the scroll bar The mouse wheel may be used to move the selection bar The Shift key must be used to enter an uppercase letter within all OSD menus Clicking on a listed CPU while in Command Mode will connect the user to that CPU Available functions will have white char...

Page 26: ... Mode is enabled At this point the Command Mode menu will be displayed The Command Mode menu see Figure 21 lists all CPUs by name and port number Only 8 ports are listed on the screen at a time To view the other portions of the list scroll using the arrow keys on the keyboard or use the mouse to click on the arrows on the scroll bar in the OSD menu When the Command Mode main menu is displayed the ...

Page 27: ... port Press any valid number from 1 1024 to connect to a desired port port Enter Increases the ports listed by 1 page Page Down Decreases the ports listed by 1 page Page Up Enter Settings menu T Toggle ports listed to view by port number or alphabetically by port name O letter not number Enable disable Scan Mode Ctrl S Enable disable Broadcast Mode Ctrl B Enter Administrator menu only available if...

Page 28: ...w describes the Settings menu functions available from the keyboard Function Keystroke Open OSD Settings screen O Go to Broadcast list B Go to Scan list S Change the scan dwell time period Enter any value from 002 255 for more on this see Scan Mode page 25 T Enable Disable right mouse button click emulation with Apple 1 button mouse see Mouse Click Equivalents on page 38 for more R Exit from Setti...

Page 29: ...re 24 OSD Settings screen Find Mode Find Mode is enabled by typing any alphabetical or numeric characters while in the Command Mode main menu or by pressing F while in supporting menus Find Mode allows the user to enter and maneuver through a list of CPU names The CPU name best matching the characters typed is selected The list of CPUs may also be searched for a specific or similar name The Find M...

Page 30: ...can Y each time the Ctrl S keys are pressed When Scan Y is shown Scan Mode is active When Scan N is shown Scan Mode is OFF From the Settings menu see page 23 press S to access the Scan List The Scan List enables the user to select specific ports to be active in Scan Mode While active the user will have full device control of the connected port Only the selected ports will be scanned in Scan Mode T...

Page 31: ...pe characters to more computers simultaneously From the Settings menu see page 23 press B to access the Broadcast List where the user can edit the list of ports that receive data in Broadcast Mode The Broadcast List is a check list with all the port numbers displayed unchecked box the corresponding port is not in the broadcast list checked box the corresponding port is in the broadcast list From t...

Page 32: ...nabled With a valid login the user will be connected to the first CPU that is powered ON To enter Command Mode press Ctrl accent tilde key The OSD menu will automatically appear on the monitor Figure 30 Administrator s main menu The administrator will activate security after logging in by pressing A S S E see page 35 Once logged in follow the instructions on page 28 for setting up users and changi...

Page 33: ...n the limitations as determined by the administrator Note If security is not enabled the message Press F1 to Autologin will appear in the login screen While security is disabled a standard user must press F1 see Figure 31 to access the switch Only the administrator can login using the name and password when security is not enabled Additional OSD Modes Available With Security Enabled Administration...

Page 34: ...le with MAC or non MAC CPUs If the port will have a MAC CPU connected use the mouse to click on the box associated with the port to place a check mark in the box Note If a port is configured as connected to a non MAC CPU but is in fact connected to a MAC CPU the mouse will still work as a generic mouse No special functions provided by software drivers will be available Note MAC mode must be enable...

Page 35: ... the name enabling it to be edited If no name is entered a default name userXX where XX is the user number will be entered N Open an edit field to insert a user password up to 15 characters in length If no characters are entered no password will be required for that user P Usable characters for Name or Password Upper and lower case characters can be used A Z 0 9 or Shift A Z Open an edit field to ...

Page 36: ...or this topic F1 Exit and return to previous menu Changes made will be saved automatically Esc Figure 37 Access Control list Change Administrator Password To change the Administrator Password press C from the Administration menu The Admin Password menu see Figure 38 enables the administrator to change his password Two edit fields are available one for password the other for verify password The pas...

Page 37: ... controlling the switch via Telnet Interface page Error Bookmark not defined press E from the Administration menu The default values are shown in Figure 40 Function Keystroke Change the IP Address I Change the Subnet Mask S Change the Gateway G Change the port number T Exit and return to previous menu Esc Figure 40 Ethernet Configuration If the Ethernet feature is not present in the UNIMUX the mes...

Page 38: ...field 4 press Esc to exit the System Configuration menu Figure 41 Change value of Idle Timeout OSD Blank Timeout The OSD Blank Timeout is the amount of time that the user can be idle while in Command Mode before the OSD menu will disappear The time period can be set to any value from 000 to 255 minutes A value of 000 will disable it After the OSD disappears when the configured time period has elap...

Page 39: ...e menu Only the administrator is able to set or change the Alternate Command Hot Key This function must be set individually for each of the USB User Device ports on the UNIMUX USB KVM switch Note The Alternated Command Hot Key does not replace the accent key it just works as another way to enter into Command Mode After setting it the user can enter into Command Mode either with Ctrl or with Ctrl A...

Page 40: ...on t have a country code In this case the selection will remain in the AutoDetect position and the default country code 00 will be programmed in the UNIMUX If a specific country code is manually programmed it will be the country code for the switch regardless of the actual country code of the connected keyboard The programmed country code is saved in memory and restored each time the UNIMUX is pow...

Page 41: ...administrator Figure 47 Login screen with security disabled Serial Baud Rate The serial baud rate for the UNIMUX can be changed by pressing B from the System Configuration menu In order to control the UNIMUX via RS232 page 40 the baud rate must be set the same as the communication port on the control terminal attached to the UNIMUX page Error Bookmark not defined The baud rate value can be set to ...

Page 42: ...ce is designed to allow daisy chaining up to 15 units Each unit must be assigned a unique address The unit address for the UNIMUX can be changed by pressing E from the System Configuration menu With the edit field highlighted press the Left arrow or Right arrow to change the value of the unit address The address range is 1 15 For more on daisy chaining see page 40 Figure 49 Adjust Serial Address ...

Page 43: ...Application SB F12 Compose R Alt R Alt R Option Alt Graph SB Alt Windows Logo Command Meta SB R Arrow SB R Arrow Power Suspend SB Space Bar L and R Left and Right keys when two keys are marked the same on a keyboard Mouse Click Equivalents To emulate a right button click using Apple 1 button mouse hold down the Command key while pressing the mouse button Note Right mouse button emulation must be e...

Page 44: ...al 101 Keyboard Alt Command Key Enter Enter Ctrl Shift Shift Caps Lock Tab Esc Ctrl Alt Backspace Num Lock Alt F1 F2 F3 F4 F5 F6 F7 F8 F9 F10 F11 F12 Scroll Lock Pause Break Print Screen SysRq Application Key Windows Logo Key Windows Logo Key help home pg up pg dn F12 F11 F9 F10 F8 F7 F6 F5 F4 F3 F2 F1 esc Enter Enter Alt Graph Shift Shift Caps Lock Tab Esc Ctrl Alt Backspace Num Lock Help Stop Pr...

Page 45: ...he port s to be selected by RS232 control A 5 foot patch cable and two adapters RJ45 to DB9 and RJ45 to DB25 have been provided for connection to most CPUs see page Error Bookmark not defined To daisy chain multiple units connect a Matrix Y 1 cable sold separately between the CPU and the first switch and between each switch as shown in Figure 51 Baud Rate The baud rate can be changed using the OSD...

Page 46: ... source connector Unit 2 9D Female 9D Male 9D Male Wiring Schematic of Matrix Y 1 cable NTI SWITCH CPU RS232 First Unit NTI SWITCH RS232 NTI SWITCH RS232 Second Unit Last Unit RS232 Serial Port Matrix Y 1 Matrix Y 1 Matrix Y 1 RJ45 TO DB9 SERIAL ADAPTER RJ45 TO DB9 SERIAL ADAPTER RJ45 TO DB9 SERIAL ADAPTER CAT5 CABLE CAT5 CABLE CAT5 CABLE Note The maximum combined RS232 cable length between the CP...

Page 47: ... the serial address but the syntax is wrong after this field the switch will answer with CR Syntax example CS 01 05 01 CR insert the space and commas as shown which means At the switch with unit address 01 connect CPU port 05 to user port 01 The switch will answer with CR The HEX code representation of example above is Byte 1 Byte 2 Byte 3 Byte 4 Byte 5 Byte 6 Byte 7 Byte 8 Byte 9 C 0x43 S 0x53 Sp...

Page 48: ... To install the NTI Switch Control Program after downloading 1 Locate the Setup exe in the directory the program was downloaded to and double click on it 2 Follow the instructions on the screen Note In order to use the NTI NTI Switch Control Program to control the UNIMUX the UNIMUX RS232 port must be set at a baud rate of 9600 bps see page 40 The NTI Switch Control Program performs best on monitor...

Page 49: ...s into Unit Memory save the connections into switch memory bank b Restore I O Connections from Unit Memory restore the connections from switch memory bank c Change All Units Baud Rate 9600 COM1 change RS232 Baud rate of all switches the current baud rate and serial port are displayed in parentheses d Reset Unit send a reset command to the switch This command does not function at this time e Reset ...

Page 50: ...t 4 Change all outputs connect an input to all outputs 5 Read single output read which input is connected to an output 6 Read unit size read how many inputs and outputs the unit has 7 Return to main menu go back to the MAIN OPTIONS menu The Setup Options main menu selection only needs to be executed if the switches baud rate or unit address have been changed from the factory defaults 9600 baud and...

Page 51: ...CH AND KVM ON IP 46 SUN RAY SUPPORT The UNIMUX fully supports SUN Ray CPUs however a lack of horizontal mouse movement may be experienced If this occurs enable MAC mode page 29 for the port that the SUN Ray is connected to This should enable proper mouse movement ...

Page 52: ...endently 3 Vendor Specific Port Controller there is one such controller for each CPU port available on the switch it will be upgraded with an Intel hex file named unimux suhd cpvdx x hex Each CPU port is upgraded independently The UNIMUX firmware has a bootloader which can be used for firmware upgrades The bootloader resides in a protected area of Flash memory so that if the upgrade fails for any ...

Page 53: ...pply the following settings to the terminal console for the port connected to the UNIMUX Baud rate 57600 Data bits 8 Parity none Stop bits 1 Flow control none 250V 2A 12 4 11 3 10 2 9 1 CPU CPU 16 8 15 7 14 6 13 5 CPU CPU NETWORK TECHNOLOGIES INCORPORATED 1275 Danner Drive Aurora Ohio 44202 330 562 7070 www networktechinc com MONITOR RS232 Rear View of UNIMUX USBV 16HDU VGA Multi Scan Monitor Cont...

Page 54: ...oader is waiting for commands The available commands are composed by sending one ASCII character To send a command to the bootloader type the key in the terminal window that corresponds to the desired command The available commands listed below can be viewed by typing h or H the Help command from the keyboard Note Commands can be typed using upper or lower case letters Commands h H Display list of...

Page 55: ...ansmission will start shortly Wait until the transmission is finished There will be some pauses during transmission since the processor writes blocks of 4KB When the transmission is complete the HyperTerminal window should show the following status message and return to the menu prompt Device successfully programmed To exit from the bootloader press x Update the HID Port Controller Firmware The HI...

Page 56: ...ogrammed the message above will be repeated for each port that was programmed After all are programmed unless the switch has 32 CPU ports the following message will be shown on the screen Programming device please wait Device ID 0x0000 Device failed Error Code 1 This is shown because the bootloader continues to look for devices until it has found up to 32 the maximum number of possible CPU ports a...

Page 57: ... download To read the checksum type s for HID port controllers or t for vendor specific port controllers at the bootloader prompt The following message will be displayed Please type the two digit number of the port to be checked A to check all or X to exit the two digit number should be between 01 and nn where nn is the number of available ports To read the checksum for only one device type the nu...

Page 58: ...f fire or electrical shock Always unplug this product before cleaning it Do not use any liquid or aerosol cleaners to clean it Do not install or use this product near water Be sure to mount this product on a solid stable surface or in a rack if applicable Route all cables and the power cord away from sharp edges or objects that could cause damage to them Use only the power cord or AC adapter that ...

Page 59: ...t Unit CCFL 4 Tables Edge Light 2 Top 2 Bottom Operating Lamp Life 40 000 50 000 hrs Contrast Ratio 500 1 Display Controller VGA Connector 15HD female Video Format VGA SVGA XGA SXGA Signal Input from Video Source Analog RGB Sync Range H 31 80KHz V 55 76Hz OSD Control Menu Up Down Select Power 5 keys Plug and Play VESA DDC 2B Ver1 3 OSD Control Board OSD Control 5 Keys Power Key Power ON OFF Menu K...

Page 60: ...tion Detection Method capacitance sensing X Y Position Sensing Resolution 40 counts mm X Y Position Reporting Relative Similar to mouse Tracking Speed Up to 1016 mm sec Touch Force No Contact pressure required Lifetime Plastic Overlay Minimum 10 000 000 strokes Sample Rate Up to 100 samples sec ...

Page 61: ... they are secure AUTO CONFIGURATION The LCD monitor is configuring itself for proper communication with the CPU No action necessary Keyboard touchpad not functioning Keyboard is in the incorrect mode Cables are not properly connected Toggle the keyboard mode from PS 2 to USB Check all cable connections between the RACKMUX and the computer Keys pressed on the keyboard do not yield the expected resu...

Page 62: ...3 Password and User Name 7 29 port configuration 31 reset port names 36 38 39 RMTEST 47 RS232 Command Protocol 44 RS232 pinout 42 Scan Mode 27 security configuration 37 security enable 37 Security features 22 Select Language 37 SerTest 46 Settings 25 Sun s extra keys 40 system configuration 31 usage statistics 34 USB port 8 USB PS 2 mode 20 USBVEXT xx MM cable 6 user access control 33 user configu...

Reviews: