background image

NTI RACKMUX-V15/17  RACKMOUNT LCD MONITOR WITH KEYBOARD AND MOUSE 


3


INSTALLATION 

Rack Mounting Instructions 

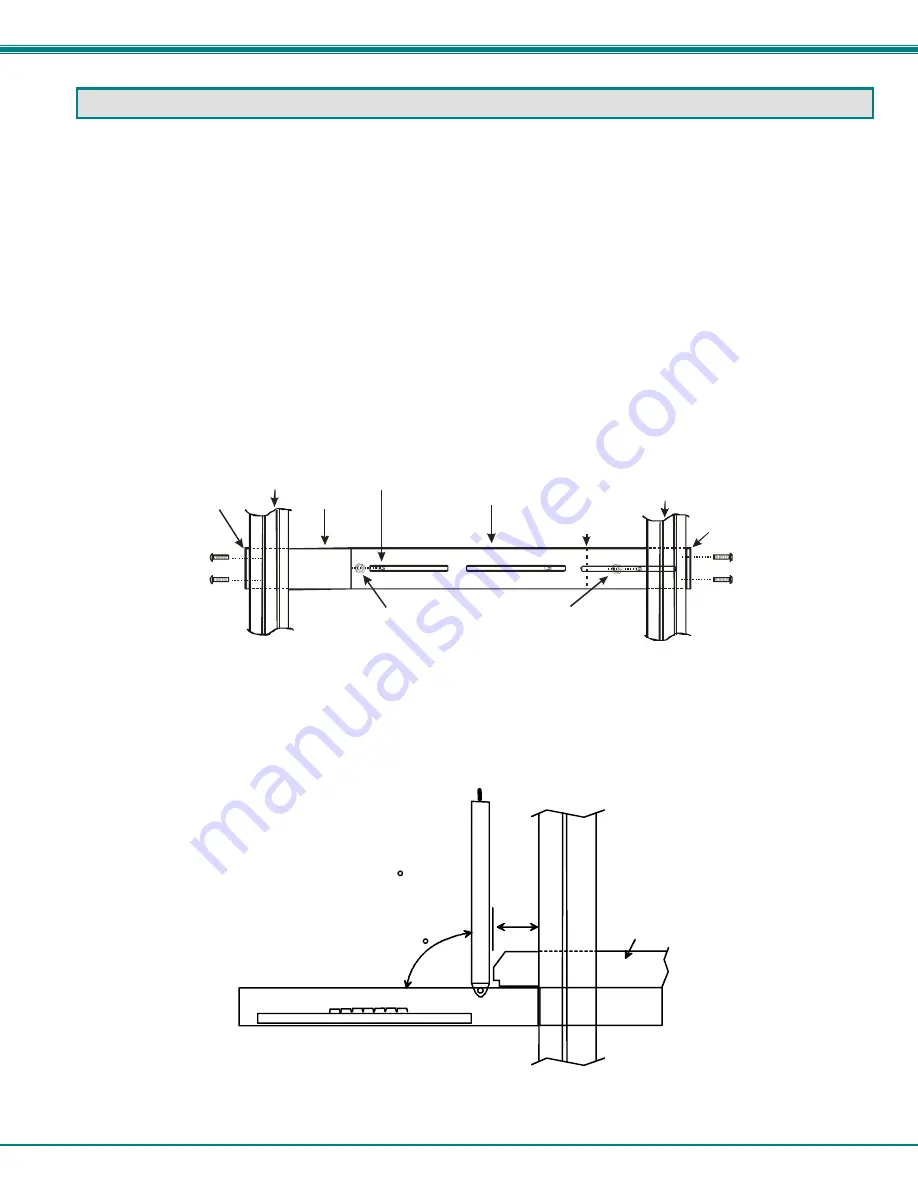
The RACKMUX was designed to be mounted to a rack and includes mounting flanges to make attachment easy.    


1.   Determine the mounting height in the rack for the drawer.    It should be a height comfortable to use the keyboard and see the 
LCD display.  Mark holes in each of the 4 corner cabinet rails at points all level with each other.   


2.  Secure the rear brackets to the rear rack cabinet rails.   Apply the top screws (supplied) for each bracket to the holes marked in 
step 1.  


3. Lift the keyboard into position and line the studs on the left and right sides up with the slotted openings in the rear bracket.   
Apply the nuts (supplied) to the studs but do not tighten the nuts yet.  


FYI:  There are 4 mounting studs provided on each side of the RACKMUX.  Depending on the depth of the rack and 
distance apart of the cabinet rails, the position of the rear bracket may make all 4 studs available for use.    In this case, 
apply the 2 nuts to the studs furthest apart from each other on each side.   


4. Slide the drawer in until the top holes in the front bracket flanges line up with the holes marked in step 1.   Secure the front 

brackets on the drawer to the front cabinet rails with two screws per bracket.  Be sure to tighten the screws securely.  Then 
tighten the nuts applied in step 3.     


5. Apply one more screw to each of the rear brackets to finish.  


                                                   Figure 1- Mount RACKMUX to a standard rack 


Note:   To provide sufficient room for the LCD monitor to be opened to a proper viewing angle (a minimum 90 degree 
position from the keyboard), ensure that all devices mounted  above the RACKMUX extend no more than 1.75” from the 
rack frame.     (See Fig. 2) 


                                                              Figure 2- Position RACKMUX with clearance to open 


Apply nuts (supplied) to studs and 
secure rear brackets to drawer. 

Front bracket
flange on drawer

Rear bracket
   flange

Drawer

Front Cabinet 
      Rail

Rear Cabinet 
      Rail

Rear bracket overlapping
drawer

(Rear edge
of drawer)

Stud on drawer

Secure bracket
to rail using two
 screws and nuts
(supplied)

Secure bracket
to rail using two
 screws and nuts
(supplied)

Side View of RACKMUX

"X" must be
less than 1.75"
for LCD to open
to full 90 

X

90

Server mounted
above RACKMUX 
in the same rack

Summary of Contents for RACKMUX-D15

Page 1: ...CKMUX D15 17 Rackmount Drawer with Keyboard LCD Monitor and Mouse Installation and Operation Manual RACKMUX Series NETWORK TECHNOLOGIES INCORPORATED Tel 330 562 7070 Fax 330 562 1999 1275 Danner Dr Au...

Page 2: ...f Network Technologies Inc 1275 Danner Drive Aurora Ohio 44202 CHANGES The material in this guide is for information only and is subject to change without notice Network Technologies Inc reserves the...

Page 3: ...enu 8 Color Menu 8 Position Menu 8 Setup Menu 9 Keyboard Functions 10 RACKMUX V15 10 Number Pad 11 Other Functions of the Fn Key 12 Numeric Keypad Option 12 SUN Keyboard Keys 13 Power Key 13 USB PS 2...

Page 4: ...used for RACKMUX with DVI video support 5 Figure 7 Connect a USB 1 1 device to the front optional 6 Figure 8 Connect the power cord 6 Figure 9 OSD Controls 7 Figure 10 US English Keyboard Layout 10 Fi...

Page 5: ...monitor when the LCD is in a folded closed position Built in 83 key US or 84 key Europe keyboard with wrist pad Standard 3 button mouse touchpad Support for PS2 and USB connections for the keyboard an...

Page 6: ...controlling the computer 14 Keylock to prevent unauthorized use of the RACKMUX 15 Auto Shut OFF switch automatically shuts OFF the LCD display when the monitor is folded down 16 keyboard for manual da...

Page 7: ...uts to the studs furthest apart from each other on each side 4 Slide the drawer in until the top holes in the front bracket flanges line up with the holes marked in step 1 Secure the front brackets on...

Page 8: ...tighten all nuts and screws before using the drawer Figure 3 Mount to Telco post with optional mounting brackets Connect to a CPU The RACKMUX may be connected to either a PS 2 or a USB CPU with a VGA...

Page 9: ...e Video Connector VEXT 6 MM supplied USB CPU USB Type A Male USB Type B Male REAR VIEW OF RACKMUX V17 NTI NETWORK TECHNOLOGIES INCORPORATED Tel 330 562 7070 Fax 330 562 1999 1275 Danner Dr Aurora OH 4...

Page 10: ...7 Connect a USB 1 1 device to the front optional Note If a USB 2 0 device is connected to the optional USB device port it will operate at USB 1 1 speed Connect Power Connect the IEC power cord to the...

Page 11: ...tings The Up and Down Arrow buttons are used to navigate through the menus Move the cursor up or down as desired to highlight an item for selection Once an item is highlighted pressing the Menu button...

Page 12: ...isplay With the RED GREEN or BLUE sections highlighted use the Up or Down arrow to move between them press the Select button to choose the option to adjust Then use the Up or Down Arrow to adjust the...

Page 13: ...ser can be idle before the OSD menu automatically exits adjustable from 10 to 60 seconds LANGUAGE the language that the OSD menus will be presented in With the item highlighted use the Up or Down arro...

Page 14: ...ow what special features are enabled Figure 10 US English Keyboard Layout Figure 11 Keyboard LED Indications ESC F1 F2 F3 F4 F5 F6 F7 F8 F9 F10 F11 F12 NUMLCK PRT SC INSERT DELETE SYS RQ PAUSE BREAK S...

Page 15: ...n LED will illuminate With the Fn and NumLock LEDs illuminated pressing some standard keys will result in displaying characters as indicated in the chart below Standard Key Displayed when NumLock is O...

Page 16: ...eys See additional functions of the Fn key described on page 13 Numeric Keypad Option Models with the Numeric Keypad option N i e RACKMUX V15 N have a standard Windows keyboard with 17 key numeric key...

Page 17: ...2 Keyboard Mouse Mode The RACKMUX keyboard and mouse can be configured to connect to either a PS 2 or USB enabled CPU At power ON the keyboard will always be in USB mode 1 With the proper cable conne...

Page 18: ...ctions Proper connections are indicated Note Be sure to properly secure the terminal block to the RACKMUX after wire insertion An earth ground terminal has been provided for optional use Figure 15 RAC...

Page 19: ...r electrical shock Always unplug this product before cleaning it Do not use any liquid or aerosol cleaners to clean it Do not install or use this product near water Be sure to mount this product on a...

Page 20: ...ge light Operating Lamp Life 30 000 40 000 hrs Contrast Ratio 500 1 LCD 17 Display area 337 92mm W x 270 336 H 17 inch diagonal Panel Type TFT Active Number of Pixels 1280 H x 1024 V Number of Colors...

Page 21: ...Style Rectangular Cylindrical Operating Force 50gf 25gf Stroke 3 0mm 5mm Tactile 20 gf typ Height 8 5 mm Operating Life 10M operations minimum Interface Row and column matrix Key Switch Bounce 10 ms...

Page 22: ...t properly connected Toggle the keyboard mode from USB default to PS 2 A If keyboard works in PS 2 mode and not USB USB cable is incorrectly connected B If keyboard works in USB mode and not PS 2 PS 2...

Reviews: