LGA 2011
LGA 2011
LGA 775 / 115X / 1366
LGA 775 / 115X / 1366
LGA 775 / 115X / 1366
THIS SIDE
FOR INTEL
1366
115X
775
1
2
3
4
8
11
9
10
4
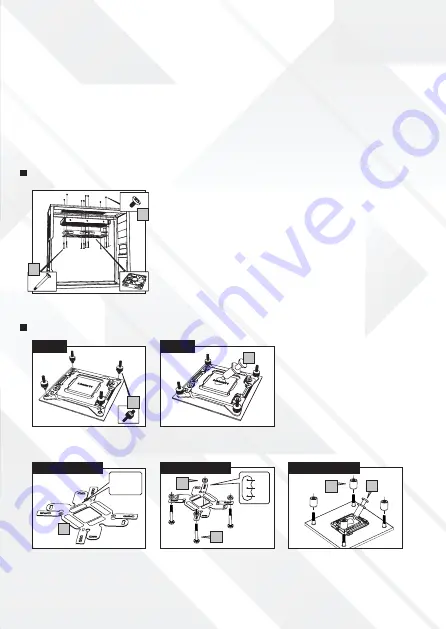
Radiator & fans installation
Intel installation
LGA 2011 / 775 / 115X / 1366
1)
6mm radiator screws x8
2)
29.5mm fan screws x8
3)
Intel LGA 2011 screws x4
4)
Thermal compound x1
5)
Intel clip x1 (pre-installed)
A.1)
Attach the LGA 2011 (3) screws on
the motherboard.
6)
Spring nuts x4
7)
Back plate spacer (AMD) x1
8)
Back plate x1
9)
28.5mm back plate screws x4
10)
Spacers x4
11)
Insulative rings x4
12)
AMD clip x1
13)
Fan spliter cable x1
14)
12cm Hummer fan x2
15)
Fan power cable x1
A)
Attach the fans on the radiator using the 29.5mm fan screws (2).
Make sure that the fan’s airflow will be moving towards the exterior of the
PC chassis.
B)
Attach the radiator on the PC chassis using the 6mm radiator screws (1).
Note:
Optionally, you can also install the radiator at the PC chassis’ front interior.
A.2)
Apply thermal compound (4) on
the CPU.
A.2)
Position and insert the screws (9)
on the back plate according with the
CPU socket. Put the insulative rings (11)
on the back plate screws.
A.3)
Pass the back plate screws through
the motherboard, apply the spacers (10).
Apply thermal compound (4) on the CPU.
A.1)
Use the back plate (8) with the
correct side for Intel mounting. This
side will face the motherboard.


