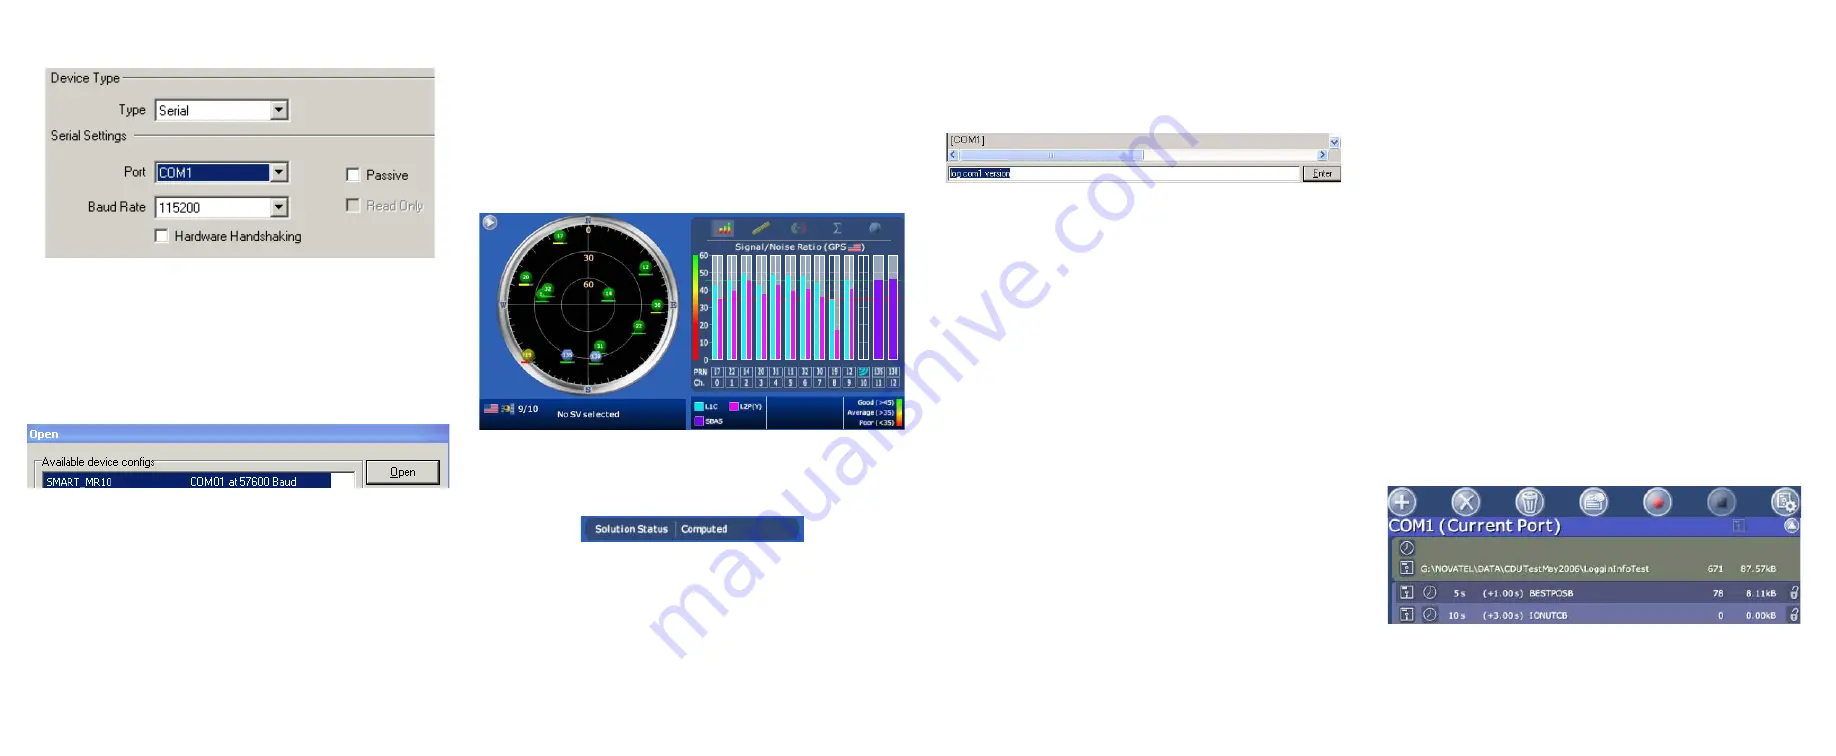
5.
Select
Serial
from the
Type
list and select the PC/laptop port
to which the SMART-MR10 is connected, from the
Port
list.
6.
Select
115200
from the
Baud Rate
list.
7.
Cancel
Hardware Handshaking
.
8.
Select
OK
to save the new device settings.
9.
Select the new configuration from the
Available device
configs
area of the
Open
dialog.
10. Select the
Open
button to open SMART-MR10
communications.
As
CDU
establishes the communication session with the
receiver, it displays a progress box. Once
CDU
is con-
nected, the progress box disappears and several windows
open, including the
Console
window.
CDU
is now ready for
use to view status information, enter commands, or log data.
USING CDU
CDU
provides access to key information about your receiver and
its position. The information is displayed in windows accessed
from the
View
menu. For example, select
Position Window
from
the
View
menu to display the position solution of the receiver. To
show details of the GNSS and geostationary (SBAS) satellites
being tracked, select the
Tracking Status Window
from the
View
menu. Select
Help
from the main menu for more details on
CDU
,
its windows and features.
DETERMINING WHEN THE POSITION IS VALID
When the receiver has a valid position, the
Solution Status
field
in
CDU
’s
Position
window shows
Computed
:
ENTERING COMMANDS
The SMART-MR10 uses a comprehensive command interface.
Commands can be sent to the receiver using the
Console
window in
CDU
, which is opened from the
View
menu. Enter
commands in the text box at the bottom of the
Console
window.
The following information is important when entering commands:
•
Commands can be entered in three formats:
•
ASCII (for example,
log bestposa
)
•
Abbreviated ASCII (for example,
log best-
pos
)
•
Binary (for example,
log bestposb
).
Abbreviated ASCII is the best format to use when you
want to work with the receiver directly. For data
collection, use ASCII or Binary.
•
Click
Enter
to send the command string to the receiver.
•
Commands are not case sensitive.
The
OEMV Family Quick Reference Guide,
provided on the CD,
provides comprehensive information about available
commands. The
SMART-MR10 User Manual
provides
information on a subset of these commands; in particular, the
ones commonly used on the SMART-MR10.
SAVECONFIG COMMAND
If you change the configuration of a function and want to save
the new settings for your next session, use the SAVECONFIG
command. This applies to most configuration changes,
Bluetooth
and ER enable and disable, for example.
LOGGING DATA
An extensive set of logs has been created to capture the data
your SMART-MR10 receives and processes. These logs can be
directed to a SMART-MR10 port (COM1, COM2 or AUX) and
can be automatically generated when new or changed data
becomes available, or at regular intervals. The available logs are
listed in the
OEMV Family Quick Reference Guide
.
To log data, use the LOG command. For example, to log the
pseudorange position to COM 2 every 30 seconds, enter the
following:
log com2 psrposb ontime 30
Logs can be generated in one of three formats: ASCII,
Abbreviated ASCII, or Binary. Refer to the
SMART-MR10 User
Manual (OM-20000130)
or the
OEMV Family Firmware
Reference Manual (OM-20000094)
for information on the LOG
command, specifying the output format, and the detailed
contents of each log.
If you prefer,
CDU
provides a graphical interface for configuring
data logging. Select
Logging Control Window
from the
Tools
menu. In the
Logging Control
window, you can select which logs
to capture and choose the ports to which you want the data sent.
You can also specify a file in which to save the data.
When logging data through CDU, close all unused windows to
maximize COM port throughput and receiver CPU performance.


