


FlexPak-G2-V1, FlexPak-G2-V1G,
FlexPak-G2-V2, and FlexPak-G2-OEMStar
http://
www.novatel.com/Downloads/docupdates.html
. To order a
printed copy of the manuals, free of charge, follow the
instructions given on the enclosed
User Manuals
postcard.
The FlexPak-G2 provides a Mini-B USB connection. The USB
drivers, along with installation instructions, are available in the
USB Driver’s directory of the CD provided. An installation
program for NovAtel’s PC Utilities, including the
CDU
(Control
and Display Unit) user interface, and sample source code, are
also on the CD
.
Each FlexPak-G2 receiver tracks a different satellite
combination, as follows:
•
FlexPak-G2-OEMStar: Single frequency GPS +
G SBAS
•
FlexPak-G2-V1: Single frequency GPS + SBAS +
OMNISTAR VBS + CDGPS
•
FlexPak-G2-V1G: Single frequency GPS + G
SBAS
•
FlexPak-G2-V2: Dual frequency GPS + G
SBAS
BOX CONTENTS
In addition to this
Quick Start Guide
, the following is provided
with your FlexPak-G2:
•
1 power adapter cable
•
1 null modem serial cable
•
1 USB cable
•
1 I/O cable
•
1 CD containing:
•
NovAtel’s PC Utilities’ installation program
•
Product documentation, including user manuals
•
Sample source code
•
Quick Reference Guide
•
User Manuals postcard for requesting printed manuals
ADDITIONAL EQUIPMENT REQUIRED
The additional equipment listed below is required for a typical
setup:
•
A Windows-based PC with an RS-232 DB-9 or USB port
•
One of the following:
•
A standard 12 V DC power outlet, or
•
Power cable supplied with LEMO connector and
6-18 V DC power supply, 750 mA.
If you use an alternative power source, a 12V car adapter can
be cut off from the power cable.The exposed wires can then be
tied to a 6-18Vsupply capable of at least 5 W.
Since the 12V car adaptor on the supplied adaptor cable
incorporates a 6A fuse, a user supplied 6A slow blow fuse in a
suitable holder must be used at the alternate power source to
protect both the power supply and your warranty.
See Step 4, in
, for an illustration of
this process.
•
A quality GNSS antenna, such as one from NovAtel’s
700 or ANT series. Contact your NovAtel representative
for a full range of options.
•
An antenna cable with a TNC male connector at the
receiver end, such as NovAtel’s GPS-C016 model
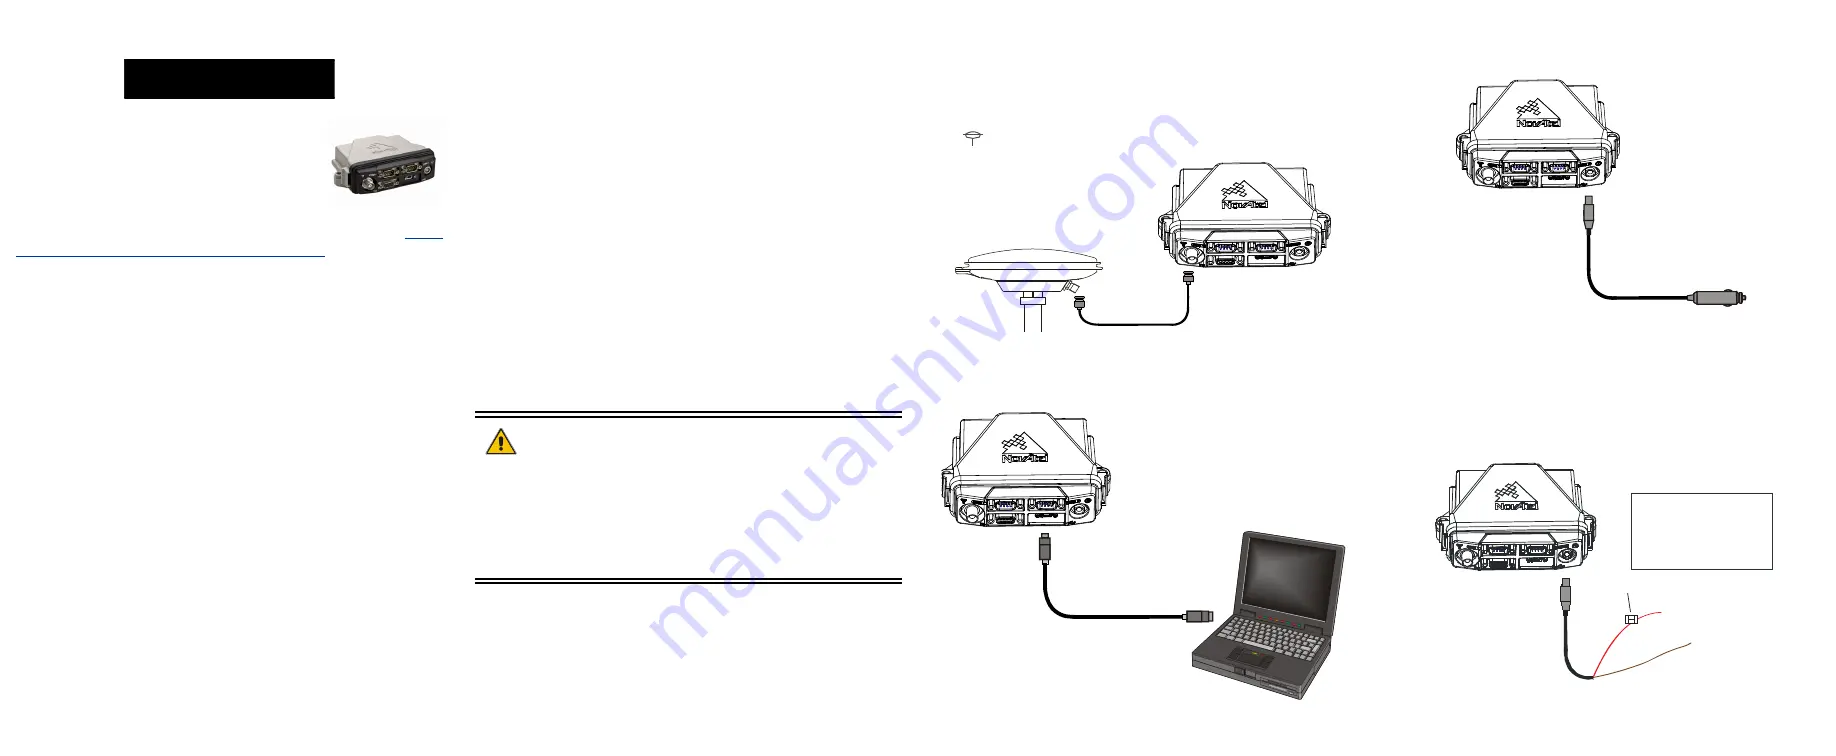
SETTING UP YOUR FLEXPAK-G2
Complete these steps to connect and power your FlexPak-G2.
1. Mount an antenna on a secure, stable structure with an
unobstructed view of the sky.
2. Using a coaxial cable, connect the antenna to the
port, which is found on the front face of the FlexPak.
3. Connect the
COM1
or
USB
port on the receiver to the
USB
or serial port on the PC. If you are using a USB connection,
install the USB drivers available on the CD provided.
4. Connect the power cable connector to the
PWR
port. Line
up the red mark on one power cable connector with the red
mark on the receiver’s PWR port and insert power cable.
For an alternative power source
:
a) Cut a 12V car adapter from the power cable.
b) Tie the exposed wires to a 6-18V supply capable of at least 5 W.
*Be sure to connect the red and orange wires to the
positive side of supply and connect the black and brown
wires to the negative side of supply.
c) Use a user supplied 6A slow blow fuse at the alternate power
source to protect the power supply wiring and your warranty.
QUICK START GUIDE
+
-
6A Fast Blow Fuse
(User Supplied)
Fuse/Holder Recommentations:
12V Systems
LITTELFUSE “ATO” 0257005 Fuse (or equivalent)
LITTELFUSE “MINI” 0297005 Fuse (or equivalent)
Holders
ATO/TAC ATO: LITTELFUSE FHAC0001 (or equivalent)
MINI: LITTELFUSE 0FHM0001 (or equivalent)


