background image


KU20 LED Display Controller User Manual 


www.novastar.tech 


  8 


Internal sources 


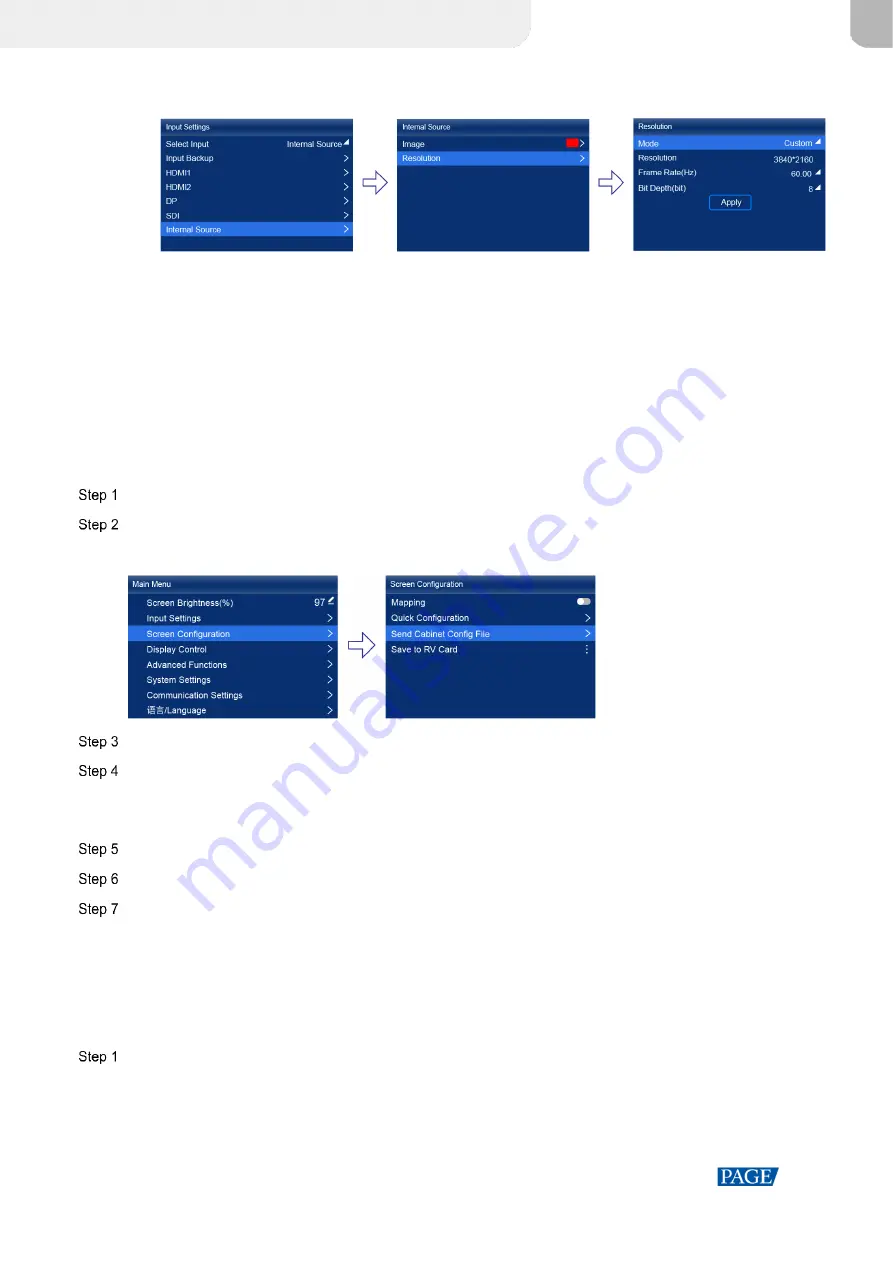
a. 

Choose 

Internal Source

 > 

Image

, and then select a static picture or a motion picture. 

b. 

When the relevant parameters of the image are displayed, set the parameters according to your actual 
needs; otherwise, please skip this step. 

c. 

Press the 

BACK

 button to go back to the upper-level menu and select 

Resolution

d. 

Set 

Mode

 to 

Custom

 or 

Standard

, and then set the resolution, frame rate and bit depth. 

e. 

After the settings are done, select 

Apply

 and press the knob. 

5.1.2 

(Optional) Send Cabinet Config File 

Send the cabinet configuration file (.rcfgx) to the cabinet and save it to display the image normally. Before the 
operation, please store the cabinet configuration file in the root directory of the USB drive in advance. 

  Insert the USB drive into the USB connector on the device front panel. 

  On the main menu screen, choose 

Screen Configuration

 > 

Send Cabinet Config File

Figure 5-2 Send cabinet config file 


  Select the target configuration file. 

  Select 

Yes

 in the displayed dialog box. 

After the configuration file is successfully sent, a message appears on the menu screen and then then you will 
automatically return to configuration file screen. 

  Press the 

BACK

 button to go back to the upper-level menu. 

  Select 

Save to RV Card

  Select 

Yes

 in the displayed dialog box. 

After the configuration file is successfully saved, a message appears on the menu screen. 

5.1.3 

Quick Configuration 

Set the screen configuration parameters to quickly complete the cabinet connection, so that the LED screen can 
display the input source image normally. 

  On the main menu screen, choose 

Screen Configuration

 > 

Quick Configuration

XI'AN 

NOVASTAR 

TECH 

CO., 

LTD.

Summary of Contents for KU20

Page 1: ...KU20 LED Display Controller User Manual XI AN N O VASTAR TECH CO LTD...

Page 2: ...KU20 LED Display Controller User Manual www novastar tech i Change History Document Version Release Date Description V1 0 0 2022 10 11 First release XI AN N O VASTAR TECH CO LTD...

Page 3: ...10 6 1 1 View Input Source Information 10 6 1 2 Set Resolution and Frame Rate 10 6 1 3 Adjust Color 11 6 2 Set Internal Input Sources 12 6 3 Set Output Parameters 12 6 3 1 Adjust Screen Brightness 12...

Page 4: ...rand new control system COEX series of Xi an NovaStar Tech Co Ltd hereinafter referred to as NovaStar This controller offers 1x HDMI input 6x Ethernet outputs and 1x optical output It can also work wi...

Page 5: ...the diagnostic result LCD Screen A 2 0 inch screen that displays the device status menus submenus and messages for parameter settings Knob On the home screen press the knob to enter the main menu scre...

Page 6: ...it 60Hz 325 000 pixels When the controller works with the A10s Pro receiving card the capacity can be up to 480 000 pixels OPT 1 10G optical output port HDMI LOOP 1 HDMI loop through SPDIF 1 A digital...

Page 7: ...4 3 Applications The KU20 has two typical application scenarios as shown below In those application examples the LED screen size is 1920 1200 Application 1 Synchronous Mosaic Application 2 Long Distan...

Page 8: ...the following situations Hold down the knob and BACK button simultaneously for 5s or longer Operate and control the device in VMP software The connection status of the Ethernet ports Blue Connected G...

Page 9: ...e Connected Gray Disconnected Bottom line Sync Active Input The sync signal currently used and the signal status Sync Active Input Sync with the frame rate of the current input source Sync Genlock Syn...

Page 10: ...must be the same and the integral multiple of the number of cabinet rows or columns and it must be greater than or equal to the number of cabinets loaded by the last port 5 1 Quick Screen Configurati...

Page 11: ...ot directory of the USB drive in advance Insert the USB drive into the USB connector on the device front panel On the main menu screen choose Screen Configuration Send Cabinet Config File Figure 5 2 S...

Page 12: ...nt View Select the data flow for the cabinets loaded by Ethernet port 1 H Offset Set the horizontal offset of the displayed image V Offset Set the vertical offset of the displayed image 5 2 Free Scree...

Page 13: ...ct Input Choose HDMI Infoframe Figure 6 2 Infoframe View the input source information 6 1 2 Set Resolution and Frame Rate Set the resolution and frame rate of the input source If the resolutions of th...

Page 14: ...ent If the values of these parameters are not set manually the values that come with the input source can be used On the main menu screen choose Input Settings HDMI Infoframe Override Figure 6 5 Infof...

Page 15: ...g to your actual needs otherwise please skip this step Press the BACK button to go back to the upper level menu and select Resolution Set Mode to Custom or Standard and then set the resolution frame r...

Page 16: ...rature On the main menu screen choose Advanced Functions LED Screen Color Figure 6 11 LED screen color Adjust the Gamma value 1 Select Gamma and then the value becomes editable 2 Rotate the knob to ad...

Page 17: ...rm any of the following operations as required Enable low latency Set the Low Latency switch to to enable the low latency function Set additional frame delay a Select Additional Video Delay and then t...

Page 18: ...ct Sync Source and then select the desired sync source from the drop down options Current Input Sync with the frame rate of the current input source Internal Sync with the frame rate of the controller...

Page 19: ...main menu screen choose Communication Settings Network Settings Figure 7 2 Network settings Choose Mode and then select a mode from the drop down options Manual Manually set a static IP address for th...

Page 20: ...screen always display the current frame The input source is played normally Blackout Make the output screen go black The input source is played normally 7 5 Diagnostics Perform device diagnostics then...

Page 21: ...ry Settings Reset part or all of the device data to the factory settings On the main menu screen choose System Settings Factory Reset Figure 7 7 Factory reset Do any of the following according to the...

Page 22: ...y after the specified amount of time if no action is performed during the time specified On the main menu screen choose System Settings Return to Home Figure 8 2 Session timeout value Select 30s 1min...

Page 23: ...kg Gross weight 3 1 kg Note It is the total weight of the product accessories and packing materials packed according to the packing specifications Packing Information Outer box 387 0 mm 173 0 mm 359...

Page 24: ...XI AN N O VASTAR TECH CO LTD...

Reviews: