Nova Kool NovaJet PRO 600E Quick Start Manual Download Page 19

ENGLISH


NovaJet PRO 600e

          Quick Start   19

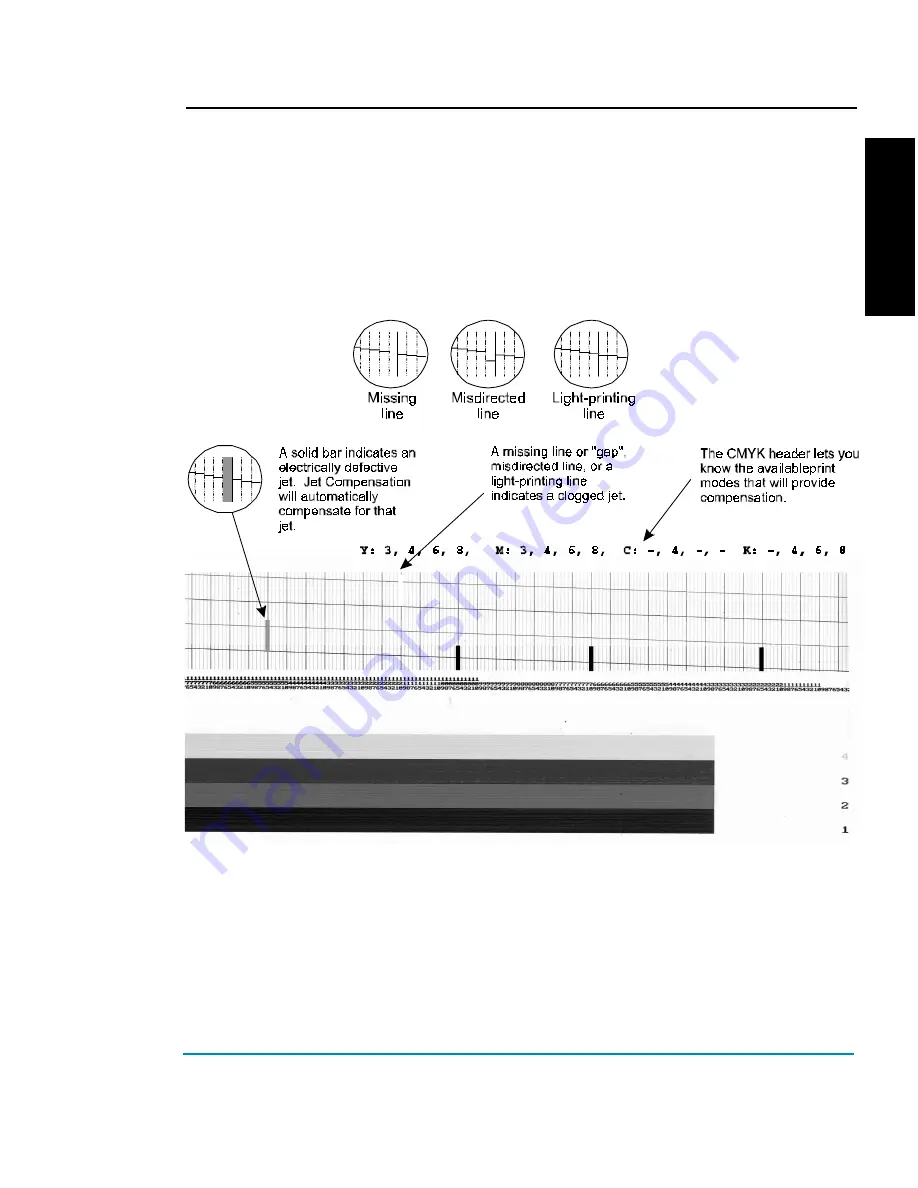
To interpret the Prime test pattern

The test pattern consists of bands of color for each cartridge and a sloping
line. Within the Prime test pattern, each jet is represented with a short
horizontal line. Together, these short horizontal lines form a “stair step”
pattern. Electrically defective jets appear as solid bars. Clogged jets appear
as missing or misdirected lines in the “stair step” pattern. The print modes
for which compensation is available are shown clearly above the Prime.

Clogged jets

Clogged jets cannot be automatically detected and therefore must be cleared manually. If
a jet is clogged, it will appear in the prime pattern as a gap in the sloping line for each
cartridge.

To clear a clogged jet, clean and prime the affected cartridge according to the instruc-
tions in Chapter 4 of the User Guide. Your goal is to eliminate all gaps in the “stair step”
pattern before starting your job.

Summary of Contents for NovaJet PRO 600E

Page 1: ...ered trademarks are the property of their respective owners No part of this manual may be copied or distributed transmitted transcribed stored in a retrieval system or translated in any human or compu...

Page 2: ...PU 8 Using the control panel 10 Choosing menu functions 10 Setting the language 10 Loading media 11 Moving the carriage 12 Installing the cutter 12 Priming the ink delivery lines 15 Printing the color...

Page 3: ...fi v e c a rt r id g e t u b e n ee d l e s s c re w d r i ve r s ta n d s c r ew s l o o p b a c k c a b le a nd w a r ra n t y c a r d P r i nt e r st a n d w it h i nt e g ra t e d m e d i a fe e...

Page 4: ...nd from rolling during subsequent assem bly 4 One of the stand legs has a connector on it Pull the connector from the access hole in the leg and remove the tiewrap holding the connector in place Attac...

Page 5: ...r assembly in the slots provided at the base of the stand Be sure fans will blow upward and toward the printer Position the dryer assembly to the desired angle Replace and tighten the wing nut on the...

Page 6: ...ensor mounting bracket away from the printer if necessary when loading media 10 To load media slide the media roll over the feed roller If you will be using the takeup roller mount an empty media core...

Page 7: ...ge Remove the protective film from the control panel and remove the tape from the ink reservoir cover Do not remove the foam insert located between the rear support bracket and slide shaft on the left...

Page 8: ...0 MB free hard disk space for the application and 15 MB for each of the color tables You will need additional space for RIPing and printing files For Windows 95 installation 1 Insert the CD ROM in you...

Page 9: ...he number of print passes specified will significantly impact the data transfer requirements Less passes require more data conse quently there is a higher probability of stalling when using less passe...

Page 10: ...let you view and modify values Choosing menu functions To select a function press the button adjacent the function displayed The display will list options available for the selected function Press the...

Page 11: ...r and printer leg cause the LCD to blank out and cause the paper axis motor to stop These conditions can be temporary or permanent Depending on the model the printer can use media up to 60 wide The ro...

Page 12: ...power turned on select Utility Access Cartridges on the control panel to move the carriage away from the service station so that you can install change adjust or clean the ink cartridges change the cu...

Page 13: ...n the ink Do not add more than 400 ml of ink or fill higher than 1 2 inch from top of the reservoir Be sure to use the same type of ink i e GA GS or GO in all the reservoirs and ink cartridges Be sure...

Page 14: ...ENCAD distributor dealer for return replacement of the defective cartridge To install the ink cartridges Do not touch the jet area or the flex contact area of the ink cartridge Work with only one ink...

Page 15: ...irs When filling more than one color of ink be sure to thoroughly wipe any excess ink from the NovaPrime before working with the next color to avoid the possibility of contamina tion To install tube n...

Page 16: ...re to stabilize 5 Remove the cartridge from the carriage and remove the blue tape from the jet area of the cartridge CAUTION Do not tilt the cartridge up higher than a 30 degree angle This could cause...

Page 17: ...ink is visible in the NovaPrime sight tube Maintain good contact between the inkjet plate and the pump for an addi tional 5 seconds When removing the NovaPrime use the silicone tip to wipe and clean...

Page 18: ...to the air or with non use Printing the Prime pattern helps to clear the jets and to check that the ink cartridges fire properly ENCAD recommends that you print the prim pattern daily to ensure the b...

Page 19: ...s appear as missing or misdirected lines in the stair step pattern The print modes for which compensation is available are shown clearly above the Prime Clogged jets Clogged jets cannot be automatical...

Page 20: ...ues and adjust them for the best printing results A loupe is provided in the accessory box to help you check the prints You should perform Color Deadband Compensation before perfoming Color Calibratio...

Page 21: ...attern Current heads test pattern Examine the registration in the Current Heads Test Pattern If they are in register your calibration is correct If not perform the following steps to align the printer...

Page 22: ...ou measured Note The Paper Axis Test should be performed every time new media is loaded To print the Paper Axis calibration test pattern 1 Load the printer with media that is at least 36 91 cm inches...

Page 23: ...while others require user input Cartridge related error messages are listed in Appendix F of the User Guide To clear a cartridge related error press Access Cartridges to move the carriage to the posit...

Page 24: ...8 CLEAR FILM 60 X 100 208149 CLEAR FILM 42 X100 208038 WHITE FILM 42 X 100 208039 WHITE FILM 60 X 100 208152 BACKLIT FILM 60 X 100 208153 BACKLIT FILM 42 X 100 209353 CANVAS 42 X 35 209356 CANVAS 60 X...

Reviews: