Norton 6900 PowerMatic Installation Instructions Manual Download Page 4

80-9369-0120-020 (09-08)

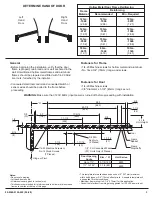
• Determine hand of door from illustration on Page 3.

• Using template, locate and prepare holes in the frame and door:

7/8" (22mm) diameter holes

for conduit, for power input and for switch/sensor wires.

On new construction these holes will generally be drilled by

the frame supplier at their shop or at the time the frame is installed in
the wall.

– Prepare

holes for 1/4-20 machine screws or

No. 14 x 2-3/4" (70mm) wood screws. Blind rivet nuts (by others) are
suggested for unreinforced hollow metal frames or for aluminum
frames.

– Prepare

holes for 3/8" diameter sex nuts. Standard units are

supplied with sex nuts and screws for 1-3/4" (44mm) thick door. Sex
nuts and screws for other door thicknesses are available to order.

• Remove cover from door operator assembly and set cover and cover

screws aside.

• Fasten backplate/control assembly to frame face

Connect conduit to backplate

fastening backplate to frame.

Fasten backplate to frame. Connect

conduit bracket, from screw pack, to the door control's backplate
with two (2) screws provided.Then connect wiring conduit to conduit
bracket on backplate.

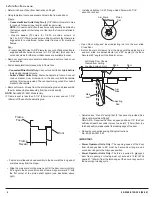
• Remove forearm screws from the arm adjusting rod and disassemble

the arm slide and shoe assembly from the arm assembly.

Series 6920 / 6921 Models Only.

IF frame reveal is less than 3-1/4” (83mm) use a saw and cut 1-7/8”

(48mm) off the end fo the adjusting rod.

Frame

Door

Concealed Wired Units Only: Two (2)

NOTE:

seven (7)

two (2)

Concealed Wired Units Only:

Surface Wired Units Only:

NOTE:

before

Installation Sequence

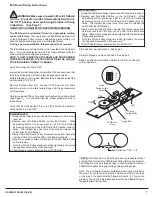
• Fasten arm slide and shoe assembly to the door with the long end of

arm shoe away from the hinge.

• Slide the main arm onto the pinion shaft of the door control unit at a

90° angle to the door control unit and frame. Align arm mark “S” with
the flat corner of the pinion shaft square (see illustration above
right).

Install and tighten 1/4-20 Flange Head Screw with 7/16”

wrench or socket.

• Open Door. Align and insert adjusting rod into the arm slide.

Close Door.

• Rotate the main arm away from the hinge until the adjusting rod

and arm slide are perpendicular (at a 90° angle) to the door.
Secure at 90° angle with the forearm screw.

• Adjust valves “S” and “L” using the 1/8” hex wrench provided. See

Hydraulic Adjustment Page 5

Note: A.D.A. Requires that from an open position of 70° the door

will take at least 3 seconds to move to a point 3” (75mm) from the
latched position, measured at the leading edge of the door.

• Make wire connections using Wiring Instructions

No. 80-9369-0901-020

IMPORTANT:

Power Operator Units Only:

Power Operator Units Only:

The opening speed of the door

from closed position to 80° must be 3 seconds or longer and 4
seconds or longer to the fully open position.

The force required to

a

door from opening or closing must not exceed a 15lbf. (67N)
applied 1" (25mm) from the latch edge of the door at any point in
the opening or closing cycle.

prevent

Left Hand Door Shown
Viewed from ceiling
Looking down on Unit

4

Adjusting

Rod

Arm

Slide

Door

Shoe

Main
Arm

R

L

Y

S

Z

Pinion

Flat

Arm Mark

Frame

Face

Frame

Reveal

Door

Summary of Contents for 6900 PowerMatic

Page 1: ...ceed all of the requirements for the Power Assist Door POR Function is designed to meet or exceed all of the requirements for the Low Energy Power Operated Door C US UL 6900 PowerMatic Low Energy Power Operator Installation Instructions Activation Modes Modes are configured during installation Selectively Activated Mode Automatically Activated Mode Functions Functions are configured during install...

Page 2: ...ng on butt hinges 5 127mm max width or 3 4 19mm offset pivots A separate door and frame preparation template will be supplied for other conditions Door thickness must be 1 3 4 44mm minimum 2 1 4 57mm maximum Door must swing freely through the entire opening and closing cycle before beginning the installation Use of a supplemental door stop is always recommended Requirements 2 SC SC XX XXXX PAS DN ...

Page 3: ...ameter x 1 3 4 45mm long sex nut WARNING Make sure that 120V 60Hz input power is turned off before proceeding with installation 1 2 13 5 16 8 7 1 4 184 1 11 16 43 1 7 16 37 5 8 16 3 8 10 4 0 102 A 11 1 2 292 17 5 16 440 23 7 8 606 26 0 660 3 8 10 1 1 4 32 Notes Do not scale drawing Left hand door shown All dimensions are given in inches mm Thickness recommended for reinforcements in hollow metal d...

Page 4: ...ven 7 two 2 ConcealedWired Units Only Surface Wired Units Only NOTE before Installation Sequence Fasten arm slide and shoe assembly to the door with the long end of arm shoe away from the hinge Slide the main arm onto the pinion shaft of the door control unit at a 90 angle to the door control unit and frame Align arm mark S with the flat corner of the pinion shaft square see illustration above rig...

Page 5: ...Backcheck B valve as necessary for hydraulic resistance to door opening in the backcheck range See illustration on Page 2 1 8 Hex Key Slower Closing Faster Closing Closing Cycle Closed 10 L a t c h R a n g e S weep Range 1 8 Hex Key Increase Cushion Decrease Cushion Opening Cycle Backcheck O p e n i n g Length of Time Seconds Setting 0 2 5 10 15 20 25 30 0 1 2 3 4 5 6 7 If desired install No 668 S...

Page 6: ... power cycle starts 3 Read the EXSOL DLY rotary switch timer pot to determine how long solenoid should be energized or de energized depending upon function required 4 Read th SW1 2 A D dip switch to determine how long solenoid should be energized 5 Read the M DLY rotary switch timer pot to determine how long before the pump motor and solenoid valve tu n on 6 When ELS board reaches upper taught lim...

Page 7: ...AD STEPS COMPLETELY BEFORE PROCEEDING The ELS board is calibrated Timed to appropriate starting zone at the factory During a normal installation this procedure is not required If for any reason the ELS Board was removed or the ELS Board Pulley is turned without the pinion turning it is likely the ELS board will need to be re calibrated timed The ELS board may be timed while unit is mounted to the ...

Page 8: ...eck SC Speed Control Valve setting Door may be opening too slowly Turn SC valve clockwise to increase speed 4 There may be wind or some other positive pressure present Adjust Obstruction Sensitivity to a longer time setting See page 7 PowerMatic Motor turns on and re activates door before it reaches jam or closed position a This could be caused by the unit sensing an obstruction on Closing 1 Check...

Reviews: