background image


Please read the manual carefully, before you start. Then follow it step by step. 


1) 

Scope of delivery:


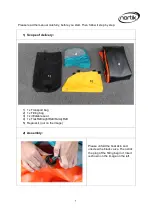
1)  1x Transport bag 
2)  1x Filling bag 
3)  1x inflatable seat 
4)  1x TrekRaft/LightRaft/FamilyRaft 
5)  Repair-kit (not on the image) 


2)  Assembly: 


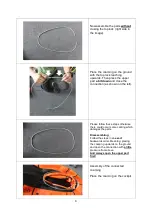
Please unfold the boat skin and 
unscrew the black valve. Then stick 
the plug of the filling bag in it, like it 
is shown on the image on the left. 
 

1) 

2) 

3) 

4) 

Summary of Contents for Packraft FamilyRaft

Page 1: ...Assembling Instruction nortik Packraft Line TrekRaft LightRaft FamilyRaft QR code assembly instruction TrekRaft ...

Page 2: ...delivery 1 1x Transport bag 2 1x Filling bag 3 1x inflatable seat 4 1x TrekRaft LightRaft FamilyRaft 5 Repair kit not on the image 2 Assembly Please unfold the boat skin and unscrew the black valve Then stick the plug of the filling bag in it like it is shown on the image on the left 1 2 3 4 ...

Page 3: ...the second valve and your mouth TrekRaft with deck If you have a TrekRaft with deck please read the advice for installing the coaming before fully inflating You find them after the next page The general method of inflating the boat is shown in the following Pull the filling bag up and wrap it together That way air is trapped inside then proceed to fold it downwards That way air is going to be push...

Page 4: ...l enough air is in the boat Blow up the boat till there is enough pressure it If you do that by your own without a pump there is no danger that too much pressure will be generated TrekRaft with deck Installation and handling of the coaming The coaming is going to be installed when there s just a little air in the TrekRaft The procedure of assembling and disassembling of the coaming must be followe...

Page 5: ...e connection as shown on the left Please follow these steps otherwise there could occur some canting which damages the parts Disassembling Follow the steps in an exact backwards order Meaning placing the coaming upwards on the ground and open the connection with a little pressure from above And always open the upper part first Assembly of the connected coaming Place the coaming on the cockpit ...

Page 6: ...rst time but gets easier with practice When the coaming is in position the fortification cord is placed around it The disassembling works by following the steps in backward order Seat Inflate the seat Then the seat is fixed in the mounting inside the boat Your TrekRaft is now ready for action ...

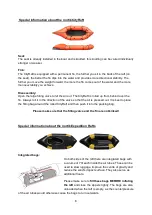
Page 7: ... fin Always roll it in the direction of the valve so that the air is pressed out It is best to place the filling bag around the rolled CityRaft and then push it into the packing bag Please make sure that the filling valve and the fin are not kinked Special information about the nortik Expedition Rafts Integrated bags On both sides of the raft there are integrated bags with a volume of 70l each ins...

Page 8: ...e pressure in the air tubes from time to time Air expands when it heats up Therefore prevent that through solar radiation a to high pressure is build up and drain some air if necessary Please only sit in the boat if it s completely in the water and hasn t any contact to the ground anymore Safety Please always wear a life jacket if you are in the water with your boat Be beware of quick weather chan...

Page 9: ... now The glue is sensitive to moisture Protect from light and heat Always store already opened tubes of Stormsure in the ice compartment Before using Stormsure always make sure that it has room temperature Safety Stormsure contains Isocyanate read the according warning information Watch videos of mending on YouTube http www youtube com user Glueshop Additional information concerning the glue under...

Reviews: