background image

11

Pages 2 and 3

). Make sure the outlet is in good condition and that the plug is not loose.

NEVER

exceed the maximum amperage for the circuit.

DO NOT

plug other appliances into the same circuit.

Methods of Operation

This electric fireplace can be operated by the CONTROL PANEL, located on the right side panel of
the fireplace (see figure below), or by the battery-powered REMOTE CONTROL.
The operation and functions of the two methods are the same.
Before operating, please review the

IMPORTANT SAFETY INFORMATION

on

Pages 2 and 3,

and

heed all warnings.

Control Panel / Remote Control Operation

(Control panel POWER switch must be ON to use remote control.)

BUTTON

FUNCTION

ACTION & INDICATION

POWER

ON

: Enables control panel functions and

remote control. Turns on flame effect.

OFF

: Disables control panel functions and

remote control. Turns off flame effect.

1.

Press once

. Indicator light turns on.

Power turns on. All functions enabled.

2.

Press again

. Flame effect turns off.

Power and all functions turn off.

TIMER

TIMER button

: Controls timer settings to

turn off fireplace at selected time.
Settings range from 0.5 hours to 7.5 hours.

1.

Press once

. Indicator light turns on.

Timer is set to 0.5 hours.

2.

Press again until desired setting is

reached

. Indicator lights show setting.

FLAME -

FLAME “-”

: Makes flame effect dimmer.

NOTE:

Flame effect stays on until power

button is turned off. Flame effect must be
on for heater to turn on.

1.

Press once

. Flame effect gets dimmer.

2.

Press again until desired setting is

reached

. Flame effect continues to get

dimmer each time button is pressed.

Summary of Contents for 80-421S

Page 1: ...NING Read and understand this entire owner s manual including all safety information before plugging in or using this product Failure to do so could result in fire electric shock or serious personal injury CAUTION Keep this owner s manual for future reference If you sell or give this product away make sure this manual accompanies this product ...

Page 2: ...re DO NOT block air intakes or exhaust in any manner Doing so could cause a fire DO NOT use on soft surfaces like a bed where openings may become blocked A heater has hot and arcing or sparking parts inside DO NOT use it in areas where gasoline paint or flammable liquids are used or stored Use this heater only as described in this manual Any other use not recommended by the manufacturer may cause ...

Page 3: ...the cord must be at least 14AWG and the rating must be at least 1875 Watts NEVER use a smaller gauge cord with a lower rating Doing so may result in fire or electric shock ONLY use this heater on a 120V AC 15 Amp grounded circuit NEVER overload the circuit If this heater trips the circuit breaker unplug all other appliances on the same circuit before the next use Avoid plugging other appliances in...

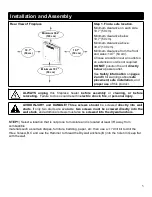
Page 4: ...ll parts and hardware from the carton and place them on a clean soft dry surface Parts and assembly steps are grouped for free standing or wall hanging use Check the parts list to make sure nothing is missing Dispose of packaging materials properly Please recycle whenever possible You will need the following tools not included Phillips screwdriver stud finder level tape measure electric drill 7 wo...

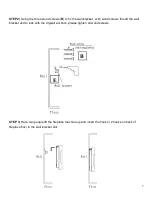
Page 5: ...before assembly or cleaning or before relocating Failure to do so could result in electric shock fire or personal injury AVOID INJURY and DAMAGE Three screws should be screwed directly into wall studs If only two studs are available two screws must be screwed directly into the wall studs and additional screws must also be screwed into the drywall anchors STEP1 Select a location that is not prone t...

Page 6: ...6 C ...

Page 7: ...l bracket with wood screws thread the wall bracket and to lock with the drywall anchors please tighten all wood screws STEP 3 Have two people lift the fireplace machine up and insert the hooks 2 hooks on back of fireplace box to the wall bracket slot B E ...

Page 8: ...e installed safely then using screws driver to lock the bracket and fireplace with two ST4x10 D screws in both sides Check the appliance for stability ensuring that the appliance will not pull free from the wall ST4x10 2 pcs D A ...

Page 9: ...9 Installation for Pebbles ...

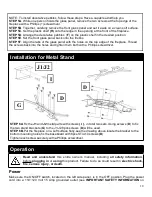
Page 10: ...holes and tighten them both with a Phillips screwdriver Installation for Metal Stand STEP 6A Fix the J1 and J2 metal parts with screws I in total two sets Using screws D to fix the two stand brackets G to the J1 J2 8pcs screws D will be used STEP 6B Put the fireplace on a soft surface flatly see the drawing above locate the bracket to the bottom mounting holes fix the baseboard with 8pcs ST4x10 sc...

Page 11: ...ATION POWER ON Enables control panel functions and remote control Turns on flame effect OFF Disables control panel functions and remote control Turns off flame effect 1 Press once Indicator light turns on Power turns on All functions enabled 2 Press again Flame effect turns off Power and all functions turn off TIMER TIMER button Controls timer settings to turn off fireplace at selected time Settin...

Page 12: ... for a long period of time NOTICE To improve operation aim the remote control at the front of the fireplace DO NOT press the buttons too quickly Give the unit time to respond to each command Temperature Limiting Control This heater is equipped with a Temperature Limiting Control Should the heater reach an unsafe temperature 212 F 100 C the heater will automatically turn OFF To reset 1 Unplug the p...

Page 13: ...uster to remove dust and dirt from the heater and vent areas Plastic Wipe gently with a slightly damp cloth and a mild solution of dish soap and warm water NEVER use abrasive cleansers liquid sprays or any cleaner that could scratch the surface Maintenance Risk of electric shock DO NOT OPEN any panels No user serviceable parts inside ALWAYS turn the heater OFF and unplug the power cord from the ou...

Reviews: