background image


10

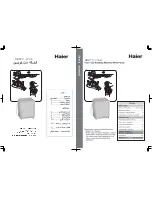
XI.) Adjust Pressure 

The unloader valve regulates the operating pressure of 
the pump.  You can change the pressure by turning the 
adjustment


knob on the unloader. The maximum 

pressure is set at the factory and locked. 


WARNING:  Do not alter the unloader valve’s 
maximum pressure. Excess pressures could cause 
serious injury and/or pump damage.  Any alteration 
other than turning the adjustment knob will void 
your warranty. 
 

You can install an optional pressure gauge from 
Northern Tool and Equipment Co. p/n 53618(gauge 
reads in PSI) to your pressure washer. To order call 
(800) 556-7885.  
A.) Follow Shut-Down Instructions. 
B.) Cut away decal from hole(shown below). 
C.) Remove plug. 
D.) Apply teflon tape to threads. 
E.) Thread pressure gauge into port.  


XII.) Cleaning


WARNING: Wear eye, ear, hand, foot and skin 
protection at all times while operating this pressure 
washer. 
DANGER: Do not point the spray wand at yourself or 
at any person.  Bodily injury may result from water 
under high pressure.


CAUTION: Be careful on painted or delicate 
surfaces. The pressure may damage the surface if 
the nozzle is too close. 
IMPORTANT: Your spray gun is equipped with a 
built-in trigger safety latch to guard against 
accidental trigger actuation and potentially 
dangerous high pressure spray.  Rotate the safety 
latch to the locked position when not spraying. 


A.) Hold the lance with two hands, have a sturdy stance. 
B.) Point lance at dirty surface and squeeze trigger.


C.) Wash from the bottom to the top, using side to side 

motions.  This washes away heavy dirt and allows the 
detergent to soak as you work toward the top. 

D.) Use the width of the spray pattern to wash in a wide 

path.  Overlap spray paths for complete coverage. 

E.) The nozzle should be 12” to 24” from the work, 

closer for tough areas.  

F.) Small parts should be washed in a basket so the 

pressure does not push them away.  Larger, light 
weight parts should be clamped down. 

G.) The pressure washer is set to the maximum rated 

pressure when it leaves the factory. There are two 
easy ways to lower your pressure. 


a. Turn the black unloader knob counter clockwise 


b. Reduce the engine speed. 


XIII.) Shut-Down Instructions 

WARNING: Do not leave an operating machine 
unattended.  Always shut the machine OFF and 
relieve the pressure before leaving the machine.  
Never disconnect the high pressure hose from the 
pump or spray gun while the system is pressurized. 
Depressurize the system by squeezing the spray 
gun trigger after the engine is turned OFF.


A.) Turn engine OFF. 
B.) Close engine fuel line valve. 
C.) Turn water supply OFF. 
D.) Actuate spray gun trigger to relieve system pressure. 
E.) Remove garden hose. 
F.) Remove pressure hose. 


Pressure 
Adjustment 
Knob 

00479


00417


Safety 

Hole covered 

by decal

Pressure Gauge

#53618

Summary of Contents for MPPWE

Page 1: ...rgent pump oil item 4043 or Cat Pump oil item 22158 for oil changes Water Make sure your water flow is 20 higher than the pressure washer s flow rate Make sure your water is clean and particle free Storage Do not allow water to freeze in the pump hose or spray gun Add fuel stabilizer to the fuel tank before long term storage Spraying Chemicals Use any North Star brand or equivalent pressure washer...

Page 2: ...eep good footing and balance at all times Wear footwear capable of maintaining a good grip on wet surfaces Do not place the machine on soft or unstable ground 8 Follow the maintenance instructions specified in all manuals Do not run machine without sufficient lubrication or sufficient water to cool the pump 9 Wear safety glasses gloves face protection and appropriate clothing when operating the ma...

Page 3: ...ion Ref Description 1 Hose Gun Holder 6 Water Outlet Pressure Hose 2 Water Inlet Garden Hose 7 Pressure Adjustment unloader 3 Easy Start Knob 8 Inlet Filter 4 Engine Start Stop Switch 9 Engine Oil Drain 5 Engine Oil Fill 10 Engine Controls see engine manual 00477 7 2 9 1 5 10 4 6 3 8 ...

Page 4: ... 1 Chemical Injector Qty 1 Clear Hose Qty 1 Chemical Strainer Qty 1 5 16 Flange Nut Qty 2 10 x 3 4 Hex Bolt Qty 1 Handle Ear Qty 2 Vented Dipstick Qty 1 Handle Knob Qty 2 Handle Qty 1 Wheel Qty 2 Hose Hook Qty 1 Engine Pump Base Assembly Qty 1 Fastener Bag Qty 1 5 16 18 x 1 Carriage Bolt Qty 2 5 16 18 x 3 4 Carriage Bolt Qty 6 5 16 Flat Washer Qty 2 5 16 x 3 4 Hex Bolt Qty 2 5 16 Lock Washer Qty 6...

Page 5: ...Ear 2 B Attach Handle to Hinge Ears with carriage bolts flat washers and nyloc nuts Tighten nyloc nuts then loosen 1 4 turn so handle hinges freely Item Description Qty 32459 Handle 1 5 16 18 x 3 4 Carriage Bolt Qty 4 5 16 Lock Washer Qty 4 5 16 18 Hex Nut Qty 4 Hinge Ear 00488 00489 00490 5 16 18 x 1 Carriage Bolt Qty 2 5 16 Flat Washer Qty 2 5 16 18 Nyloc Nut Qty 2 Handle 00491 ...

Page 6: ...ption Qty 32463 Knob 2 32738 Spacer 2 D Attach Hose Hook to Handle with bolts lock washer and hex nuts Insert Grommets as shown Item Description Qty 32612 Hose Hook 1 17156 Grommet 5 5 16 18 x 3 4 Carriage Bolt Qty 2 5 16 Lock Washer Qty 2 5 16 18 Hex Nut Qty 2 Hose Hook Grommet Knob 00493 00494 00489 Knob Spacer ...

Page 7: ... the shipping plug from the oil fill hole B Screw the vented dipstick into oil fill hole C Check oil level in the pump Make sure it is between the max min marks on the vented dipstick TP2530 EZ4040 Cat Pumps Only A Remove shipping tape from oil fill cap B Make sure the oil is 1 2 way up oil sight glass C Push yellow cap onto red oil fill cap 157820 Only 4SF40G51 2SFX30GZ 5DX40G1 V Engine Preparati...

Page 8: ...flow 3 x 1 20 3 6gpm 5gallons 3 6gpm 1 39 minutes 1 39min x 60sec min 83 seconds Therefore you must be able to fill a 5 gallon bucket in 83 seconds or faster C The water supply garden hose must have an inside diameter of at least 5 8 If the hose is more than 100 ft long the diameter must be at least 3 4 D Never use a reservoir tank as a water source This pressure washer is designed for a pressuriz...

Page 9: ...er is equipped with a low pressure chemical injector The proper chemical used for the proper application can speed up cleaning jobs tremendously A Snap the quick couple chemical injector onto the pump outlet and high pressure hose and submerge the suction strainer into the chemical solution B You need to use the black nozzle to spray chemicals onto the cleaning surface C The amount of chemical app...

Page 10: ... Rotate the safety latch to the locked position when not spraying A Hold the lance with two hands have a sturdy stance B Point lance at dirty surface and squeeze trigger C Wash from the bottom to the top using side to side motions This washes away heavy dirt and allows the detergent to soak as you work toward the top D Use the width of the spray pattern to wash in a wide path Overlap spray paths f...

Page 11: ...l protector discharges water when it reaches 140 F preventing pump damage Maintenance Instructions Refer to the Honda Engine Owner s Manual for Engine Maintenance Instructions Maintenance Mode Before performing any maintenance on the pressure washer it must be placed in maintenance mode A Turn off engine B Turn off water supply C Bleed water from system D Shut off fuel valve E Unplug spark plug wi...

Page 12: ...pe of Fluid QTY General TP2530 SAE 30 11 0oz 0 33L General EZ4040 SAE 30 14 0oz 0 41L Non Detergent Oil order pump oil Item 4043 TP2530 EZ4040 Changing The Pump Oil Cat Change oil after first 50 hours then every 3 months or 500 hours 1 Remove oil drain plug 2 Drain pump oil 3 Replace oil drain plug 4 Remove yellow rain cap 157820 only 5 Remove oil fill cap 6 Fill pump with SAE 30 non detergent pum...

Page 13: ...pressure washer with high pressure hose for five minutes 3 Shut down pressure washer by turning engine start switch OFF 4 Disconnect high pressure and garden hose 5 Remove spark plug turn engine start switch OFF and turn fuel valve OFF 6 Pour one teaspoon of engine oil into spark plug hole Cover the spark plug hole with a rag and turn engine over several times to lubricate cylinder 7 Replace spark...

Page 14: ... clean screen carefully Need to use high pressure nozzle Change to the green nozzle Plugged nozzle Remove nozzle check for blockage Worn nozzle Replace nozzle Leak in high pressure line Fix leaks NO CHEMICAL INJECTION Causes Solutions Adjustment knob turned OFF Rotate adjustment knob counter clockwise Need to use different nozzle Change to the black nozzle Back pressure from extra long hose Try sh...

Page 15: ... hose 1 157818 19 20 30 5232 Rubber Gasket 1 all 31 30623 Inlet Quick Couple Nipple 1 all ITEM PART DESCRIPTION QTY MODEL 32 30624 Inlet Quick Coupler 1 all 33 313108 Coupler 3 8 female npt 1 all 34 32084 50 x 3 8 x 3000 PSI Hose 1 157816 17 18 32270 50 x 3 8 x 4000 PSI Hose 1 157819 20 35 313109 Q C Nipple 3 8 female npt 1 all 36 313107 Coupler 3 8 male npt 1 all 37 2227 Spray Gun 1 all 38 22622 ...

Page 16: ... BEARING 1 25 98 2103 00 OIL DIP STICK 1 26 92 2216 00 NUT 3 27 96 7008 00 WASHER 3 28 51 0400 09 PLUNGER 15mm 3 29 90 3572 00 O RING 3 30 90 5022 00 BACK UP RING 3 31 96 0707 00 FLINGER WASHER 3 32 97 0310 00 CONNECTING ROD PIN 3 33 51 1600 22 CRANKCASE COVER 1 34 99 1867 00 SCREW 4 ITEM PART DESCRIPTION QTY 35 90 3917 00 COVER O RING 1 36 51 0301 22 CONNECTING ROD 3 37 51 0500 56 PLUNGER ROD 3 4...

Page 17: ...29 97 7340 00 PIN 3 30 96 6967 00 WASHER 3 33 44 0402 66 PLUNGER 13mm 3 40 90 3612 00 O RING 3 41 44 0803 70 PACKING RETAINER 3 42 44 2162 70 INTERMEDIATE RING 3 43 90 5076 00 PACKING 3 44 90 2602 00 PACKING 3 ITEM PART DESCRIPTION QTY 45 44 1002 51 HEAD RING 3 46 98 2100 00 CAP SCREW 1 47 98 2176 00 CAP SCREW 1 48 96 7380 00 WASHER 1 49 96 7514 00 WASHER 1 50 98 1966 00 CAP SCREW 1 51 90 2603 00 ...

Page 18: ...3 106 44876 LPS w S Spg 3 110 44874 Manifold Inlet 1 124 45847 Ceramic Plunger 3 125 43245 HPS w S PS 3 134 45854 Valve Inlet 3 135 44871 Spacer 3 136 44872 Spring Inlet Valve 3 137 88575 Washer Conical M6 3 ITEM PART DESCRIPTION QTY 138 81240 Nut Hex M6 3 152 26089 O Ring Adapter 80 3 157 44878 Spacer Discharge Seat 3 159 26089 O Ring Adapter 80 3 164 44881 Seat 3 166 43723 Valve 3 167 541062 Spr...

Page 19: ... Rod 3 65 46728 Plunger Rod 3 70 29257 Oil Seal Crankcase 3 75 46732 Barrier Slinger 3 90 46727 Plunger 3 98 46730 Sealing Gasket Plunger Retainer 3 99 46729 Plunger Retainer 3 100 46408 Seal Retainer 3 106 46435 Lo Pressure Seal 3 120 46471 Seal Case 3 121 13980 O Ring Seal Case 3 ITEM PART DESCRIPTION QTY 127 46617 V Packing 3 128 46618 Male Adapter 3 163 17547 O Ring Seal Case 6 164 46658 Valve...

Page 20: ...essure Seal 3 110 45187 Inlet Manifold 1 124 45848 Plunger 3 126 45190 Female Adapter 3 127 45191 V Packing 6 134 45845 Inlet Valve 3 135 44871 Spacer 3 136 45186 Inlet Valve Spring 3 ITEM PART DESCRIPTION QTY 137 88575 Conical Washer M6 3 138 27000 Slotted Nut M6 3 139 14158 Cotterpin 3 152 43781 O Ring Adapter 6 153 21986 Back up Ring Adapter 6 157 45192 Adapter Spacer 3 164 45194 Valve Seat 3 1...

Reviews: