Page 8 of 10
Disconnect electrical plug or spark plug lead from the power source. Accidental start up could
cause serious personal injury.
ASSEMBLY OF CHAIN SAW SHARPENING ATTACHMENT
Because there are different sizes and types of chains used on different saws, your new sharpener must
be assembled to suit your particular chain. To do this:
1. First determine the size and pitch of your saw chain. Refer to your chain saw owner’s manual, your
chain saw instruction manual or contact the chain manufacturer for this information.
2. Refer to the chart below for the correct grinding stone.
Chain Size / Pitch
Grinding Wheel Size (Diameter)
1/4" PITCH
5/32"
3/8" PITCH
7/32"
3/8" PITCH LOW PROFILE (LP)
5/32"
5/16" PITCH
3/16"
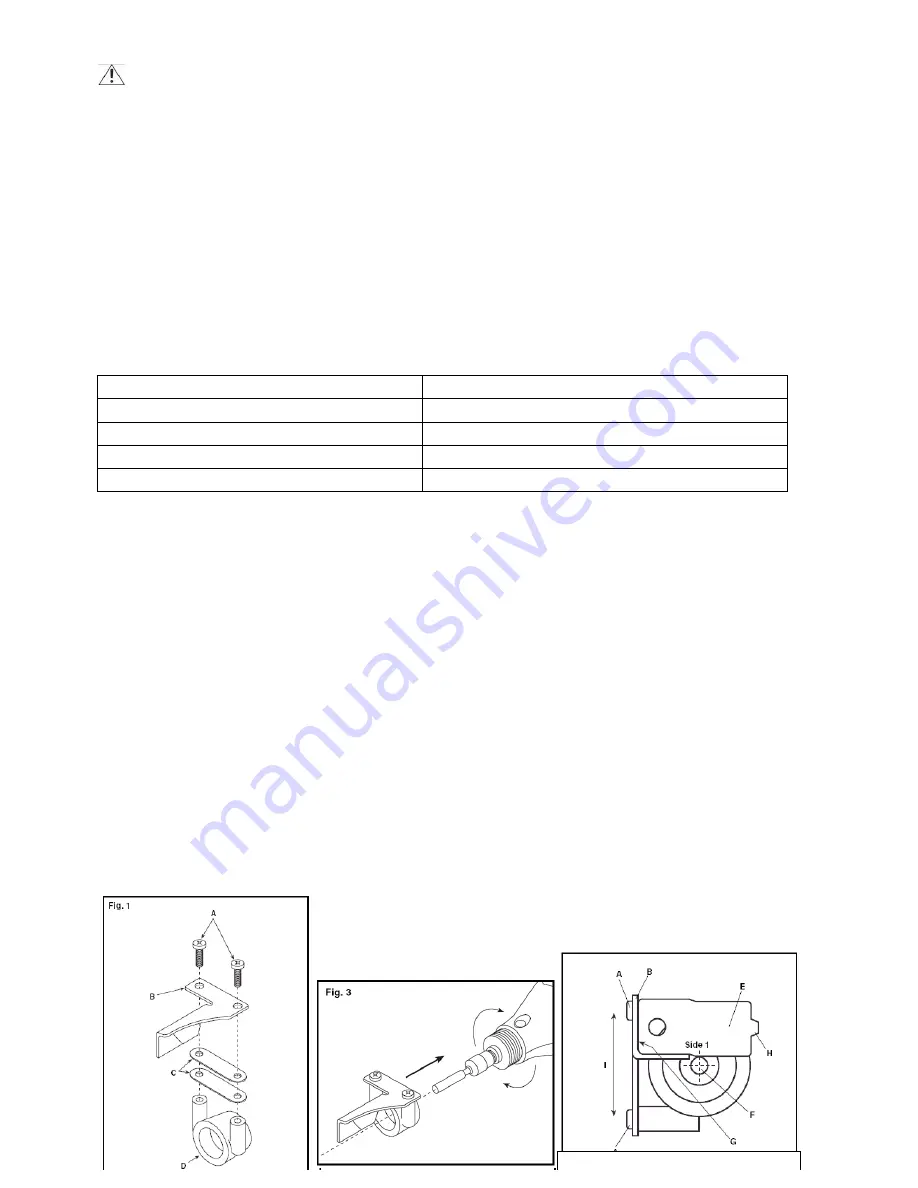
3. When you have determined the correct grinding stone for your chain from the chart, assemble
attachment by screwing the guide (B) and appropriate number of spacers (C) to the clamp (D) using the
two screws (A), as shown in figure 1.
• If using the 7/32" diameter (pink) grinding stone, assemble
both spacers
between the guide and the
clamp.
• If using the 3/16" diameter (orange) grinding stone, assemble with
only one spacer
between the
guide and the clamp.
• If using the 5/32" diameter (blue) grinding stone,
no spacers
are needed.
4. Securely mount the correct grinding stone in your tool with approximately 1/4" of the shank exposed
between the chuck cap and the stone (Figure 2). Use the rotary tool wrench to securely tighten the
chuck cap.
5. Screw on the chain saw sharpening attachment (Figure 3) to the rotary tool.
6. Using the appropriate side of the gauge (E) (see above chart), check to see if the guide (B) is
properly positioned in respect to the grinding stone (F). The gauge must be flush with the corner (G) of
the guide while making contact with the grinding stone (Figure 4).
If the guide is not properly positioned, use a screwdriver (the end of the gauge has a screwdriver (H) on
it) to loosen the two guide mounting screws (A) enough so the guide can be moved (I). It has elongated
holes to allow for adjustment. Using the appropriate side of the gauge, adjust the guide so it is properly
positioned in respect to the grinding stone and tighten the screws.
VIEW: Looking down at the tip of the tool
with guide mounting screws to the left.


