background image

4

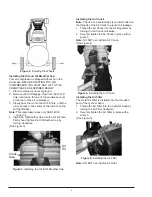
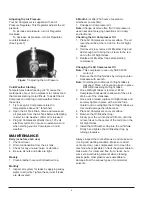
Installing the Oil and Oil Breather Cap

Your air compressor is shipped without oil in the

crankcase. BEFORE STARTING THE AIR

COMPRESSOR YOU MUST ADD OIL TO THE

CRANKCASE AS DESCRIBED BELOW:

1. Place compressor on level ground.

2. Remove the Oil Shipping Plug from the Oil Fill

hole, located on the top of the crankcase cover

at the rear of the air compressor.

3. Slowly pour the oil into the Oil Fill hole, until the

oil level rises to the center of the red dot on the

Oil Sight Glass.

Note:

This compressor uses only SAE 5W-30 

motor oil.

4. Install the Oil Breather Cap into the Oil Fill hole.

Firmly hand tighten the Oil Breather Cap by

turning clockwise.

(See Figure 3)

Installing the Air Chuck

Note: 

The use of a sealant tape is recommended on

the threads of the Air Chuck to prevent air leakage.

1. Thread the Air Chuck into the Air Regulator by

turning the Air Chuck clockwise.

2. Securely tighten the Air Chuck in place with a

wrench.

Note:

DO NOT over tighten Air Chuck.

(See Figure 4)

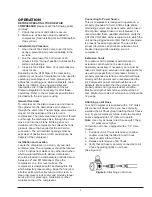
Installing the Air Filter

The metal Air Filter is installed into the threaded

port of the cylinder head.

1. Thread the Air Filter into the Cylinder Head by

turning the Air Filter clockwise.

2. Securely tighten the Air Filter in place with a

wrench.

(See Figure 5)

Note:

DO NOT over tighten Air Filter.

Figure 4.

Installing the Air Chuck

Figure 3.

Installing the Oil & Oil Breather Cap

Figure 5.

Installing the Air Filter

Oil

Fill

Crank-

case

Figure 2.

Installing the Wheels


Summary of Contents for 123007

Page 1: ...2 HP 8 GALLON AIR COMPRESSOR OPERATING MANUAL Item 123007...

Page 2: ...uction manual cannot cover all possible conditions or situations that could occur It must be understood by the operator that common sense and caution are factors which cannot be built into this produc...

Page 3: ...isk of starting the tool accidentally 14 Do not force tool Use the correct tool for your application The correct tool will do the job better and safer at the rate for which it was designed 15 Do not u...

Page 4: ...ndicate the amount of air pressure built up in the air tank as well as the air pressure being delivered to the air chuck Safety Valve The Safety Valve device relieves pressure from the Air Tank in the...

Page 5: ...eather Cap by turning clockwise See Figure 3 Installing the Air Chuck Note The use of a sealant tape is recommended on the threads of the Air Chuck to prevent air leakage 1 Thread the Air Chuck into t...

Page 6: ...ace The compressor is designed with heat dissipation fins which allow for proper cooling Keep the fins and all other parts which collect dust or dirt clean A clean compressor runs cooler and provides...

Page 7: ...Compressor Oil 1 Place Air Compressor on level surface The oil level should be at the red dot on the Oil Sight Glass 2 If oil level is low remove Oil Breather Cap and add enough oil to bring the oil...

Page 8: ...1 Defective Pressure Switch 1 Too much Oil in Crankcase 2 Compressor Overheated 3 Restricted Oil Breather Cap CORRECTIVE ACTION 1 Replace or Reset Fuse Circuit Breaker 2 Check Wiring Connections 1 Re...

Page 9: ...lator 1 66 Air Chuck 1 67 Pressure Gauge 1 68 Screw M8X30 4 69 Unload Pipe 1 70 Check Valve 71 Power Cord 1 72 Tank Drain Valve 1 73 Rubber Feet 1 74 Washer 1 75 Screw M8X25 1 1 Air Tank 1 2 Nut M8 9...

Page 10: ...9...

Page 11: ......
Reviews: