background image

Accessories

82

Accessories

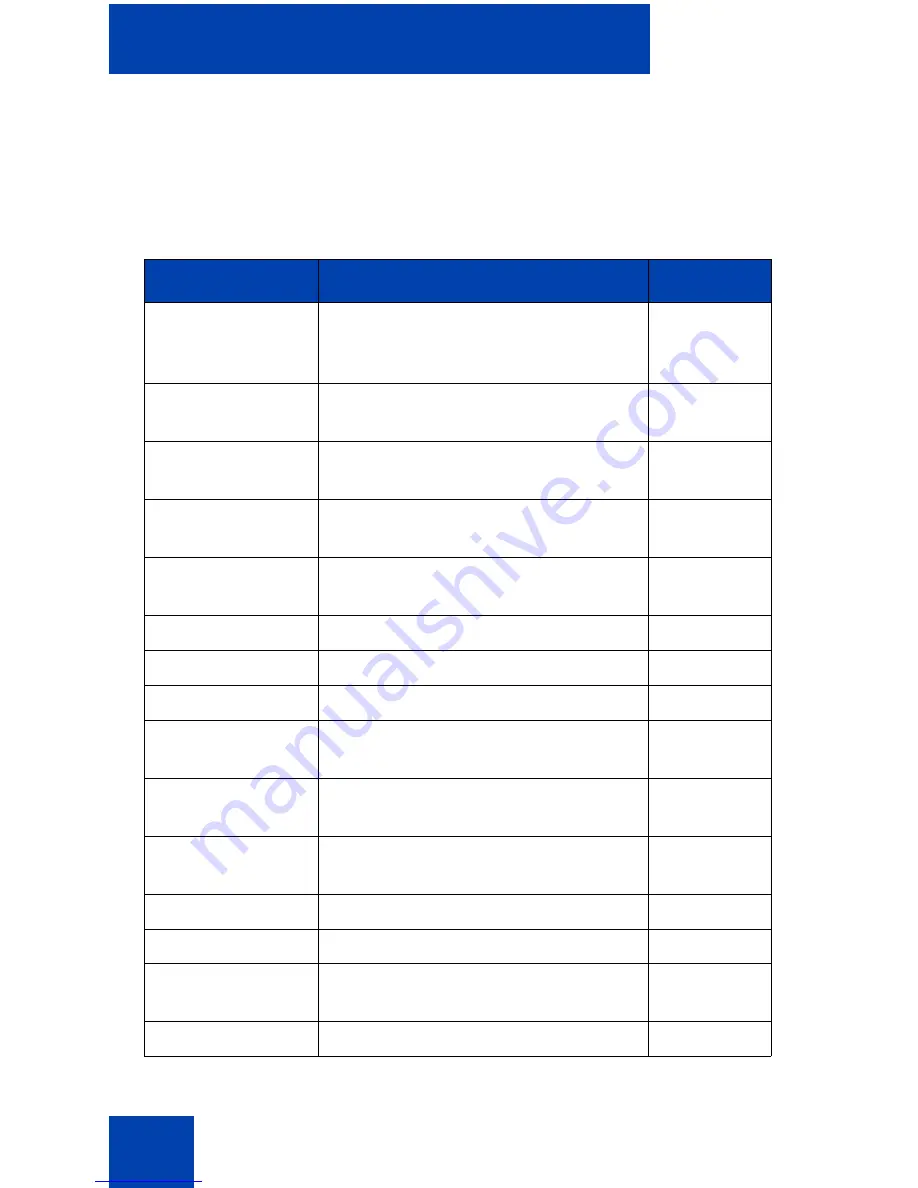
Table 9 lists accessories that are available for the DECT Handset 4065R.

Table 9: Accessories

Item

Description

Order Code

AC Adapter 
Charging Rack 
Base

AC Adapter for charging rack base – 
International/UK mains plug

N0026094

AC Adapter Int

AC Adapter for Desktop Charger – 
International mains plug

N0035845

AC Adapter Int 
Plus

AC Adapter for Desktop Charger 
Plus – International mains plug

N0035850

AC Adapter UK

AC Adapter for Desktop Charger – 
UK mains plug

N0035846

AC Adapter UK 
Plus

AC Adapter for Desktop Charger 
Plus – UK mains plug

N0035851

Battery Pack

Extra handset battery

N0035856

Belt Clip

Extra belt clip

N0035857

Desktop Charger

N0035849

Desktop Charger 
Plus

Charger that allows you to charge 
more than one battery at one time

N0035854

Handset carry 
Case

Leather pouch plus pouch belt clip

N0035855

Handset Charging 
Rack Base

Base for charging rack, supporting 
up to eight charging racks

N0041285

Headset

A0550712

MEM Card

Replacement MEM card

N0035858

MEM Card Tool 

USB MEM card tool including 
Application CD.

N0035860

Rack Charger 

Charger for rack charger base

N0041286

Get user manuals: 

See SafeManuals.com


Summary of Contents for 4065R

Page 1: ...Nortel Communication Server 1000 DECT Handset 4065R User Guide Title page Get user manuals See SafeManuals com...

Page 2: ...Get user manuals See SafeManuals com...

Page 3: ...Revision history 3 Revision history September 2005 Standard 1 00 This document is issued to support Nortel Communication Server 1000 Release 4 5 software Get user manuals See SafeManuals com...

Page 4: ...Revision history 4 Get user manuals See SafeManuals com...

Page 5: ...the handset on or off 16 Keys and display 16 Handset illumination 21 Locking or unlocking the dialpad 21 Menu Shortcuts 22 Calling features 23 Making a call 23 Answering a call 26 Changing settings d...

Page 6: ...ing a number to the Telephone Book 49 Deleting an entry or deleting all entries 50 Using the Caller Filter list 52 Working with Caller Filter 52 Audio settings 56 Adjusting Ringer Settings 56 Adjustin...

Page 7: ...to IEC 60 529 Use only in countries where authorized Sensitive electronic equipment Any radio based equipment can potentially cause interference with other equipment and can receive interference from...

Page 8: ...e personnel WARNING Do not use the handset in a vehicle or hazardous location CAUTION This product contains magnetic material Be aware that small metallic objects can stick for example to the loudspea...

Page 9: ...ect the cable on the plug in mains adapter to the terminal on the bottom of the charger 2 Plug the mains adapter into the mains socket outlet CAUTION Do not install the charger handset and accessories...

Page 10: ...supplied and use only approved accessories Ensure the mains voltage of the adapter matches the local mains voltage Do not use AC adapters that are visibly damaged cracked or broken housing and keep t...

Page 11: ...for approximately five to six hours before using the handset for the first time This protective measure extends the service life of the batteries The maximum power output is attained only after three...

Page 12: ...hes in the display If the battery warning tone is switched on the battery warning tone sounds see Configuring Attention Tones on page 65 If you are making a call when this occurs approximately three t...

Page 13: ...t layout Figure 2 DECT Handset 4065R Use the SOS key located on the side of the phone to signal for help in an emergency Press the arrow up down keys to select menu items Use the two soft keys to sele...

Page 14: ...ds transfer a call or conference a third party open the information menu Use the Hook key to make a call answer a call end a call Switch the handset ON by pressing the On Off key Switch the handset OF...

Page 15: ...lines The middle lines of the display provide information that varies with the current state of the handset When the handset is in idle mode status information is shown in calling mode caller names or...

Page 16: ...e display Soft key line Soft keys are located below the Information Text line The functions allocated to the keys are shown on the bottom line of the display The key functions change automatically acc...

Page 17: ...click is enabled a tone sounds to return to the previous menu Press the OK soft key to select a function In the display area active settings are indicated by a check mark o while inactive settings ar...

Page 18: ...receiver of a normal telephone Handsfree Transfer Conference Info key The Handsfree key has the following functions Number keys The dialpad number keys are used to directly enter telephone numbers an...

Page 19: ...le key input and prevent any accidental operation To lock the dialpad To unlock the dialpad Note You can answer calls when the key lock is active once you do key lock is temporarily suspended enabling...

Page 20: ...Function Key Description Buzzer off Menu 1 Switch Buzzer off Buzzer on Menu 2 Switch Buzzer on Silent Charging on Menu 3 Switch Silent Charging on Silent Charging off Menu 4 Switch Silent Charging off...

Page 21: ...l option To predial a number Note Long press the zero 0 key to insert P for pause when entering a number in predial mode You can add additional digits to the number you are dialling For example in som...

Page 22: ...ncludes a Handsfree feature 1 Use the arrow keys to position the insertion point 2 Use the dialpad to enter the new digits Note 1 Press the right soft key to delete individual digits Note 2 Long press...

Page 23: ...ress the SOS key the phone sends a text message if one is programmed otherwise it initiates a voice call 3 Press the Handsfree key or the Hook key to end the call 1 Press the Telephone Book soft key 2...

Page 24: ...one Options on page 59 The Mandown call option can be switched on or off with the key shortcut Menu 6 See Menu Shortcuts on page 20 for more information Answering a call The ringer sounds and the call...

Page 25: ...Handsfree see Using Handsfree on page 22 Press the Reject soft key to reject the call During a call you can change the Earpiece or Handsfree volume in eight steps using the arrow keys N When the minim...

Page 26: ...irst caller on hold The letter R is displayed on the bottom line of the display and a special dial tone sounds 2 Use the dialpad to dial the phone number of the third party or 3 Choose one of the foll...

Page 27: ...is out of the range of the system the Message Waiting indicator is displayed when the handset is turned on or comes back in range of the system For automated access to your voice messages Nortel recom...

Page 28: ...Voice Mail access number is automatically dialled and your voice box number and password are automatically entered Note Press the Esc key at any time to cancel this procedure 4 Press the Esc soft key...

Page 29: ...lable on your system Messaging limitations The following limitations apply The system can store up to ten messages Messages cannot be sent or received if the handset is outside the range of the system...

Page 30: ...message is displayed in the list 5 Press the Esc soft key one or more times to return to the idle display Table 4 Text Message status icons Symbol Meaning urgent message normal message read normal mes...

Page 31: ...date and time Read to display the entire message Use the arrow keys to scroll and display longer messages 5 Press the OK soft key 6 Press the Esc soft key one or more times to return to the idle displ...

Page 32: ...Press the OK soft key 8 Use the dialpad to enter the recipient phone number 9 Press the OK soft key 10 Press the Esc soft key one or more times to return to the idle display 1 Open the Messages menu a...

Page 33: ...ess the arrow keys to scroll and highlight one of the following Normal Message Urgent Message and press the OK soft key Note For more information about the difference between Normal and Urgent message...

Page 34: ...l a short alert tone sounds Urgent messages Urgent messages are messages that you must confirm An activated key lock is temporarily deactivated when receiving such a message so that its receipt can be...

Page 35: ...e message list can store a maximum of ten messages if it is full a flashing l symbol appears on the display and the system handles a new message according to the Overwrite setting discussed in Configu...

Page 36: ...numbers and names which can be searched alphabetically The following restrictions apply Each entry must have a unique name A telephone number can be stored more than once if a different name is used...

Page 37: ...case letters See Table 5 for a reference chart of characters you can enter using the handset dialpad Note When you enter characters the first display line shows all characters assigned to the key The...

Page 38: ...ion and press the OK soft key 4 Use the dialpad to enter the phone number and press the OK soft key 5 Use the dialpad to enter the name Note 1 Each phone number you store in the Telephone Book must ha...

Page 39: ...ey 5 Use the dialpad to edit the telephone number Move the cursor using the arrow c keys New digits and characters are added in front of the flashing cursor Press the right soft key to delete individu...

Page 40: ...t your handset is in an idle state and long press the key to which you have assigned the number 1 Press the Telephone Book soft key 2 Press the arrow keys to scroll and highlight the entry you want to...

Page 41: ...ephone Book soft key 2 Press the arrow keys to scroll and highlight the entry to which you want to assign a Quick Call number 3 Press the Options soft key 4 Press the arrow keys to scroll and highligh...

Page 42: ...the Redial List see Transferring a number to the Telephone Book on page 44 from the Caller List see Transferring a number to the Telephone Book on page 47 4 Press the arrow keys to scroll and highligh...

Page 43: ...deleting all entries on page 45 Figure 5 The Redial List Dialling a number from the Redial List Note The beginning and end of the Redial List is marked by a dashed line 1 Press the Redial soft key 2...

Page 44: ...Telephone Book option and press the OK soft key 6 Use the dialpad to enter or edit the telephone number Move the cursor using the arrow c keys New digits and characters are added in front of the flash...

Page 45: ...ighlight one of the following Delete to delete the selected entry Delete All to delete all entries in the Redial List and press the OK soft key 5 At the Sure prompt choose one of the following Press t...

Page 46: ...y or deleting all entries on page 48 The following are features of the Caller List When a call is not answered the text Missed Calls is shown on the display until you open the Caller List Multiple cal...

Page 47: ...scroll and highlight a list entry 4 Press the Hook key to dial the number Note If you want to predial from the Caller List long press Hook and then follow the predial procedure for more information s...

Page 48: ...u do not want to change a phone number or name Long press the right soft key to exit without making any changes 8 Use the dialpad to enter or edit the name using the same keys and controls you used to...

Page 49: ...l List and press the OK soft key 6 At the Sure prompt choose one of the following Press the OK soft key to delete the entry or entries from the Caller List Press the Esc soft key to cancel changes 7 P...

Page 50: ...to function the caller s number must be transmitted through Integrated Services Digital Network ISDN Working with Caller Filter To open the Caller Filter menu Adding an entry to the Caller Filter list...

Page 51: ...ress the right soft key to exit without making any changes Note 1 Numbers can consist of a maximum of 32 characters Names can consist of a maximum of 16 characters Note 2 One or more asterisks can be...

Page 52: ...Use the dialpad to edit the name associated with the list entry 5 Press the OK soft key 6 Press the Esc soft key one or more times to return to the idle display 1 Open the Caller Filter menu as discus...

Page 53: ...ng the Caller List on page 46 2 Press the Options soft key 3 Choose one of the following Press the arrow keys to scroll and highlight the Add To option if you are adding a number from the Redial or Ca...

Page 54: ...ing Calls VIP calls normal messages and urgent messages Select the melody by entering a number 0 to 60 or use the arrow keys To select ringer melodies 1 Press the Menu soft key 2 Press the arrow keys...

Page 55: ...ge Urgent Message 5 Use the dialpad to select a melody 1 to 60 Note Table 7 provides a list of selected melody codes 6 Press the OK soft key 7 Press the Esc soft key one or more times to return to the...

Page 56: ...he Ringer Settings menu as discussed in Accessing the Ringer Settings menu on page 54 2 Press the arrow keys to scroll and highlight the Type option 3 Press the OK soft key 4 Press the arrow keys to s...

Page 57: ...isplay 1 Open the Ringer Settings menu as discussed in Accessing the Ringer Settings menu on page 54 2 Press the arrow keys to scroll and highlight the Volume Settings option 3 Press the OK soft key 4...

Page 58: ...oft key 3 Press the arrow keys to scroll and highlight one of the following Earpiece Hands free Headset 4 Press the OK soft key 5 Press the arrow keys to increase or decrease the volume Note Alternati...

Page 59: ...65 Activating or deactivating Silent Charging on page 66 Activating or deactivating Charger Answer on page 67 Activating or deactivating Auto Quick Hook on page 67 Activating or Deactivating Auto Answ...

Page 60: ...s to scroll and highlight the User Name option and press the OK soft key 3 Use the dialpad to enter or edit the User Name 4 Press the OK soft key 5 Press the Esc soft key one or more times to return t...

Page 61: ...onsult your system administrator to find out what features are available for your use After an SOS message is sent the message is stored in the Text Message list refer to Using Text Messaging on page...

Page 62: ...initiated when the handset orientation changes from upright to horizontal One of the following occurs If no text message is entered the Mandown number is dialled voice call If a text message is define...

Page 63: ...eep Repeat timer If the handset is placed in a horizontal position while a call is established the phone does not initiate the Mandown call unless a text message is configured If no text message is co...

Page 64: ...following Active Messages optional SOS number Auto Answer optional Delay optional Pre Alarm Time optional Repeat optional 5 Depending on your selection in step 4 perform one of the following If you c...

Page 65: ...charge is too low Battery alarm a setting is confirmed Confirm tones the end of a menu is reached 1 Access the Telephone Options menu as described in Accessing the Telephone Options menu on page 59 2...

Page 66: ...to scroll and highlight the Attention Tones option 3 Press the OK soft key 4 Press the arrow keys to scroll and highlight one of the following Key click Coverage warning Battery alarm Confirm tones E...

Page 67: ...ick Hook is disabled press any previously assigned Quick Call number and the associated phone number is entered automatically in predial mode 3 Press the OK soft key Note A check mark indicates the se...

Page 68: ...arrow keys to scroll and highlight the Auto Quick Hook option 3 Press the OK soft key Note A check mark indicates the selected option is activated 4 Press the Esc soft key one or more times to return...

Page 69: ...row keys to scroll and highlight one of Overwrite Display Note The message memory can store a maximum of ten messages Use the Overwrite option to control what the handset does when ten messages are al...

Page 70: ...ey 4 Press the arrow keys to increase or decrease the display contrast Note You can also use the dialpad keys 1 through 8 to adjust the display contrast 5 Press the OK soft key 6 Press the Esc soft ke...

Page 71: ...Enabling automatic DECT system selection on page 74 Deleting a system on page 75 Editing the system name and phone number on page 76 Checking the Equipment ID IPEI on page 76 To carry out the followin...

Page 72: ...ne DECT systems overlap in your location Authorization code Use this code PABX PIN to register the handset with the DECT system DECT system name The name of the system to which you are subscribing Onc...

Page 73: ...r the PIN authentication code at the PIN prompt and press the OK soft key 8 Use the dialpad to enter the System Name at the Enter name prompt and press the OK soft key 9 Use the dialpad to enter the p...

Page 74: ...ng this option disables automatic system selection See Enabling automatic DECT system selection on page 74 6 Press the OK soft key Note A check mark indicates the selected system is activated 7 Press...

Page 75: ...on page 71 2 Press the arrow keys to scroll and highlight the Subscription option and press the OK soft key 3 Press the arrow keys to scroll and highlight the system name 4 Press the Options soft key...

Page 76: ...em name 4 Press the Options soft key 5 Press the arrow keys to scroll and highlight the Edit option and press the OK soft key 6 Use the dialpad to edit the system name and press the OK soft key 7 Use...

Page 77: ...otten your PIN contact your system administrator Accessing the Security menu 1 Press the Menu soft key 2 Press the arrow keys to scroll and highlight the Security option 3 Press the OK soft key 4 Use...

Page 78: ...as shown in Accessing the Security menu on page 77 2 Press the arrow keys to scroll and highlight the Change PIN option 3 Press the OK soft key 4 Use the dialpad to enter the old PIN 5 Press the OK s...

Page 79: ...d system registrations and the Read Only setting 1 Access the Security menu as shown in Accessing the Security menu on page 77 2 Press the arrow keys to scroll and highlight the Reset option 3 Press t...

Page 80: ...your handset s features To use an FFC enter the FFC and press the Hook key Special Prefix SPRE codes dial an SPRE code plus a one or two digit number to access some of your handset s features The SPR...

Page 81: ...SPRE codes 81 Use Table 8 to list the FFCs or the SPRE codes assigned by your system administrator Table 8 FFCs and SPRE codes FFC or SPRE code Feature Call Forward to activate Call Forward to deacti...

Page 82: ...ins plug N0035846 AC Adapter UK Plus AC Adapter for Desktop Charger Plus UK mains plug N0035851 Battery Pack Extra handset battery N0035856 Belt Clip Extra belt clip N0035857 Desktop Charger N0035849...

Page 83: ...eadset Installing or removing the MEM card The DECT Handset 4065R is equipped with a removable MEM card Using the optional MEM card tool and software you can edit the phone s Telephone Book using your...

Page 84: ...dure to remove the MEM card from the handset Note This procedure is required only if you plan to use the MEM card with the optional MEM card tool To remove the MEM card 1 Press the small tag b locks t...

Page 85: ...hat you do not touch the metal contacts To install the MEM card into the handset 1 Place the MEM card into the MEM card tray with the notch in position b and the metal contacts face down 2 Shift the M...

Page 86: ...Accessories 86 Get user manuals See SafeManuals com...

Page 87: ...labeled keys on your telephone Flexible Feature Codes FFCs Specialized codes entered using the dialpad that enable features for example Ring Again Hands free A method of conversing with the party on t...

Page 88: ...s to be sent and received by your DECT handset Soft keys Two keys located below the display with programmable functions and labels System or Switch Your office communication system Voice Mail A system...

Page 89: ...69 Charging guidelines 13 Charging the batteries 13 Clearing the telephone book 80 D DECT system 73 DECT system selection 76 Deleting a DECT system 77 Deleting quick call assignments 43 Dialing the p...

Page 90: ...et 14 Reset the handset 81 Ringer settings 56 S Safety information 9 Security functions 79 Selecting the DECT system 75 Setting volume 60 Shortcuts 22 Silent Charging 68 Soft keys 21 SOS 63 SPRE 82 Sw...

Page 91: ...Get user manuals See SafeManuals com...

Page 92: ...design or components as progress in engineering and manufacturing may warrant Nortel Nortel Logo the Globemark This is the Way This is Nortel Design mark SL 1 Meridian 1 and Succession are trademarks...

Reviews: