21
To change thermocouple:
1.
Follow the same steps used to remove pilot assembly
2.
Remove pilot tube close-off plate by removing the phillips
screw on the burner plate.
3.
Note the height of the thermocouple in relationship to the
pilot before removal. It is critical to use the correct height
for reinstallation. Disconnect thermocouple from gas
valve and pilot assembly.
4.
Slide thermocouple out through hole left after pilot close-
off plate was removed.
5.
Reinstall new thermocouple and reverse steps from above.
Note: Use hand to tighten thermocouple in gas valve, plus
1/4” turn with wrench. Do not overtighten!
Venturi Burner Assembly
The burner assembly consists of the burner, venturi and
spreader. If burn through or other burner problem occurs,
follow these steps to replace the burner:
1.
Follow the steps under changing burner assembly.
2.
Disconnect pilot assembly by removing the two screws
holding pilot assembly and shield.
3.
Remove the two phillips screws holding the burner from
the round burner plate. Note that one is removed from the
front side and one from the back side.
4.
Remove burner and flame spreader assembly.
5.
Install the new one by reversing steps 1 through 4.
6.
Start up and test.
Gas Valve Replacement
1.
Turn off gas and electric.
2.
Disconnect the two low voltage wires.
3.
Disconnect pilot tubing and thermocouple from gas valve.
4.
Remove the two screws from the gas valve mounting
plate.
5.
Remove gas valve and remove gas valve mounting.
6.
Remove spud holder threaded into valve.
7.
Repipe dope spud holder and tighten into new valve.
8.
Reverse steps through 5 and test.
Fan Switch (Picture 5) – The fan switch is a temperature
actuated, normally open switch that closes on temperature
rise and is in series with the heating speed of the air circulating
blower. Upon a call for heat, and when the burner builds up
a supply of heat, the fan switch wraps closed at 115° (±5°) and
blower motor starts. After the thermostat opens and the
chamber cools down, the fan switch opens at 95° (±5°) and
blower shuts off.
If blower does not start after warm up, check blower for power.
If blower has power, see Blower Checkout section. If blower
does not have power, check for line voltage across the fan
switch. If voltage is present the switch is open. You also can
remove wires, and ohm out after warm up. NOTE: Use tape
to make sure wires do not touch anything. An infinity reading
indicates the switch is open.
If blower motor does not shut off and chamber has cooled (and
fan switch is off), check across fan switch contacts. If there is
no voltage, pull the single orange wire off (take care not to
touch uninstalled terminal or lay wire against metal). If blower
shuts off, fan switch is stuck closed. If switch does not close
or open properly, it will have to be replaced. Turn off power,
remove wires, and remove the two phillips screws to remove
switch. Install new switch and re-test.
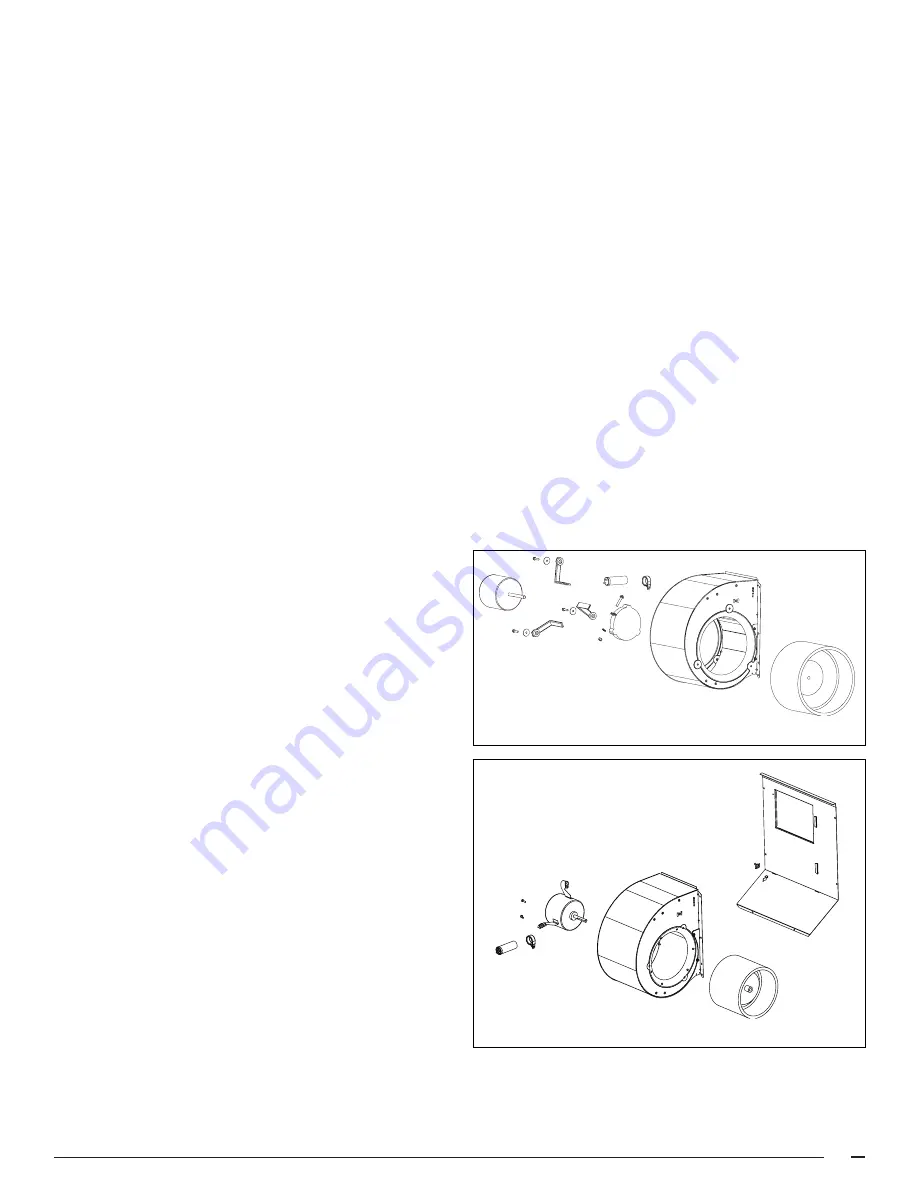
Blower Assembly (Picture 10) – If the blower motor has
power to it (heating speed and neutral) and motor does not
start, motor has electrically opened up. NOTE: Some models
incorporate a capacitor, this should be checked first.
To replace motor:
1.
Remove wires going to motor.
2.
Remove Phillips screw(s) on left side.
3.
Raise entire blower assembly slightly and swing out to left.
4.
Loosen set screw on blower hub.
5.
Remove screws holding motor to blower housing.
6.
Remove motor and replace. NOTE: Some motors are
torsion-flex mount and some are band around mount. See
picture below.
7.
Reverse steps 1-5 to reinstall. Note: Be sure to tighten
blower set screw on flat of motor shaft.
Band Around Mount
Picture 10. Blower Assemblies
Torsion Mount


