background image

13

3. Enter user information.

Highlight the words USER WEIGHT and then

press the User/Enter button. Next, press the in-

crease and decrease buttons beside the

User/Enter button to enter your weight. Then,

press the User/Enter button.

If you want to enter a maximum target heart rate

(see HOW TO USE A PULSE PROGRAM on page

18), first highlight MAX HEART RATE and press

the User/Enter button. Next, press the increase and

decrease buttons beside the User/Enter button to

enter a maximum target heart rate. Then, press the

User/Enter button.

To exit the users mode, highlight START and then

press the User/Enter button.

4. Select the settings mode.

To select the settings mode, first remove the key

from the console. Then, hold down the Stop button

while reinserting the key into the console.

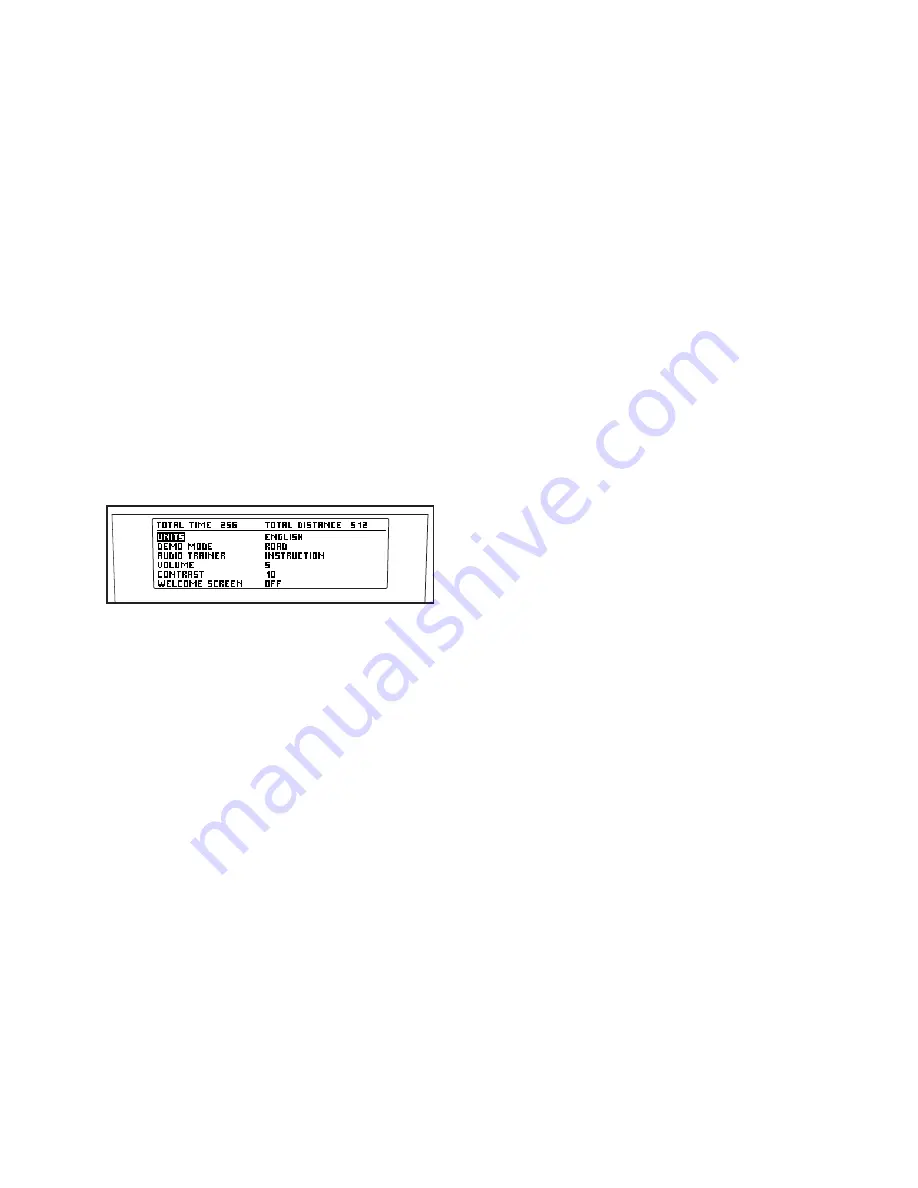
When the settings mode is selected, the display will

show the word ENGLISH or METRIC to indicate

which system of measurement is selected. To

change the system of measurement, first highlight

UNITS and press the User/Enter button. Next,

press the increase or decrease button beside the

User/Enter button to select the desired system of

measurement. Then, press the User/Enter button.

The display will also show the words DEMO MODE

and the current setting: OFF, LOGO, ROAD, or VI-

SUAL EQ. The demo mode can be used while the

treadmill is displayed in a store. While a demo

mode is selected, the power cord can be plugged

in, the key can be removed from the console, and

the display will remain on. The console buttons will

not function. To select a demo mode, highlight

DEMO MODE and then press the User/Enter but-

ton. Next, press the increase or decrease button

beside the User/Enter button to highlight OFF (to

turn off the demo mode), LOGO (to display a logo),

ROAD (to display an animation of a runner on a

road), or VISUAL EQ (to display a visual). Then,

press the User/Enter button.

You can select an audio setting if desired. When

you use an iFIT Card, a personal trainer will guide

you through your workouts and instruct you how to

purchase more iFIT Cards if INSTRUCTION is se-

lected as your audio setting. If you select the ON

setting, your personal trainer will simply guide you

through your iFIT workouts. If you select OFF, you

will hear no audio guidance during your workouts.

To change the audio setting, first highlight AUDIO

TRAINER and press the User/Enter button. Next,

press the increase or decrease button beside the

User/Enter button to select the desired audio set-

ting. Then, press the User/Enter button.

You can adjust the volume of your personal

trainerʼs voice by highlighting VOLUME, pressing

the User/Enter button, and then pressing the in-

crease and decrease buttons beside the User/Enter

button to select a volume setting. Then, press the

User/Enter button.

The contrast of the display can also be adjusted.

To adjust the contrast of the display, first highlight

CONTRAST and press the User/Enter button.

Next, press the increase and decrease buttons be-

side the User/Enter button to select a contrast set-

ting. Then, press the User/Enter button.

The console can also display a welcome message

each time you insert the key into the console.

Highlight WELCOME SCREEN and press the

User/Enter button. Then, press the increase or de-

crease button beside the User/Enter button to se-

lect ON or OFF and press the User/Enter button.

5. When you are finished exercising, remove the

key from the console.

To exit the settings mode at any time, remove the

key from the console.

Summary of Contents for 30705.4

Page 1: ...ence QUESTIONS As a manufacturer we are com mitted to providing complete customer satisfaction If you have questions or if parts are damaged or missing DO NOT CONTACT THE STORE For assistance please contact our Customer Service Department CALL TOLL FREE 1 888 936 4266 Mon Fri 8 00 until 17 00 EST excluding holidays OR E MAIL US customerservice iconcanada ca Serial Number Decal www nordictrack com ...

Page 2: ...DRAWING 32 ORDERING REPLACEMENT PARTS Back Cover LIMITED WARRANTY Back Cover NordicTrack is a registered trademark of ICON IP Inc 2 These drawings show the locations of the warning decals If a decal is missing or illegible call the telephone number on the front cover of this manual and re quest a free replacement decal Apply the decal in the location shown Note The decals may not be shown at actua...

Page 3: ... specifications described on page 10 To purchase a surge suppressor call the telephone number on the front cover of this manual 13 Failure to use a properly functioning surge suppressor could result in damage to the con trol system of the treadmill If the control sys tem is damaged the walking belt may change speed accelerate or stop unexpectedly which may result in a fall and serious injury 14 Ke...

Page 4: ...g them 25 Inspect and properly tighten all parts of the treadmill regularly 26 Never insert or drop any object into any opening on the treadmill 27 DANGER Always unplug the power cord immediately after use before cleaning the treadmill and before performing the main tenance and adjustment procedures de scribed in this manual Never remove the motor hood unless instructed to do so by an authorized s...

Page 5: ...e using the treadmill If you have questions after read ing this manual please see the front cover of this man ual To help us assist you note the product model number and serial number before contacting us The model number and the location of the serial number decal are shown on the front cover of this manual Before reading further please familiarize yourself with the parts that are labeled in the ...

Page 6: ... and your own Phillips screwdriver standard screwdriver and wire cutters Use the drawings below to identify the assembly hardware The number in parentheses below each drawing is the key number of the part from the PART LIST near the end of this manual The number after the parentheses is the quantity needed for assembly Note If a part is not in the parts bag check to see if it is preattached to one...

Page 7: ...de together easily and snap into place If they do not turn one connector and try again IF THE CONNECTORS ARE NOT CON NECTED PROPERLY THE CONSOLE MAY BE DAMAGED WHEN THE POWER IS TURNED ON Then insert the connectors into the right Upright 20 2 Console Assembly Console Wire 3 Carefully set the console assembly on the Uprights 20 as shown Make sure that no wires are pinched Attach the console assem b...

Page 8: ... storage position and make sure that the latch pin is engaged as de scribed on page 24 Position the Base Plate 75 on the treadmill as shown Attach the Base Plate to the Uprights 20 with the three Base Plate Bolts 77 Note It may be helpful if a second person tips the tread mill slightly as you tighten the Bolts Carefully lower the Walking Platform 15 to the floor as described on page 25 5 6 Make su...

Page 9: ...2 B 2 While a second person holds the Console 83 connect the wire on the receiver A to the indi cated wire extending from the Console Next hold the receiver so the small cylinder is ori ented as shown and is facing away from the Console Attach the receiver to the Console in the location shown with the two included Small Screws B 3 Make sure that no wires are pinched See drawing 1 Reattach the Cons...

Page 10: ...least resistance for electric current to reduce the risk of elec tric shock This product is equipped with a cord having an equipment grounding conductor and a grounding plug Plug the power cord into a surge suppressor and plug the surge suppressor into an appropriate outlet that is properly installed and grounded in accordance with all local codes and ordinances IMPORTANT The treadmill is not comp...

Page 11: ...ole to accept iFIT Interactive Workout Cards containing workout programs designed to help you achieve spe cific fitness goals For example lose unwanted pounds with the 8 week Weight Loss program or train for a long distance run with the Marathon program iFIT pro grams automatically control the treadmill while the voice of a personal trainer coaches you and motivates you through every step of your ...

Page 12: ...ed from the console adjust the position of the clip HOW TO PERSONALIZE CONSOLE SETTINGS The console features a user mode that allows you to designate yourself as User 1 or User 2 view your workout history and enter user information before you begin exercising The console also features a settings mode that allows you to select a system of measurement for the con sole turn on and turn off the demo m...

Page 13: ...se button beside the User Enter button to highlight OFF to turn off the demo mode LOGO to display a logo ROAD to display an animation of a runner on a road or VISUAL EQ to display a visual Then press the User Enter button You can select an audio setting if desired When you use an iFIT Card a personal trainer will guide you through your workouts and instruct you how to purchase more iFIT Cards if I...

Page 14: ...n To restart the walking belt press the Start button the Speed button or one of the twelve 1 Step Speed buttons 5 Change the incline of the treadmill as desired To change the incline of the treadmill press the Incline increase or decrease button or one of the twelve 1 Step Incline buttons Each time one of the buttons is pressed the incline will gradually adjust until it reaches the selected inclin...

Page 15: ...lse sensor at the same time the display will not show your heart rate accurately To use the handgrip pulse sensor first re move the sheets of clear plastic from the metal contacts on the hand grip pulse sen sor Next stand on the foot rails and hold the metal con tacts avoid moving your hands When your pulse is detected your heart rate will appear in the display For the most accurate heart rate rea...

Page 16: ...ss the Display button repeatedly to select the desired display mode If the first or second display mode is selected a profile of the speed settings of the program will appear in the display A small arrow below the profile will indi cate your progress At the end of the first one minute segment of the program a series of tones will sound If a different speed setting and or incline setting is program...

Page 17: ...t To stop the program at any time press the Stop button To restart the program press the Start but ton The walking belt will begin to move at 1 mph When the next segment of the program begins the treadmill will automatically adjust to the speed and incline settings for the next segment 6 Measure your heart rate if desired See step 7 on page 15 7 Turn on the fan if desired See step 8 on page 15 8 W...

Page 18: ...cutive segments 5 Adjust the maximum target heart rate setting if desired To adjust the maximum target heart rate setting press the increase and decrease buttons beside the User Enter button see EXERCISE INTENSITY on page 28 To adjust the target heart rate setting quickly hold down one of the buttons 6 Press the Start button to start the program A moment after the button is pressed the walking bel...

Page 19: ... the Speed or Incline buttons however when the console compares your heart rate to the current target heart rate set ting the speed or incline of the treadmill may automatically change To stop the program at any time press the Stop button To restart the program press the Start but ton The walking belt will begin to move at 1 mph When the console compares your heart rate to the current target heart...

Page 20: ...lt will begin to move Hold the handrails and begin walking 5 Select a display mode and program the desired speed and incline settings When a Record program is selected the console of fers three display modes Press the Display button repeatedly to select the desired display mode To program a speed setting and an incline setting for the first one minute segment of the program simply adjust the speed...

Page 21: ...ically adjust to the first speed and in cline settings that you programmed previously Hold the handrails and begin walking 5 Select a display mode and monitor your progress with the display and the training zone bar The Record program will function in the same way as a Cardio program see step 5 on pages 16 and 17 If desired you can redefine the program while using it To change the speed or incline...

Page 22: ... walking 5 Select a display mode and monitor your progress with the display and the training zone bar When an iFIT program is selected the console of fers three display modes see step 6 on pages 14 and 15 Press the Display button repeatedly to se lect the desired display mode If the first or second display mode is selected a profile of the speed settings of the program will appear in the display A...

Page 23: ...is fully plugged in Next press the Play button on your MP3 player or CD player Then adjust the volume of your MP3 player or CD player If you are using a portable CD player and the CD skips set the CD player on the floor or another flat sur face instead of on the console THE OPTIONAL CHEST PULSE SENSOR An optional chest pulse sensor offers hands free oper ation as it monitors your heart rate during...

Page 24: ...the pin on the latch knob Release the latch knob Make sure that the latch plate is resting against the pin as shown To protect the floor or carpet from damage place a mat under the treadmill Keep the treadmill out of direct sunlight Do not leave the treadmill in the stor age position in temperatures above 85 F 30º C HOW TO MOVE THE TREADMILL Before moving the treadmill convert the treadmill to the...

Page 25: ...nd as shown Using your left hand pull the latch knob to the left and hold it Pivot the frame down until it is past the pin on the latch knob 2 Hold the frame firmly with both hands and lower it to the floor To decrease the possibility of injury bend your legs and keep your back straight Knob ...

Page 26: ...SOLUTION a Check the reset off circuit breaker see the drawing above If the circuit breaker has tripped wait for five minutes and then press the switch to the reset position b Make sure that the power cord is plugged in If the power cord is plugged in unplug it wait for five minutes and then plug it back in c Remove the key from the console Reinsert the key into the console d If the treadmill stil...

Page 27: ...plug in the power cord insert the key and run the treadmill for a few minutes Repeat until the walking belt is centered b If the walking belt slips when walked on first remove the key and UNPLUG THE POWER CORD Using the hex key turn both rear roller bolts clockwise 1 4 of a turn When the walking belt is correctly tightened you should be able to lift each edge of the walking belt 3 to 4 inches 7 10...

Page 28: ... must be aerobic Aerobic exercise is activity that requires large amounts of oxygen for prolonged periods of time This increases the demand on the heart to pump blood to the muscles and on the lungs to oxygenate the blood For aerobic exercise adjust the speed and incline of the treadmill until your heart rate is near the highest number in your training zone WORKOUT GUIDELINES Each workout should i...

Page 29: ...illes Stretch With one leg in front of the other reach forward and place your hands against a wall Keep your back leg straight and your back foot flat on the floor Bend your front leg lean forward and move your hips toward the wall Hold for 15 counts then relax Repeat 3 times for each leg To cause further stretching of the achilles ten dons bend your back leg as well Stretches Calves achilles ten ...

Page 30: ... Plastic Washer 43 1 Controller 44 1 Foot Pad Left 45 1 Belly Pan 46 1 Power Cord Grommet 47 1 Power Cord 48 1 Off Reset Circuit Breaker 49 1 Platform Support Bracket 50 3 Tie Holder 51 1 Releasable Tie 52 10 Plastic Tie 53 4 Platform Support Bracket Screw 54 1 Incline Stop Bracket 55 1 Incline Motor Bolt Upper 56 1 Drive Roller Ground Wire 57 1 Idler Arm Spring 58 1 Idler Arm 59 2 Rear Wheel 60 2...

Page 31: ...Qty Description 101 1 Belly Pan Grommet 102 1 Plug 103 1 Key Clip 104 2 Front Wheel Bolt 4 Black Wire M F 4 White Wire M F 4 Red Wire M F User s Manual These parts are not illustrated Specifications are subject to change without notice ...

Page 32: ...56 14 12 12 10 8 69 3 44 16 65 15 2 2 5 9 5 9 1 71 6 64 27 36 59 35 2 5 9 62 60 51 87 50 52 49 53 53 18 17 24 7 87 32 11 29 59 28 2 27 32 5 9 62 60 11 61 61 13 EXPLODED DRAWING A Model No 30705 4 R0709A 32 ...

Page 33: ...0 84 97 32 57 63 79 22 21 87 26 30 87 87 87 30 38 32 4 19 4 19 1 14 23 23 23 78 43 33 99 99 54 40 41 32 85 46 47 48 45 7 7 85 7 70 7 91 7 23 92 101 102 37 91 32 42 25 86 EXPLODED DRAWING B Model No 30705 4 R0709A 33 ...

Page 34: ...77 77 77 75 74 81 82 89 104 88 94 96 81 82 89 104 88 94 96 81 82 20 76 34 7 72 67 67 72 73 81 82 73 23 90 34 EXPLODED DRAWING C Model No 30705 4 R0709A ...

Page 35: ...103 98 83 66 68 66 95 7 7 7 7 7 7 7 7 7 7 7 7 7 93 7 7 23 100 39 35 EXPLODED DRAWING D Model No 30705 4 R0709A ...

Page 36: ...CON ICON is not responsible or liable for indirect special or consequential damages arising out of or in con nection with the use or performance of the product or damages with respect to any economic loss loss of property loss of revenues or profits loss of enjoyment or use costs of removal or installation or other consequential damages of whatsoever nature Some provinces do not allow the exclusio...

Reviews: