


98
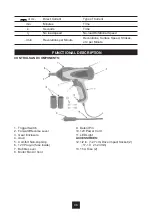
DIRECTION SWITCH
The Impact Wrench can move in two
directions: Forward “FWD” for tightening,
Reverse “REV” for loosening.
FWD
FWD
REV
FORWARD/REVERSE LEVER
REV
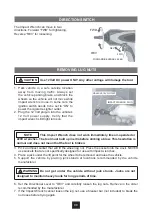
REMOVING LUG NUTS
CAUTION Use 12 Volt DC power ONLY. Any other voltage will damage the tool.
1. Park vehicle in a safe outside location
away from moving traffic. Always set
the vehicle parking brake and block the
wheels so the vehicle will not move while
impact wrench is in use. In some cars, the
ignition switch needs to be set to “ON” to
power the cigarette Lighter outlet.
2. Plug the 12 Volt plug-in into the vehicle’s
12 Volt power supply. Verify that the
impact wrench LED light turns on.
IMPACT WRENCH PLUG
VEHICLE 12V OUTLET
NOTE
This Impact Wrench does not work immediately like air-operated or
220V wrenches. The tool must built up inertia before striking a blow. This hesitation is
normal and does not mean that the tool is broken.
3. Pick an impact socket that will fit the wheel lug nut. Press the socket onto the anvil. NEVER
use sockets that are not specifically designed for use with impact wrenches.
4. Place a jack under the lift point for the wheel to be removed and raise the vehicle.
5. Support the vehicle by placing jack stands at locations recommended by the vehicle
manufacturer.
WARNING Do not get under the vehicle without jack stands. Jacks are not
designed to maintain heavy loads for long periods of time.
6. Set the Directional Lever to “REV” and carefully loosen the lug nuts. Remove in the order
recommended by the manufacturer.
7. If the Impact Wrench cannot loosen the lug nut, use a breaker bar (not included) to break the
nut loose before trying again.
Summary of Contents for 46866
Page 1: ...12V DC FR 1 12 NL 13 23 ES 24 34 IT 35 45 PT 46 56 PL 57 67 RO 68 78 RU 79 89 EN 90 101...
Page 62: ...62...
Page 66: ......
Page 79: ...79 80 80 80 81 81 82 83 83 83 84 84 85 86 86 86 87 87 88 88 88 89 89...
Page 80: ...80...
Page 81: ...81...
Page 82: ...82 III...
Page 83: ...83...
Page 84: ...84 V A Kg...
Page 86: ...86...
Page 87: ...87 12 1 2 12 12 12 3 4 5 220...
Page 88: ...1 2 3 4 5...
Page 89: ...89 12 1 2 inch 12 7 mm Square 380 Nm 2500 5500...
Page 101: ...101...
Page 102: ...102...
Page 103: ...103 deren Seriennummer ist wie folgt siehe Seite 101...
Page 104: ...waarvan het serienummer is Verwijs naar p 101 104...
Page 105: ...consulte la p gina 101 105...
Page 106: ...cujo n mero de s rie veja p gina 101 106...
Page 107: ...Numer seryjny kt rych przedstawia si nast puj co patrz strona 101 107...
Page 108: ...patrz strona 101 108...
Page 109: ...vezi pagina 101 109...