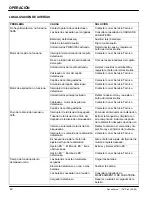
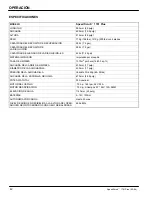
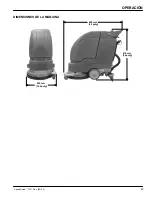
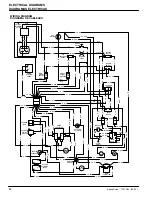
background image

OPERACIÓN

31

Speed Scrub

t

 1701 Plus  (02–04)

FIG. 19

OPERACIÓN DE LA MÁQUINA

PARA SEGURIDAD: No utilice la máquina salvo
que el operario haya leído y comprendido el
manual de instrucciones.

PREOPERACIÓN

S

Barra el suelo para eliminar partículas y otros
restos.

S

Controle el nivel de carga de la batería para
asegurarse que de las baterías están
completamente cargadas (Consulte el apartado
CARGA DE LA BATERÍA).

S

Controle el estado del cepillo o la almohadilla.

S

Controle el estado de las láminas de la escobilla de
goma.

FREGADO CON LA MÁQUINA

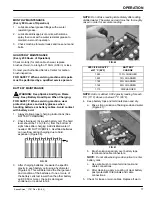
1.

Suelte el pedal de elevación del cepillo de la
posición de transporte pisando el pedal de
liberación del cabezal de fregado (Figura 20).

FIG. 20

2.

Baje el conjunto de la escobilla de goma
desplazando el botón de elevación de la escobilla
de goma a la derecha (Figura 21).

FIG. 21

3.

Encienda la máquina y los interruptores de la
aspiración y de la disolución (Figura 22).

FIG. 22

NOTA: El flujo de la disolución y el cepillo no se
pondrán en funcionamiento hasta tirara de los
accionadores del cepillo.

4.

Tire de los accionadores del cepillo y comience a
andar con la máquina. El cepillo impulsará la
máquina hacia delante permitiendo maniobrar con
poco esfuerzo (Figura 23).

FIG. 23

NOTA: Es posible que sea necesario reducir la
presión de la almohadilla en superficies irregulares.

Summary of Contents for Speed Scrub1701 Plus

Page 1: ...T COMPANY 701 NORTH LILAC DRIVE MINNEAPOLIS MN 55422 MAILING ADDRESS TENNANT COMPANY P O BOX 1452 MINNEAPOLIS MN 55440 1452 Operator and Parts Manual Manual de Operaci n y de Piezas Battery Automatic...

Page 2: ...parts and service center distributor or from any of the manufacturer s subsidiaries This machine will provide excellent service However the best results will be obtained at minimum costs if S The mac...

Page 3: ...RAINING RECOVERY TANK 14 DRAINING SOLUTION TANK 15 BATTERY CHARGING 15 MACHINE MAINTENANCE 16 DAILY MAINTENANCE 16 WEEKLY MAINTENANCE 16 MONTHLY MAINTENANCE 17 QUARTERLY MAINTENANCE 17 BATTERY MAINTEN...

Page 4: ...mable Materials Or Reactive Metals WARNING Keep Sparks And Open Flame Away Keep Battery Hood Open When Charging WARNING Disconnect Battery Cables Before Servicing Machine The following information sig...

Page 5: ...when batteries are installed Use a recommended ramp when loading unloading into off truck or trailer Use tie down straps to secure machine to truck or trailer SAFETY LABELS The safety labels appear o...

Page 6: ...odel 17 Charger Plug 18 Recovery Tank Drain Hose 19 Solution Tank Drain Hose With Level Indicator 20 Solution Fill Port Cover 21 Scrub Head Lift Pedal 22 Scrub Head Release Lift Pedal 23 Solution Flow...

Page 7: ...aged with machine Batteries battery charger brush pad driver and pads must be purchased separately Consult an authorized distributor for specific pads and brushes ATTENTION The use of supplies other t...

Page 8: ...Jumper Cable Jumper Cable TOP BATTERY BOTTOM BATTERY FIG 4 7 Reconnect vacuum hose to recovery tank snout as shown Figure 5 FIG 5 8 After batteries are properly installed turn on key and vacuum switch...

Page 9: ...igure 10 FIG 10 3 Turn key switch on Figure 11 FIG 11 4 Place the pad driver brush on the floor in front of the scrub head Figure 12 FIG 12 5 Tilt the machine back on it s rear wheels and center the s...

Page 10: ...solution tank with 28L 7 5 gal of clean water 60 C 140 F maximum temperature To fill with bucket use a bucket with a spout Figure 17 FIG 17 NOTE If filling with a bucket be certain that bucket is cle...

Page 11: ...RATION S Sweep and dust mop floor to remove particles and other debris S Check battery meter charge level to ensure batteries are fully charged See BATTERY CHARGING S Check condition of pad or brush S...

Page 12: ...ns on Figure 25 FIG 25 3 When finished scrubbing drain and rinse solution tank and clean ESt filter See DRAINING TANKS WHILE OPERATING MACHINE FOR SAFETY When using machine go slow on inclines and sli...

Page 13: ...Operate accessory tool as normal WARNING Do Not Pick Up Flammable Materials Or Reactive Metals CIRCUIT BREAKERS The machine is equipped with two circuit breakers to protect machine from damage The Mai...

Page 14: ...ling system be certain to drain and rinse both tanks after each use FOR SAFETY Before leaving or servicing machine stop on level surface and turn off machine DRAINING RECOVERY TANK ATTENTION Do not al...

Page 15: ...all times Never let batteries set in a discharge condition for lengthy periods WARNING Keep Sparks And Open Flame Away Keep Battery Hood Open When Charging FOR SAFETY When servicing machine wear prote...

Page 16: ...ice was performed DAILY MAINTENANCE Every 4 Hours of Operation 1 Remove and clean pad or brush Never use soiled pads when cleaning Replace pad when it becomes worn or loaded with residue 2 Drain and r...

Page 17: ...ging Add distilled water if needed DO NOT OVERFILL Overfilled batteries can overflow during charging due to fluid expansion Figure 39 A FIG 39 3 After charging batteries measure the specific gravity i...

Page 18: ...gee removed and scrub head in the raised position 3 Remove recovery tank lid to promote air circulation ATTENTION If storing machine in freezing temperatures be certain to drain machine of all water D...

Page 19: ...p Contact Service Center Short run time Batteries not fully charged Charge batteries Bad cell in one or more batteries Replace battery Batteries need maintenance See BATTERY MAINTENANCE Faulty charger...

Page 20: ...gal DRIVE SYSTEM Brush driven CLEANING RATE 1375m2 per hour 14 800 sq ft CLEANING PATH WIDTH 430 mm 17 in PAD DIAMETER 430 mm 17 in PAD PRESSURE Variable 30 44Kg 65 95lbs SQUEEGEE WIDTH 670 mm 26 5 in...

Page 21: ...o de cualquier centro autorizado de piezas y servicio distribuidor o de cualquiera de las subsidiarias del fabricante Esta m quina proporcionar un servicio excelente Sin embargo los mejores resultados...

Page 22: ...IADO DEL DEP SITO DE LA DISOLUCI N 35 CARGA DE LA BATER A 35 MANTENIMIENTO DE LA M QUINA 36 MANTENIMIENTO DIARIO 36 MANTENIMIENTO SEMANAL 37 MANTENIMIENTO MENSUAL 37 MANTENIMIENTO TRIMESTRAL 37 MANTEN...

Page 23: ...a cubierta de la bater a ADVERTENCIA Desconecte los cables de la bater a antes de prestar servicio a la m quina La informaci n siguiente se ala condiciones potencialmente peligrosas para el operador o...

Page 24: ...as Use una rampa recomendada al cargar descargar al fuera del cami n o remolque Use correas de amarre para asegurar la m quina al cami n o remolque ROTULOS DE SEGURIDAD Los r tulos de seguridad aprece...

Page 25: ...ci n 19 Manguera de Vaciado del Dep sito de Disoluci n con Indicador de Nivel 20 Tapa del Orificio de Llenado de la Disoluci n 21 Pedal de elevaci n del cabezal de fregado 22 Pedal de liberaci n de la...

Page 26: ...allet haci ndola rodar porque podr a averiarla ATENCI N La instalaci n de la bater a debe realizarse DESPU S de retirar la m quina del pallet El conjunto de la escobilla de goma est embalado con la m...

Page 27: ...eja con los bornes en la posici n que muestra la figura Fije la segunda bater a con una cinta Figura 3 FIG 3 6 Conecte el cable negro de la bater a procedente de la m quina al borne negativo de la bat...

Page 28: ...lice dicha escobilla en las ranuras del soporte de montaje de la escobilla de goma Figura 8 FIG 8 4 Fije bien las palometas 5 Conecte la manguera de aspiraci n de la m quina al conjunto de la escobill...

Page 29: ...ccionador cepillo de plancha aseg rese de mantener la m quina en la posici n de transporte para que el fald n no se da e FIG 14 NOTA Antes de instalar el impulsor de la almohadilla o el cepillo aseg r...

Page 30: ...la m quina observe las instrucciones de mezcla y manejo de los recipientes de substancias qu micas ATENCI N Utilice nicamente productos de limpieza recomendados NO utilice sustitutos Consulte a un di...

Page 31: ...edal de elevaci n del cepillo de la posici n de transporte pisando el pedal de liberaci n del cabezal de fregado Figura 20 FIG 20 2 Baje el conjunto de la escobilla de goma desplazando el bot n de ele...

Page 32: ...omenzar autom ticamente a reciclar cuando el indicador luminoso de la bomba ESt se encienda Figura 25 FIG 25 3 Cuando acabe la operaci n de fregado aseg rese de vaciar y aclarar el dep sito de la diso...

Page 33: ...bo de cala y reemplazcalo con la manguera accesorio 3 Conecte las mangueras al tubo 4 Encienda la llave vara de pompa y interruptor de aspiradora Figura 26 FIG 26 5 Opere las herramientas accesorias d...

Page 34: ...so Entre cargas completas del tanque de soluci n En caso de detenerse el flujo de la soluci n durante el funcionamiento Cuando se activa la pantalla del flotador Si la escobilla de goma comienza a dej...

Page 35: ...24V suministrados con la m quina En cualquier otro caso utilice un cargador con las siguientes caracter sticas para evitar el deterioro de las bater as ESPECIFICACIONES DEL CARGADOR S VOLTAJE DE SALI...

Page 36: ...bater a A en cada celda de la bater a El nivel debe ser de 1 cm 3 8 pul desde el fondo de los tubos de mirilla B Agregue agua destilada si requerido NO LLENE EN EXCESO Figura 36 A B FIG 36 MANTENIMIEN...

Page 37: ...ese de que el dep sito de la disoluci n est vac o El filtro se encuentra debajo de la m quina en la parte trasera Figura 38 FIG 38 3 Controle el nivel del electrolito en los elementos de la bater a Co...

Page 38: ...dici n de las bater as Si resulta que una o m s de las celdas de la bater a son inferiores que la otra celda de bater a 0 050 o m s la celda est da ada acortada o est por fallar NOTA No lea inmediatam...

Page 39: ...RIDAD Al transportar la m quina use una rampa recomendada cuando cargue al descargue del cami n o acoplado use correas de amarre para asegurar la m quina al cami n o acoplado ALMACENAMIENTO DE LA M QU...

Page 40: ...rar la obstrucci n y reajustar el bot n del cortacircuitos Cableado o motor de aspiraci n defectuoso Contactar con el Servicio T cnico Cepillos de carb n gastados Contactar con el Servicio T cnico Flu...

Page 41: ...o la manguera est perforada Introducir bien la manguera de aspiraci n en sus conexiones Sustituir la manguera si est da ada Manguera de aspiraci n bloqueada Retirar los residuos que la bloquean Orific...

Page 42: ...LSOR Impulsado por el cepillo TASA DE LIMPIEZA 1375m2 por hora 14 800 sq ft ANCHURA DEL CARRIL DE LIMPIEZA 430 mm 17 pulg DI METRO DE LA ALMOHADILLA 430 mm 17 pulg PRESI N DE LA ALMOHADILLA Variable 3...

Page 43: ...OPERACI N 43 Speed Scrubt 1701 Plus 02 04 DIMENSIONES DE LA M QUINA 495 mm 19 5 pulg 914 mm 36 pulg 990 mm 39 pulg...

Page 44: ...R E D 14 G R N 30 B R N 30 BRN 50 GRN 54 GRN BLK 54 GRN 31 BLK W H T 26 R E D 24 BLU 27 B L K 27 B L K 27 B L K 13 B L K 13 B L K 8 Y E L 52 GRN 52 G R N 21 BLK 21 B L K 15 B L K 28 R E D 56 R E D 56...

Page 45: ...D GRN RED LADDER DIAGRAM DIAGRAMA ESCALONADO D1 R E D B L K W H T OPTIONAL LOW VOLTAGE RED 14 RED RED BLK BLK REF LEGEND RED Red BLK Black GRN Green WHT White ORG Orange BLU Blue BRN Brown PUR Purple...

Page 46: ...LIST LISTA DE PIEZAS Speed Scrubt 1701 Plus 02 04 46 REPLACEMENT BRUSHES AND PAD DRIVER GROUP SUSTITUCI N DEL CONJUNTO DEL IMPULSOR DE LA ALMOHADILLA Y CEPILLOS 9 8 10 11 12 7 13 16 15 14 13 3 2 4 5 6...

Page 47: ...M6 X 1 0 X 35 3 Y 5 01684 WASHER FLAT 0 25 3 Y 6 601453 DPLATE CLUTCH 1 ASSEMBLY CONJUNTO Y INCLUDED IN ASSEMBLY INCLUIDO EN EL CONJUNTO D RECOMMENDED STOCK ITEMS ARTICULOS RECOMENDADOS PARA MANTENER...

Page 48: ...EZAS Speed Scrubt 1701 Plus 02 04 48 SOLUTION TANK GROUP GRUPE DEL DEP SITO DE DISOLUCI N 31 1 2 6 5 7 3 4 8 9 10 11 12 13 15 16 14 17 18 20 19 21 23 22 35 24 25 26 27 29 30 33 34 32 19 36 37 38 39 40...

Page 49: ...0 608322 SCREW TRS M6X1 0X16 PHL 2 21 140539 NUT 6 32 KEP 2 22 200301012 WASHER M3 FLAT 1 23 579211 NUT HEX M3 HEXLCK 2 24 600437 DSWITCH SNAP ACTN 250VAC 16A 1 D RECOMMENDED STOCK ITEMS ARTICULOS REC...

Page 50: ...TA DE PIEZAS Speed Scrubt 1701 Plus 02 04 50 RECOVERY TANK GROUP CONJUNTO DESPOSITO RECUPERAR 2 4 1 9 7 12 11 10 8 6 3 5 25 26 19 16 13 17 20 21 22 23 24 31 32 34 33 37 30 29 35 36 15 14 28 27 30 29 2...

Page 51: ...7 605147 WASHER RUBBER 1 50D 1 18 601437 WASHER NYLON 1 19 609709 SCREW 5 8 11X1 BTTSOCHD 1 ASSEMBLY CONJUNTO Y INCLUDED IN ASSEMBLY INCLUIDO EN EL CONJUNTO D RECOMMENDED STOCK ITEMS ARTICULOS RECOMEN...

Page 52: ...peed Scrubt 1701 Plus 02 04 52 WHEEL GROUP CONJUNTO DE LA RUEDA 1 2 3 4 5 14 12 15 16 17 18 19 20 10 12 11 13 8 7 6 21 9 22 8 7 4 1 3 2 48 23 24 25 28 29 31 27 26 32 24 33 34 37 36 35 18 47 38 41 47 4...

Page 53: ...L SOLUTION CONTROL 1 22 1011934 MOUNT AXLE PEDAL 1 23 601444 PEDAL HEAD LIFT 1 24 140630 PIN COTTER 094 X 0 75 2 D RECOMMENDED STOCK ITEMS ARTICULOS RECOMENDADOS PARA MANTENER EN EXISTENCIA REF PART D...

Page 54: ...PARTS LIST LISTA DE PIEZAS Speed Scrubt 1701 Plus 02 04 54 SCRUB HEAD GROUP GRUPO DEL CABEZAL DE FREGADO DE DISCO 20 1 21 19 17 18 2 3 4 16 5 6 7 8 12 15 13 22 23 9 10 11 26 24 25 14 27...

Page 55: ...LIT 0 31 1 11 140219 SCREW HEX 31 18 X 1 00 1 12 601493 DSKIRT SPLASH GUARD 1 ASSEMBLY CONJUNTO Y INCLUDED IN ASSEMBLY INCLUIDO EN EL CONJUNTO D RECOMMENDED STOCK ITEMS ARTICULOS RECOMENDADOS PARA MAN...

Page 56: ...PARTS LIST LISTA DE PIEZAS Speed Scrubt 1701 Plus 02 04 56 PLUMBING GROUP GRUPO DE TUBER AS 1 2 3 9 10 11 12 8 11 17 16 14 13 15 18 19 20 21 22 25 26 23 24 25 22 23 24 4 5 6 7 11 11 11...

Page 57: ...31 0 88D 5 12 613518 TUBING 1 2IDX3 4ODX0 67 VINYL 1 13 630022 DVALVE SOLENOID 24VDC 1 ASSEMBLY CONJUNTO Y INCLUDED IN ASSEMBLY INCLUIDO EN EL CONJUNTO D RECOMMENDED STOCK ITEMS ARTICULOS RECOMENDADO...

Page 58: ...LIST LISTA DE PIEZAS Speed Scrubt 1701 Plus 02 04 58 VACUUM MOTOR GROUP CONJUNTO DEL MOTOR DE ASPIRACI N 3 4 5 8 21 26 1 2 22 19 19 20 9 10 14 18 15 23 12 16 17 11 12 13 6 7 23 12 24 25 15 23 12 16 8...

Page 59: ...12 140016 WASHER LOCK 0 25 8 13 140259 SCREW HEX 1 4 20X 62 2 14 605905 DSOLENOID 24VDC 125A MAIN 1 15 606404 DDIODE ASM W RING TERMINALS 2 16 32520 NUT HEX JAM 25 20 4 ASSEMBLY CONJUNTO Y INCLUDED I...

Page 60: ...PARTS LIST LISTA DE PIEZAS Speed Scrubt 1701 Plus 02 04 60 SQUEEGEE GROUP CONJUNTO PALETA 8 4 3 2 5 7 6 11 12 13 1 9 10 10 4 7 14 15 16 17 18 19 31 20 21 22 23 24 25 26 27 28 24 29 30 29...

Page 61: ...EE GUM RUBBER 1 Y 17 600187 BOLT SHLD 38D X 1 25 31 18 1 Y 18 140028 WASHER FLAT 38 2 Y 19 630477 DWHEEL 2 0D 0 38W POLY GRAY 1 ASSEMBLY CONJUNTO Y INCLUDED IN ASSEMBLY INCLUIDO EN EL CONJUNTO D RECOM...

Page 62: ...CORD 18 2 SVTX27 3 8 SJT 1 611469 ASM TRIGGER CONTROL BOX 1 Y 11 069764190 SCREW HEX M03X0 5X16 2 Y 12 200662012 WASHER LOCK 2 ASSEMBLY CONJUNTO Y INCLUDED IN ASSEMBLY INCLUIDO EN EL CONJUNTO D RECOM...

Page 63: ...TCH PUSH MOMENTARY 1 7 601415 PANEL COVER 1 8 578141000 SCREW PAN M5X0 8X10 PHL 2 9 607475 DSWITCH KEYLOCK 12AMP 1 9 607821 DKEY REPLACEMENT STEEL 1 D RECOMMENDED STOCK ITEMS ARTICULOS RECOMENDADOS PA...

Page 64: ...PARTS LIST LISTA DE PIEZAS Speed Scrubt 1701 Plus 02 04 64 BATTERY AND CHARGER GROUP CONJUNTO DE BATER A Y CARGADOR 3 2 4 1 5...

Page 65: ...ESCRIPTION QTY 1 602871 DCABLE BATTERY 6 BLK X 24 1 2 130869 BATTERY 12VDC 130AH WET 2 2 600594 BATTERY 12VDC 130AH DAMP 2 D RECOMMENDED STOCK ITEMS ARTICULOS RECOMENDADOS PARA MANTENER EN EXISTENCIA...

Page 66: ...OPTIONS OPCIONES 66 Speed Scrubt 1701 Plus 02 04 ESt EXTENDED SCRUB KIT CONJUNTO DEL SISTEMA ESt 7 1 2 3 4 20 5 7 6 8 10 12 13 11 16 17 15 18 7 14 19 9 21 22 23...

Page 67: ...LOCK M5X0 8 NL 1 Y 10 140316 CLAMP CABLE INSULATED 1 2ID 1 Y 11 140000 WASHER FLAT 0 25B 1 ASSEMBLY CONJUNTO Y INCLUDED IN ASSEMBLY INCLUIDO EN EL CONJUNTO D RECOMMENDED STOCK ITEMS ARTICULOS RECOMEN...

Page 68: ...OPTIONS OPCIONES 68 Speed Scrubt 1701 Plus 02 04 WAND PUMP KIT CONJUNTO DE LA BOMBA DEL TUBO 6 5 4 2 3 2 1 13 2 9 12 11 2 12 8 7 10 14 15 16 17 19 18 20 21 22...

Page 69: ...M6 X 1 0 X 12 2 Y 10 630251 FITTING PIPE E90 PF12 PF12 1 ASSEMBLY CONJUNTO Y INCLUDED IN ASSEMBLY INCLUIDO EN EL CONJUNTO D RECOMMENDED STOCK ITEMS ARTICULOS RECOMENDADOS PARA MANTENER EN EXISTENCIA...

Page 70: ...18 X 6 1 Y 610849 ASM WIRE 18 X 8 5 1 Y 130040 WIRE TIE NYLON 1 ASSEMBLY CONJUNTO Y INCLUDED IN ASSEMBLY INCLUIDO EN EL CONJUNTO D RECOMMENDED STOCK ITEMS ARTICULOS RECOMENDADOS PARA MANTENER EN EXIS...

Page 71: ...MINUM 1 Y 605257 DRING LOCK BRASS 1 Y 600828 DNUT WAND COUPLING 1 Y 2 13840 DTOOL SQUEEGEE PUSH PULL 14 355MM 1 Y 605137 DBLADES REPLACEMENT SET 4 1 ASSEMBLY CONJUNTO Y INCLUDED IN ASSEMBLY INCLUIDO E...

Page 72: ...S OPCIONES 72 Speed Scrubt 1701 Plus 02 04 DELUXE POWER WAND GROUP GRUPO DEL TUBO EL CTRICO DELUXE 1 3 4 5 6 7 8 9 10 11 12 13 14 15 16 17 18 19 20 22 23 24 25 26 21 2 27 35 36 37 34 33 33 32 31 38 30...

Page 73: ...Y 18 578123000 BRACKET AXLE 3 HOLE 1 Y 19 578155000 WELDMENT HANDLE WAND 1 ASSEMBLY CONJUNTO Y INCLUDED IN ASSEMBLY INCLUIDO EN EL CONJUNTO D RECOMMENDED STOCK ITEMS ARTICULOS RECOMENDADOS PARA MANTE...

Page 74: ...OPTIONS OPCIONES 74 Speed Scrubt 1701 Plus 02 04 POWER WAND GROUP GRUPO DEL TUBO EL CTRICO 2 3 4 5 6 7 8 9 10 1 11 12 13 14 15 16 17 18 19 20 21 2 2 2 5 13 12 22...

Page 75: ...ITTING TIP 9508 1 8V JET BRS 1 Y 10 579113 SWIVEL WAND ATTACHMENT 1 Y 11 579132 RING ATTACHMENT 1 ASSEMBLY CONJUNTO Y INCLUDED IN ASSEMBLY INCLUIDO EN EL CONJUNTO D RECOMMENDED STOCK ITEMS ARTICULOS R...

Page 76: ...3 8M X 1 4H QC 1 Y 2 140325 CLAMP HOSE 1 2 EAR 2 Y 3 578820000 HOSE 25ID 44OD 4 0M LG 1 Y 4 578072000 DCUFF SWIVEL 1 1 2 BLACK 2 ASSEMBLY CONJUNTO Y INCLUDED IN ASSEMBLY INCLUIDO EN EL CONJUNTO D REC...

Page 77: ...TERY 1 Y 1 603210 DASM CABLE W RED CONNECT QUICK CHANGE 2 Y 2 603209 ASM CABLE W RED CONNECT QUICK CHANGE 1 ASSEMBLY CONJUNTO Y INCLUDED IN ASSEMBLY INCLUIDO EN EL CONJUNTO D RECOMMENDED STOCK ITEMS A...

Page 78: ...IT BATTERY CONNECTOR MOUNT 1 Y 1 140887 SCREW 10 24X 38 PAN PHL 2 Y 2 606688 BRACKET BATTERY CONNECTOR 1 ASSEMBLY CONJUNTO Y INCLUDED IN ASSEMBLY INCLUIDO EN EL CONJUNTO D RECOMMENDED STOCK ITEMS ARTI...

Reviews: