background image

9

EN

Nobles Quick Clean 12 (01/2014)

English

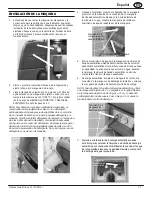
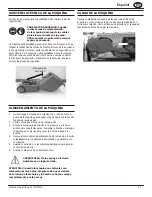
DRAINING TANKS

DRAINING SOLUTION TANK

:KHQ¿QLVKHGZLWKWKHMREVXFWLRQRXWDQ\XQXVHGVROXWLRQIURP

the solution tank.  Place the end of the vacuum hose that was 
attached to the wand into the solution tank and turn the vacuum 
switch on. 

DRAINING RECOVERY TANK


1.  Turn off all switches.
2.  Drain the recovery tank by holding the end of the drain hose 

with the cap above the machine.  Remove the cap on the 
drain hose.  Lower the drain hose over a drain or a bucket 
to drain the recovery tank.  

NOTE:  When using the Auto Dump feature, the recovery tank 

must be rinsed and then drained with the drain hose after each 

use.

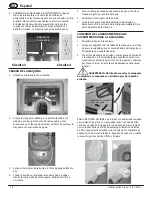
3.  Remove the Ball Float Screen, unscrew the Solution Tank Inlet 

Filter and Recovery Tank Filter.  Remove the debris from the 

VFUHHQDQG¿OWHUV%HVXUHWRUHSODFHWKH%DOO)ORDW6FUHHQ

Solution Tank Inlet Filter  and Recovery Tank Filter securely.

4.  Wipe down the machine with a damp cloth.  Do not hose off 

or power spray machine.

5.  Inspect solution hose and vacuum hose for cracks or damage   

Do not use hose if damaged.

6.  Store machine with tank covers off to promote air circulation. 
7.  Inspect the electrical cord ends on the machine and the 

power cords used with the machine for damage.  Replace 
power cords if damaged and contact service center or a 

TXDOL¿HGVHUYLFHSHUVRQLIHOHFWULFDOFRUGHQGVRQPDFKLQH

are damaged.

8.  Coil power cords neatly after each use and store on 

machine.

AFTER 80 HOURS OF USE

Flush solution lines and pump with a descaling solution (such as 
white vinegar) to remove mineral accumulation which may have 
formed from the use of hard water.  Remove spray tips from hard 
surface tool and soak in a descaling solution.  Re-attach tool and 
hose to machine.  Pour solution into solution tank and run solution 
through system by turning on pump and activating tool.  Do not 
recycle solution as it will carry small mineral deposits.  After running 

VROXWLRQWKURXJKV\VWHPÀXVKZLWKFOHDQZDWHUDQGUHLQVWDOOVSUD\

tips.

Recovery 
Tank Filter

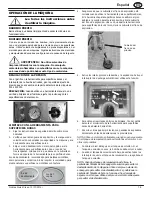
MACHINE MAINTENANCE

To keep machine in good working condition, simply follow 
machine maintenance procedures

.

)256$)(7<:KHQVHUYLFLQJPDFKLQH

unplug cords from wall outlets.  Wear 
appropriate personal protection 
equipment as needed.

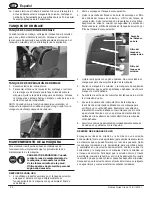
AFTER EACH USE

1. 

,IFKHPLFDOVDUHXVHGLQVROXWLRQWDQNÀXVKV\VWHPZLWKFOHDQ

water by running the machine using clean water at the end 

RIHDFKMRE

2.  Drain and rinse out recovery tank.

Ball Float 
Screen

Solution 
Tank Filter

Summary of Contents for Quick Clean 12

Page 1: ... SPANISH FRENCH Model Part No 1072857 120V To view print or download the latest manual visit www nobles com manuals MANUEL DE L OPÉRATEUR ET DES PIÈCES DÉTACHÉES 1200 PSI HARD SURFACE CLEANER LIMPIADOR PARA SUPERFICIES DURAS DE 1200 PSI APPAREIL DE NETTOYAGE DES SURFACES DURES DE 1200 PSI MANUAL PARA EL OPERADOR Y MANUAL DE REPUESTOS ...

Page 2: ... of purchase 3OHDVH OO RXW DW WLPH RI LQVWDOODWLRQ IRU IXWXUH UHIHUHQFH Model No _________________________________ Serial No _________________________________ Installation Date ____________________________ PROTECT THE ENVIRONMENT Please dispose of packaging materials and used machine components in an environmentally safe way according to your local waste disposal regulations Always remember to rec...

Page 3: ...LWKRXW EDOO ÀRDW VFUHHQ LQ SODFH 15 HHS KDLU ORRVH FORWKLQJ QJHUV DQG DOO SDUWV RI ERG DZD IURP RSHQLQJV DQG PRYLQJ SDUWV 16 Turn off all controls before unplugging 17 R QRW XVH ÀDPPDEOH FOHDQLQJ VROYHQWV ZLWK PDFKLQH 18 R QRW DGG ZDWHU RYHU Û Û WR VROXWLRQ WDQN 19 R QRW XVH WR SLFN XS ÀDPPDEOH RU FRPEXVWLEOH OLTXLGV VXFK DV JDVROLQH RU XVH LQ DUHDV ZKHUH WKH PD EH SUHVHQW 20 Do not pick up any ty...

Page 4: ...f HOHFWULF VKRFN KHFN ZLWK D TXDOL HG HOHFWULFLDQ RU VHUYLFH person if you are in doubt as to whether the outlet is properly grounded Do not modify the plug provided with WKH PDFKLQH I LW ZLOO QRW W WKH RXWOHW KDYH D SURSHU RXWOHW LQVWDOOHG E D TXDOL HG HOHFWULFLDQ This machine is for use on a nominal 120 volt circuit and has a grounding attachment plug that looks like the plug illustrated below M...

Page 5: ...oa Loa Loa Loa Loa oa Lo oa oa Loa Loa oa Lo oa Lo Loa oa o o din i din din din din din din din din d din din di din din din din din din din din din din din din d din din ng g g g g g g g g g g g g g g g g g g g g g g g Wh Wh Wh Wh Wh Wh Wh h h he he e h h Wh h Wh els els els Wan Wan Wan n n n n n n n n n Wan n nd H d H d H d H d H d H H H H H d H d o o o o old old ld o o er er ŝŌ ŝŌ ŝ ŝŌ Ō Ō Ō Ō ...

Page 6: ...WHP ZLWK FOHDQ ZDWHU after each use to prevent detergent buildup The use of powdered detergents with machine is discouraged 4 Auto Fill Connect the hose adaptor supplied with the machine to the Auto Fill Hose Connection at front of machine Then connect a water supply garden hose to the hose adapter 5 Turn on the water supply hose The Auto Fill valve located LQVLGH WKH VROXWLRQ WDQN ZLOO DXWRPDWLFD...

Page 7: ...OGXS LW V UHFRPPHQGHG WR XVH WKH RSWLRQDO OWHU EDJ 7KH OWHU bag will capture the larger debris and prevent the auto dump OWHU IURP FORJJLQJ 7KH RSWLRQDO OWHU EDJ LV LQVWDOOHG DW WKH vacuum hose connection as shown After each use or as needed UHPRYH WKH OWHU EDJ DQG FOHDQ 8 CONNECT POWER CORDS Turn off all the switches Plug the two power cords into properly grounded outlets Do not connect both powe...

Page 8: ...s with a texture Read all instructions before using this machine 4 Ensure the vacuum break cover is closed when using the Hard Surface Tool If the Hard Surface Tool happens to VWLFN WR WKH ÀRRU GXH WR WKH YDFXXP VXFWLRQ VOLGH WKH vacuum break cover up Once the Hard Surface Tool is loose IURP WKH ÀRRU FORVH WKH YDFXXP EUHDN FRYHU 5 Turn on the pump and vacuum switches Turn on the Auto Dump switch i...

Page 9: ...tion 7 Inspect the electrical cord ends on the machine and the power cords used with the machine for damage Replace power cords if damaged and contact service center or a TXDOL HG VHUYLFH SHUVRQ LI HOHFWULFDO FRUG HQGV RQ PDFKLQH are damaged 8 Coil power cords neatly after each use and store on machine AFTER 80 HOURS OF USE Flush solution lines and pump with a descaling solution such as white vine...

Page 10: ...the hose from the machine to vacuum water into the recovery tank 2 Drain and rinse out recovery tank 3 Attach solution hose to machine and hard surface tool Turn on pump and hold lever on wand to run pump dry Turn off pump 4 Disconnect power cords from machine Neatly coil the power cords and store on machine 5 Store extractor with tank covers off to promote air circula tion 6 Store machine in dry ...

Page 11: ...ift Air Flow 137 in 3480 mm 107cfm Solution Pump 120V 14 5A 2 2 gpm 8 33L min 400 1200 PSI 27 6 83 bar Dump Pump 120V 0 5A 2 8gpm 10 6L min Open Flow Cord Length 2 12 3 40ft 12 m Sound Pressure Level 75 dBA 25 25 inches 641 mm 32 5 inches 826 mm 41 5 inches 1054 mm Sound levels ISO 11203 as recommended by the American Association of Cleaning Equipment Manufacturers AACEM and OSHA 6SHFLILFDWLRQV DU...

Page 12: ...d Reset circuit breaker on control panel Faulty Pump RQWDFW D TXDOL HG VHUYLFH WHFKQLFLDQ Low suction Recovery tank cover is loose or drain hose cap is loose Close recovery tank cover and secure drain hose cap Damaged vacuum gasket RQWDFW D TXDOL HG VHUYLFH WHFKQLFLDQ LUW EDOO ÀRDW VFUHHQ OHDQ EDOO ÀRDW VFUHHQ Vacuum Break Cover is open on Hard Surface Tool Close Vacuum Break Cover Vacuum hose con...

Page 13: ...ento de la instalación para que sirvan de referencia en el futuro N º de modelo _________________________________ N º de serie _________________________________ Fecha de instalación ____________________________ Tennant Company P O Box 1452 Minneapolis MN 55440 Teléfono 800 553 8033 o 763 513 2850 www nobles com Nobles es una marca registrada en los Estados Unidos de Tennant Company Quick Clean es ...

Page 14: ...GHO ÀRWDGRU GH EROD QR HVWi HQ VX OXJDU 15 Evite el contacto de las aperturas y las partes móviles con el pelo la ropa holgada los dedos y otras partes del cuerpo 16 Apague todos los controles antes de desconectar la máquina 17 1R XVH VROYHQWHV GH OLPSLH D LQÀDPDEOHV FRQ OD PiTXLQD 18 1R DJUHJXH DJXD TXH VXSHUH ORV Û R Û DO WDQTXH GH VROXFLyQ 19 1R PDQLSXOH PDWHULDOHV LQÀDPDEOHV R FRPEXVWLEOHV FRP...

Page 15: ...HFWULFLVWD R SHUVRQD GH PDQWHQLPLHQWR FDOL FDGRV VL WLHQH dudas sobre la conexión a tierra correcta del tomacorriente 1R PRGL TXH HO HQFKXIH TXH YLHQH FRQ OD PiTXLQD 6L HVWH no entra en el tomacorriente solicite que un electricista FDOL FDGR LQVWDOH XQ WRPDFRUULHQWH DGHFXDGR VWD PiTXLQD HVWi GLVHxDGD SDUD VX XVR HQ XQ FLUFXLWR GH 120 voltios nominales y cuenta con un enchufe de conexión a tierra s...

Page 16: ...giratoria Perilla de ajuste de presión Conexión de la manguera de descarga automática Indicador de circuito doble Interruptor de seguridad de la bomba y de la descarga automática Manguera de llenado automático Cable de alimentación de entre 2 y 40 pies Manguera de cebado Manguera de solución y manguera de aspiración VISTA DELANTERA VISTA TRASERA COMPONENTES DEL PANEL DE CONTROL Interruptor de segu...

Page 17: ...quina 4 Llenado automático conecte el adaptador de la manguera provisto con la máquina en la conexión de la manguera de llenado automático ubicada en la parte delantera de OD PiTXLQD XHJR FRQHFWH OD PDQJXHUD GH MDUGtQ FRQ suministro de agua al adaptador de la manguera 5 Active el suministro de agua de la manguera La válvula de llenado automático ubicada dentro del tanque de solución GHVDFWLYDUi DX...

Page 18: ...uera cebadora de la parte delantera de la máquina CONEXIÓN DE LA HERRAMIENTA PARA SUPERFICIES DURAS A LA MÁQUINA 1 Desactive todos los interruptores 2 Coloque el adaptador del brazalete de la manguera en el tubo GH DFHUR LQR LGDEOH TXH VH HQFXHQWUD GHEDMR GHO PDQJR GH OD KHUUDPLHQWD SDUD VXSHU FLHV GXUDV 3 Conecte la manguera de solución y la manguera de aspiración D OD PiTXLQD D OD KHUUDPLHQWD SD...

Page 19: ... FLHV QR VLQWpWLFDV FRQ WH WXUD 4 Asegúrese de que la cubierta del freno de aspiración esté FHUUDGD FXDQGR XWLOLFH OD KHUUDPLHQWD SDUD VXSHU FLHV GXUDV 6L OD KHUUDPLHQWD SDUD VXSHU FLHV GXUDV VH DGKLHUH DO SLVR debido a la succión durante la aspiración abra la cubierta del freno de aspiración Una vez que aparte la herramienta SDUD VXSHU FLHV GXUDV GHO SLVR FLHUUH OD FXELHUWD GHO IUHQR GH aspiració...

Page 20: ...UR GHO WDQTXH GH UHFXSHUDFLyQ 4XLWH ORV UHVLGXRV GH OD SDQWDOOD GH ORV OWURV Asegúrese de volver a colocar con seguridad la pantalla del ÀRWDGRU GH EROD HO OWUR GH HQWUDGD GHO WDQTXH GH VROXFLyQ HO OWUR GHO WDQTXH GH UHFXSHUDFLyQ 4 LPSLH OD PiTXLQD FRQ XQ SDxR K PHGR 1R XVH URFLDGRUHV R mangueras para una limpieza rápida de la máquina 5 Revise la manguera de solución y la manguera de aspiración SD...

Page 21: ... del tanque de recuperación 2 9DFtH HQMXDJXH HO WDQTXH GH UHFXSHUDFLyQ 3 Acople la manguera de solución a la máquina y a la herra PLHQWD SDUD VXSHU FLHV GXUDV QFLHQGD OD ERPED VRVWHQJD la palanca en el mango para secar la bomba Apague la bomba 4 Desconecte los cables de alimentación de la máquina Enrolle cuidadosamente los cables de alimentación y guárdelos con la máquina 5 Guarde el extractor sin...

Page 22: ...omba de solución 120 V 14 5 A 2 2 gpm 8 33 l min 400 1200 PSI 27 6 83 bar Bomba de descarga 9 JSP O PLQ ÀXMR DELHUWR Longitud del cable 2 12 3 40 pies 12 m Nivel de presión de sonido 75 dBA Niveles de ruido según ISO 11203 en base a la recomendación de la Asociación Norteamericana de Fabricantes de Equipos de Limpieza 0 PHULFDQ VVRFLDWLRQ RI OHDQLQJ TXLSPHQW 0DQXIDFWXUHUV 26 DV HVSHFL FDFLRQHV HVW...

Page 23: ...Q WpFQLFR GH PDQWHQLPLHQWR FDOL FDGR DMD VXFFLyQ La cubierta del tanque de recuperación está suelta o la tapa de la manguera de vaciado está suelta Cierre la cubierta del tanque de recuperación y asegure la tapa de la manguera de vaciado D MXQWD GH OD DVSLUDGRUD HVWi GDxDGD RPXQtTXHVH FRQ XQ WpFQLFR GH PDQWHQLPLHQWR FDOL FDGR D SDQWDOOD GHO ÀRWDGRU GH EROD HVWi VXFLD LPSLH OD SDQWDOOD GHO ÀRWDGRU ...

Page 24: ...28 29 FONCTIONNEMENT DE LA MACHINE 30 VIDANGE DES RÉSERVOIRS 31 ENTRETIEN DE LA MACHINE 31 RÉPARATION DE LA MACHINE 32 ENTREPOSAGE DE LA MACHINE 32 CHARGEMENT DE LA MACHINE 32 SPÉCIFICATIONS DE LA MACHINE 33 DÉPANNAGE 34 LISTE DES PIÈCES SCHÉMA ÉLECTRIQUE 35 48 49 PROTÉGEZ L ENVIRONNEMENT 9HXLOOH MHWHU O HPEDOODJH HW OHV FRPSRVDQWV usagés de la machine de façon écologique conformément aux réglemen...

Page 25: ... PDWpULDX VXVFHSWLEOH GH UpGXLUH OH ÀX G DLU 14 1 XWLOLVH SDV O DSSDUHLO VDQV OH OWUH j ÀRWWHXU HQ SODFH 15 Éloignez les cheveux les vêtements les doigts et toutes les parties du corps des ouvertures et des pièces mobiles 16 Mettez toutes les commandes sur arrêt avant le débranchement 17 1 XWLOLVH SDV GH VROYDQWV GH QHWWR DJH LQÀDPPDEOHV DYHF OD PDFKLQH 18 1 DMRXWH SDV GH O HDX j GHV WHPSpUDWXUHV ...

Page 26: ...doute sur la mise à la terre de la prise de courant faites H DPLQHU OD SULVH GH FRXUDQW SDU XQ pOHFWULFLHQ TXDOL p RX XQ WHFKQLFLHQ GH GpSDQQDJH 1H PRGL H SDV OD FKH fournie avec la machine Si elle ne s adapte pas à la prise de courant faites installer une prise correcte par un pOHFWULFLHQ TXDOL p Cette machine est destinée à être utilisée sur un circuit QRPLQDO GH 9 HW FRPSUHQG XQH FKH GH PLVH j ...

Page 27: ...ètre Roulette pivotante Bouton de réglage de pression Connexion du tuyau de déversement automatique Indicateur du circuit double Disjoncteur de la pompe et du déversement automatique Tuyau de remplissage automatique 2 cordons d alimentation de 40 pi Tuyau d amorçage Tuyau de solution et boyau d aspiration VUE AVANT VUE ARRIÈRE COMPOSANTS DU PANNEAU DE COMMANDE Disjoncteur d aspiration Interrupteur...

Page 28: ...ttoyants en poudre avec la machine est déconseillée 4 Remplissage automatique Branchez l adaptateur de tuyau fourni avec la machine sur la connexion de tuyau de remplissage automatique situé à l avant de la machine Branchez ensuite un tuyau d arrosage d alimentation en eau à l adaptateur de tuyau 5 Ouvrir l alimentation en eau du tuyau La vanne de remplissage automatique située à l intérieur du ré...

Page 29: ...t débranchez l autre extrémité du tuyau d amorçage de l avant de la machine CONNECTEZ L OUTIL POUR LES SURFACES DURES À LA MACHINE 1 Mettez tous les interrupteurs sur arrêt 2 Placez l adaptateur de manchette de tuyau sur le tuyau en acier inoxydable situé sous la poignée de l outil pour les surfaces dures 3 Branchez le tuyau de solution et le boyau d aspiration sur la machine et l outil pour les s...

Page 30: ...surfaces naturelles texturées 4 9pUL H TXH OH FRXYHUFOH GH FRXSXUH G DVSLUDWLRQ HVW IHUPp lors de l utilisation de l outil pour les surfaces dures Si l outil pour les surfaces dures adhère au plancher en raison de l aspiration faites glisser le couvercle de coupure d aspiration vers le haut Une fois que l outil pour les surfaces dures n adhère plus au plancher fermez le couvercle de coupure d aspi...

Page 31: ... GH UpFXSpUDWLRQ eOLPLQH OHV GpEULV GX OWUH j ÀRWWHXU HW GHV OWUHV 9HLOOH j UHPHWWUH IHUPHPHQW HQ SODFH OH OWUH j ÀRWWHXU OH OWUH G DGPLVVLRQ GX UpVHUYRLU GH OD VROXWLRQ HW OH OWUH GX UpVHUYRLU GH UpFXSpUDWLRQ 4 Essuyez la machine avec un chiffon humide N arrosez pas la PDFKLQH HW QH O H SRVH SDV j XQ SXOYpULVDWHXU j SXLVVDQW MHW d eau 5 9pUL H TXH OH WX DX GH VROXWLRQ HW OH ER DX G DVSLUDWLRQ QH ...

Page 32: ...n à la machine et à l outil pour les surfaces dures Mettez la pompe sous tension et appuyez VXU OH OHYLHU GH OD ODQFH MXVTX j FH TXH OD SRPSH WRXUQH j VHF Mettez la pompe hors tension 4 Débranchez les cordons d alimentation de la machine Enroulez soigneusement les cordons d alimentation et remisez les sur la machine 5 Remisez l extracteur avec les couvercles des réservoirs retirés D Q GH IDFLOLWHU...

Page 33: ... air 137 po 3 480 mm 107 pi min Pompe à solution 120 V 14 5 A 2 2 gal min 8 33 l min 400 à 1 200 psi 27 6 à 83 bar Pompe de déversement 120 V 0 5 A 2 8 gal min 10 6 l min plein débit Longueur du cordon 2 12 3 40 pi 12 m Niveau de pression acoustique 75 dBA Niveaux de bruit ISO 11203 tels que recommandés par l American Association of Cleaning Equipment Manufacturers AACEM et l OSHA HV FDUDFWpULVWLT...

Page 34: ...WHXU VXU OH SDQQHDX GH FRPPDQGH La pompe est défectueuse RQWDFWH XQ WHFKQLFLHQ G HQWUHWLHQ TXDOL p L aspiration est faible Le couvercle du réservoir de récupération ou le capuchon du tuyau de vidange sont desserrés Fermez le couvercle du réservoir de récupération HW H OH FDSXFKRQ GX WX DX GH YLGDQJH H MRLQW G DVSLUDWLRQ HVW HQGRPPDJp RQWDFWH XQ WHFKQLFLHQ G HQWUHWLHQ TXDOL p H OWUH j ÀRWWHXU HVW V...

Page 35: ...IT REPLMT 1 SET 13 9011716 FLOAT BALL KIT REPLMT 1 16 9011719 COVER TANK RECVY KIT REPAIR 1 17 9011720 COVER TANK RECVY KIT REPLMT 1 73 9011790 STRAINER RECOVERY TANK 1 86 9012438 FILTER BAG OPTIONAL 1 87 9012617 FITTING HOSE BRB KIT W GASKET 1 88 9012618 RETAINER CLIP RECVY TANK W HDWR 1 98 9012621 HOSE VACUUM 1 110 1072968 LABEL MODEL QUICK CLEAN12 1 SET 116 1206159 LABEL LOGO 05 5L NOBLES 1 4 V...

Page 36: ...WLRQ 4W 10 9011713 1 14 9011717 1 74 9011791 1 78 9011826 1 82 9012457 1 100 1072957 LABEL WARNING AC EXTR 1 136 1013505 FITTING ELBOW 1 TANK SOLT W N LBLS QUICKCLEAN12 COVER FILL KIT REPLMT STRAINER SOLUTION TANK VALVE WATER AUTOFILL HOSE ADAPTER AUTOFILL includes black hose not shown ...

Page 37: ...W 22 9011725 PLATE SERVICE KIT REPLMT 1 SET 56 9011759 CIRCUITBREAKER QTY 2 15A 1 59 9011762 SWITCH ELE QTY 3 EH1 EXP H1 Q12 QC 12 1 60 9011763 INDICATOR LIGHT KIT REPLMT GREEN 1 64 9011767 PLATE SWITCH KIT Q12 QC 12 1 93 9012619 RETAINER CLIP CNTRL HOUSING W HDWR 1 94 9012625 HOUSING CNTRL 1 ...

Page 38: ...38 Nobles Quick Clean 12 01 2017 PARTS BASE PARTS DIAGRAM 25 26 44 49 48 46 83 21 15 24 20 134 66 43 41 47 45 42 39 81 97 90 133 135 99 ...

Page 39: ...MP SEAL CAM KIT REPAIR 1200PSI 1 43 9011746 HOSE PRESS PULSE KIT REPLMT 34IN 1 44 9011747 PUMP DUMP KIT REPLMT 1 45 9011748 HOSE PRESS PULSE KIT REPLMT 21IN 1 46 9011749 GAUGE ASSY KIT REPLMT 1 47 9011750 HOSE PRESS PULSE KIT RPLMT 15IN 1 48 9011751 CAP HOSE KIT REPLMT 1 49 9011752 COUPLING MAL REPLMT QD 1 66 9011769 CORD POWER ELE REPLMT 15A QTY 2 1 SET 81 9011921 HOSE PRIMER 1 83 9012458 VALVE P...

Page 40: ...LVE ASSY TRIGGER W HDWR VALVE KIT REPAIR COUPLING FEM QD W ADAPTER HANDLE HOUSING ASSY W HDWR COVER VACUUM BREAK 1 6 1233814 1 7 1233438 1 8 1233439 1 9 1233441 1 10 1233440 TUBE WLDMT ASSY 1 5 DIA W HDWR HOSE VACUUM W CLAMPS HEAD TOOL ASSY W HDWR RING BRUSH RING GLIDE 1 11 9012469 1 12 9012470 1 SET 13 9012471 1 TUBE SPRAY ASSY W HDWR FITTING TIP SPRAY 0502 QTY 2 HOSE PRESSURE W HDWR ...

Page 41: ...ER W HDWR VALVE KIT REPAIR COUPLING FEM QD W ADAPTER HANDLE HOUSING ASSY W HDWR COVER VACUUM BREAK 1 6 9012464 1 7 9012465 1 8 9012466 1 9 9 901246 1 10 10 90124 TUBE WLDMT ASSY 2 DIA W HDWR HOSE VACUUM W CLAMPS HEAD TOOL ASSY W HDWR RING BRUSH RING GLIDE 1 11 9012469 1 12 9012470 1 SET 13 9012471 1 14 9012472 1 16 16 1073137 TUBE SPRAY ASSY W HDWR FITTING TIP SPRAY 0502 QTY 2 HOSE PRESSURE W HDWR...

Page 42: ...FULSWLRQ 4W 49 9011752 COUPLING MAL REPLMT QD 1 50 9011753 COUPLING FEM REPLMT QD 1 69 9011772 HOSE PRESS KIT REPAIR 25FT 1 70 9011773 HOSE VACUUM KIT REPAIR 25FT 1 72 9011775 HOSE ASSY KIT REPLMT VAC PRESS 25FT 1 80 9011922 STRAP HOSE MANAGEMENT 1 81 9013729 STRAP HOSE MGMT VELCRO 1 81 ...

Page 43: ... VALVE WATER SPRAY W HARDWARE 5 1 6 1071325 TUBE UPPER SS 1 7 1071326 TUBE LOWER SS 1 8 1071327 PLATE GLIDE W HARDWARE 1 1073399 FITTING TIP SPRAY ASM 11001 QTY 2 250 500 PSI 1 SET 9011919 FITTING TIP SPRAY 11001 QTY 2 250 500 PSI 1 SET Spray valve assembly for floor tools w tabs 1 2 3 4 5 6 7 8 9 10 9012461 COUPLING FEM QD w ADAPTER 1071324 1071323 FITTING BRS QDC ASM VALVE WATER SPRAY W HARDWARE...

Page 44: ... DIAGRAM OPTIONAL 5HI 3DUW 1R HVFULSWLRQ 4W 1 9011753 COUPLER FEM QD 1 2 9012503 HOSE PRESSURE 1 3 9012504 FITTING TIP SPRAY 9502 1 4 9012505 VALVE ASSY TRIGGER W HDWR 1 9012506 VALVE REBUILD KIT 1 43 Nobles Quick Clean 12 01 2017 PARTS ...

Page 45: ... 2 9012496 BRUSH CORNER TOOL W HDWR 1 3 9012497 COVER PLATE W HDWR 1 4 9012498 FILTER IN LINE 1 5 9012499 TUBE MANIFOLD SPRAY 1 6 9012500 VALVE ASSY TRIGGER W HDWR 1 7 9012501 LEVER TRIGGER W PIN 1 8 9012502 GRIP HANDLE SLEEVE W SLIDE 1 9 9011753 COUPLER FEM QD 1 44 Nobles Quick Clean 12 01 2017 PARTS ...

Page 46: ...RQ 4W 1 9012489 VALVE ASSY TRIGGER W HDWR 1 2 9012490 MOUNT SPRAYBAR SWIVEL W HDWR 1 3 9012491 HANDLE ASSY W HDWR 1 4 9012492 RING INNER 1 5 9012493 TUBE SPRAY ASSY W HDWR 1 6 9012494 FITTING TIP SPRAY QTY 2 1 7 9011753 COUPLER FEM QD 1 45 Nobles Quick Clean 12 01 2017 PARTS ...

Page 47: ...46 Nobles Quick Clean 12 01 2017 PARTS DETERGENT OPTIONAL 5HI 3DUW 1R HVFULSWLRQ 4W 9012084 DETERGENT HARD SURFACE PRESPRAY 1CTN 4 1 GAL BTLS 1 9012083 DETERGENT DEFOAMER 1CTN 4 1GAL BTLS 1 ...

Page 48: ... 42 9011745 PUMP SEAL CAM KIT REPAIR 1200PSI 43 9011746 HOSE PRESS PULSE KIT REPLMT 34IN 44 9011747 PUMP DUMP KIT REPLMT 45 9011748 HOSE PRESS PULSE KIT REPLMT 21IN 46 9011749 GAUGE ASSY KIT REPLMT 47 9011750 HOSE PRESS PULSE KIT REPLMT 15IN 48 9011751 CAP HOSE KIT REPLMT 49 9011752 COUPLING MAL REPLMT QD 50 9011753 COUPLING FEM REPLMT QD 56 9011759 CIRCUITBREAKER KIT REPLMT 59 9011762 SWITCH ELE ...

Page 49: ... Clean 12 01 2017 ELECTRICAL DIAGRAM 5 8 7 5 5 3803 2 5 7 51 02725 9 880 02725 3803 287 02725 02725 51 3 36 1250 26 5 51 51 7 7 7 51 51 5 51 51 7 5 8 7 5 5 7 2 5 35 6685 3803 02725 02725 51 7 8 8 6 3 5 7 5 8 7 1 725 7 ...

Page 50: ...X X 200517 3 inch Crevice Tool 250 PSI 100Ͳ200 PSI X X X 200540 Upholstery Tool 250 PSI 100 PSI X 200545 Upholstery Tool 250 PSI 200 PSI X X 1233442 Hard Surface Tool 2500 PSI 800Ͳ1200 PSI X 1210534 Hand Held Hard Surface Tool 4000 PSI 800Ͳ1200 PSI X 1210535 Hard Surface Corner Tool 1250 PSI 800Ͳ1200 PSI X Ύ W ŵĂĐŚŝŶĞ ƐĞƚƚŝŶŐ ĂĐĐŽƌĚŝŶŐ ƚŽ ĂĐĐĞƐƐŽƌLJ ƚŽŽů ƐƉƌĂLJ ƚŝƉ ƐŝnjĞ ΎΎ ZĞƋƵŝƌĞƐ ηϭϭϬϬϮ ƐƉƌĂLJ ƚŝƉƐ...

Reviews: