background image

OPERATION

7

Viper

R

 Upright Vacuum Cleaner  (06–03)

3.

Pull and turn quick-release hook to remove power
cord (Figure 6).

FIG. 6

4.

Plug power cord into a grounded wall outlet
(Figure 7).

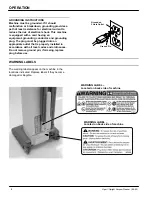
Grounded

3 Hole Outlet

Ground Pin

FIG. 7

FOR SAFETY: Do not operate machine unless
cord is properly grounded.

FOR SAFETY: Do not operate machine with the
use of an extension cord.

MACHINE OPERATION

FOR SAFETY: Do not operate machine unless
operator manual is read and understood.

1.

Activate ON/OFF switch.

WARNING: Do Not Pick Up Flammable Or

Toxic Materials, Burning Or Smoking Debris.

2.

Lower handle to operating position by stepping on
handle release latch (Figure 8).

NOTE: Brush motor will not start until handle is lowered.

FIG. 8

3.

Begin vacuuming floor. Operate machine with a
back and forth motion or “W” pattern.

4.

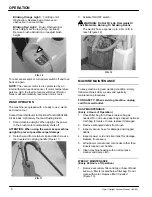
To operate in the horizontal position, lower handle
to the stop point and step on release latch again
(Figure 9).

Operating
Position

Upright
Position

Horizontal
Position

FIG. 9

5.

To stop vacuuming, raise handle to the upright
position and turn off power switch.

ELECTRONIC SENSOR SYSTEM

The machine’s Electronic Sensor System monitors the
condition of the machine while operating. The sensor
light, located on the bag compartment lid (Figure 10),
will indicate the following conditions:

Green Light =  Machine Functioning Properly.

Summary of Contents for 608669

Page 1: ... Aspiradora Vertical Viper Model No 608669 608680 Rev 03 06 03 R NOBLES CUSTOMER SERVICE 1 800 365 6625 FAX 1 800 678 4240 TECHNICAL SUPPORT 1 800 522 7839 EXT 5356 TENNANT COMPANY 701 NORTH LILAC DRIVE MINNEAPOLIS MN 55422 MAILING ADDRESS TENNANT COMPANY P O BOX 1452 MINNEAPOLIS MN 55440 1452 ...

Page 2: ...nufacturer supplied or equivalent parts MACHINE DATA Please fill out at time of installation for future reference Model No Install Date Serial No E 1999 2000 2003 Tennant Company Printed in U S A Nobles and Viper are registered United States trademarks of Tennant Company EZGrip is a United States trademark of Tennant Company Specifications and parts are subject to change without notice TABLE OF CO...

Page 3: ...ore Servicing Machine If the supply cord is damaged or broken it must be replaced by the manufacturer or it s service agent or a similarly qualified person in order to avoid a hazard WARNING Do Not Use Outdoors Or On Wet Surfaces Do Not Expose to Rain Store Indoors The following information signals potentially dangerous conditions to the operator or equipment FOR SAFETY 1 Do not operate machine In...

Page 4: ...ipment grounding conductor and grounding plug The plug must be plugged into an appropriate outlet that is properly installed in accordance with all local codes and ordinances Do not remove ground pin if missing replace plug before use Grounded 3 Hole Outlet Ground Pin WARNING LABELS The warning labels appear on the machine in the locations indicated Replace labels if they become damaged or illegib...

Page 5: ...ush Height Adjustment Dial 16 Handle Release Latch MACHINE INSTALLATION Carefully check carton for signs of damage Report damages to carrier immediately Check Machine Contents to ensure carton is complete Contact distributor for missing items Machine Contents Machine Handle Vacuum Hose Wand Crevice Tool Paper Filter Bag Pre installed Secondary Filter Pre installed Exhaust Filter Pre installed ATTA...

Page 6: ...ff FIG 3 MACHINE SETUP WARNING Do Not Operate With Damaged Power Cord Do Not Modify Plug Unplug Power Cord Before Servicing Machine 1 Install filter bag pre installed Depress latch on lid to open bag compartment Figure 4 Contact distributor for optional cloth bag 900034 NOTE The machine will not operate without a filter bag in place The protective vacuum motor lockout device will automatically sen...

Page 7: ...bris 2 Lower handle to operating position by stepping on handle release latch Figure 8 NOTE Brush motor will not start until handle is lowered FIG 8 3 Begin vacuuming floor Operate machine with a back and forth motion or W pattern 4 To operate in the horizontal position lower handle to the stop point and step on release latch again Figure 9 Operating Position Upright Position Horizontal Position F...

Page 8: ...ainer clip and attach crevice tool located on carrying handle Figure 11 FIG 11 3 Activate ON OFF switch WARNING Do Not Pick Up Flammable Or Toxic Materials Burning Or Smoking Debris The wand s hose expands up to 2 4m 8 ft in reach Figure 12 FIG 12 MACHINE MAINTENANCE To keep machine in good working condition simply follow machine s daily weekly and quarterly maintenance procedures FOR SAFETY When ...

Page 9: ... metal brush shoe from brush base Philips screwdriver is required 2 Remove brush assembly Grip brush on opposite side of belt and pull outward 3 Inspect drive belt s for wear replace if necessary 4 Rotate both bearing blocks 180_ and reinstall brush Figure 15 NOTE Brush bearing blocks are labeled with numbers To extend brush life position label 2 outwards when reinstalling brush 1 1 2 2 FIG 15 5 R...

Page 10: ... in a dry area in the upright position ATTENTION Do not expose to rain Store indoors RECOMMENDED STOCK ITEMS Refer to Parts List section for recommended stock items Stock Items are clearly identified with a bullet preceding the parts description See example below Figure 17 FIG 17 ...

Page 11: ... Service Center Defective vacuum motor Contact Service Center Brush does not operate Electronic sensor system activated blinking red light Turn off machine Inspect brush for obstruction or readjust brush height Loose or broken brush belt s Replace belt s Defective brush motor Contact Service Center Faulty electronic sensor system Contact Service Center Poor vacuum performance Full bag blinking ora...

Page 12: ...ower cord BRUSH MOTOR 120V 0 1hp 1A 3000 rpm VACUUM MOTOR 120V 1hp 7 9A 915W POWER CORD LENGTH 12m 40 ft SWEEPING PATH WIDTH 356mm 14 in includes edge cleaning VACUUM BAG CAPACITY 5 L 5 2 qts FILTRATION SYSTEM Triple filtration Filter bag secondary filter and exhaust filter High efficiency 99 9 to 0 1 micron DECIBEL RATING AT OPERATOR S EAR INDOORS ON CARPET 69 5 dB A ...

Page 13: ...a se mantiene con las piezas provistas por el fabricante o equivalentes DATOS MECANICOS Por favor complete en momento de instalación para referencia futura Modelo No Fecha de inst No de serie INDICE MEDIDAS DE SEGURIDAD 14 INSTRUCCIONES DE CONEXION A TIERRA 15 ETIQUETAS DE ADVERTENCIA 15 COMPONENTES DE LA MÁQUINA 16 INSTALACIÓN DE LA MÁQUINA 16 FIJACIÓN DEL MANGO 16 INSTALACIÓN DE LA MANGUERA VARA...

Page 14: ...la máquina Si el cordón del suministro se daña o se rompe debe ser reemplazado por el fabricante o su agente de servicio o una persona similarmente calificada para evitar un riesgo ADVERTENCIA No use al aire libre o en superficies húmedas No exponga a la lluvia Almacén bajo techo La información siguiente señala condiciones potencialmente peligrosas para el operador o el equipo PARA SEGURIDAD 1 No ...

Page 15: ...ina está equipada con un cordón con un conductor de conexión a tierra del equipo y enchufe de conexión a tierra El enchufe debe enchufarse en un tomacorrientes apropiado correctamente instalado de acuerdo con todos los códigos y ordenanzas locales No extraer la clavija de conexión a tierra si falta reemplazar el enchufe antes de usar Conexión a tierra Tomacorrientes de 3 orificios Clavija de conex...

Page 16: ...a de limpieza de Borde 15 Ajuste de la altura del cepillo 16 Pestillo de desconexión del mango INSTALACIÓN DE LA MÁQUINA Inspeccionar cuidadosamente la caja por señales de daño Informar al transportista inmediatamente acerca de daños observados Inspeccionar el contenido de la caja para asegurar que esté completo Avise al distribuidor por los artículos perdidos Contenido de la Máquina La máquina Ma...

Page 17: ...duras en el mango para transportar Figura 3 Pico Vara Base Camisa FIG 3 PREPARACION DE LA MÁQUINA ADVERTENCIA No opere con un cordón eléctrico dañado No modifique el enchufe Desenchufe el cordón eléctrico antes de reparar la máquina 1 Instale la bolsa del filtro preinstalada Deprima el pestillo en la tapa para el compartimiento de la bolsa Figura 4 Consultar con el distribuidor para la tela opcion...

Page 18: ...ce la máquina salvo que el operario haya leído y comprendido el manual de instrucciones 1 Activar el interruptor de ENCENDIDO APAGADO ADVERTENCIA No recoja materiales tóxicos o inflamables ni residuos humeantes o ardiendo 2 Bajar el mango a la posición de operación parándose sobre el pestillo de desconexión del mango Figura 8 NOTA el motor del cepillo no arranca hasta que se baje el mango FIG 8 3 ...

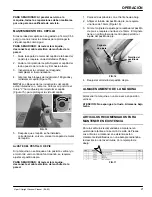
Page 19: ...lo o reajustar la altura del cepillo FIG 10 Para restablecer el sistema del sensor apagar el interruptor eléctrico y encender nuevamente NOTA El motor del vacío también está protegido por un sensor de carga térmica interior excesiva Si la temperatura de motor se eleva demasiado el sensor térmico apaga el motor El sensor se restablece automáticamente cuando el motor se enfría FUNCIONAMIENTO DE LA V...

Page 20: ...rzos por daños Reemplazar si fuera necesario 5 Enrollar el cordón de electricidad alrededor de los ganchos del cordón en lugar de flojamente sobre el mango 6 Limpiar el armazón de la máquina con un limpiador de uso múltiple y un trapo húmedo MANTENIMIENTO SEMANAL Cada 20 horas de uso 1 Quitar el filtro secundario y golpear suavemente o soplar el polvo acumulado el filtro está ubicado debajo de la ...

Page 21: ... cepillo se ha instalado correctamente volver a colocar la zapata de metal del cepillo AJUSTE DEL PESTILLO DE PIE Si la máquina no se bloquea en la posición vertical y o el motor de vacío continúa funcionando se requiere ajustar el pestillo de pie PARA SEGURIDAD Al revisar la máquina desconecte el cable eléctrico del enchufe de la pared 1 Colocar la aspiradora con el frente hacia abajo 2 Aflojar e...

Page 22: ...io Motor de vacío defectuoso Consultar con el Centro de Servicio El cepillo no funciona Activado el sistema electrónico del sensor luz roja centelleante Apagar la máquina Inspeccionar el cepillo por obstrucciones o reajustar la altura del cepillo Correa s del cepillo floja s o rota s Reemplazar la correa s Motor del cepillo defectuoso Consultar con el Centro de Servicio Sistema electrónico del sen...

Page 23: ... 3 8A 874 vatios LARGO DEL CORDON ELECTRICO 12m 40 pies 12m 40 pies ANCHO DE BARRIDO 356mm 14 pulg incluye limpieza del borde 356mm 14 pulg incluye limpieza del borde CAPACIDAD DE LA BOLSA DE VACIO 5 L 5 2 cuart 5 L 5 2 cuart SISTEMA DE FILTRACION Filtración triple Bolsa de filtro filtro secundario y filtro de descarga Alta eficiencia 99 9 a un 0 1 micrón Filtración triple Bolsa de filtro filtro s...

Page 24: ...H MOTOR VACUUM MOTOR WHT GRN BLK BLK RED BRN BLK WHT ORG WHT GRN GRN WHT WHT BLK WHT ORG WHT GRN GRN ORG BLK RED BRN WHT WHT GRN CONTROL BOARD MOUNTING BRACKET BRUSH MOTOR INTERRUPT SWITCH BRUSH BASE PLATE CONTROL BOARD SENSOR SYSTEM LIGHT MAIN SWITCH BAG LOADED SWITCH 120V RED BLK WHT ...

Page 25: ...0V 240V WHT WHT GRN ORG BLK RED RED BRUSH MOTOR VACUUM MOTOR BRUSH MOTOR INTERRUPT SWITCH BRUSH BASE PLATE CONTROL BOARD CONTROL BOARD MOUNTING PLATE SENSOR SYSTEM LIGHT BAG LOADED SWITCH MAIN SWITCH BLK GRN RED GRN BLUE BRN RED GRN BLK BLK WHT WHT WHT WHT ORG ORG BLK BRN BRN GRN GRN GRN ...

Page 26: ... PIEZAS 26 ViperR Upright Vacuum Cleaner 06 03 BAG HOUSING GROUP GRUPO DEL ARMAZON DE LA BOLSA 1 4 3 5 6 39 8 9 11 12 13 31 30 24 23 26 27 25 37 29 33 33 34 22 36 26 28 35 7 19 20 21 18 17 16 15 14 10 37 21 32 32 32 38 2 ...

Page 27: ... LIGHT 1 20 579211 NUT M3 HEXLCK 2 21 605994 DCONTROL BOARD 120V 1 22 604832 DFILTER VAC MOTOR SECONDARY 1 23 604842 DCORD 18 3 X 40 GRAY 120V 1 24 130166 DCORD GRIP NYLON BLK W NUT 1 ASSEMBLY CONJUNTO Y INCLUDED IN ASSEMBLY INCLUIDO EN EL CONJUNTO D RECOMMENDED STOCK ITEMS ARTICULOS RECOMENDADOS REF PART DESCRIPTION QTY 25 604847 DCLIP WAND 1 26 607006 SCREW M4X 7X12 TRSPHL 3 27 604844 STRIKE LID...

Page 28: ...PARTS LIST LISTA DE PIEZAS 28 ViperR Upright Vacuum Cleaner 06 03 VACUUM MOTOR HOUSING GROUP GRUPO DEL ARMAZON DEL MOTOR DE VACIO 5 1 2 4 7 8 24 10 12 13 6 15 18 19 20 11 14 21 9 17 24 3 16 22 23 21 ...

Page 29: ...7X12 TRSPHL 2 10 606732 GASKET UPPER CLAMP PLATE 1 11 608679 COVER EXHAUST FILTER GREEN 1 ASSEMBLY CONJUNTO Y INCLUDED IN ASSEMBLY INCLUIDO EN EL CONJUNTO D RECOMMENDED STOCK ITEMS ARTICULOS RECOMENDADOS REF PART DESCRIPTION QTY 12 606730 CLAMP PLATE VAC MOTOR 1 13 606731 GASKET LOWER CLAMP PLATE 1 14 606982 DFILTER EXHAUST 3 PACK 1 15 611734 SCREW SHOULDER PIVOT 2 16 606723 PLATE FOOT LATCH 1 17 ...

Page 30: ...STA DE PIEZAS 30 ViperR Upright Vacuum Cleaner 06 03 BRUSH BASE GROUP GRUPO DE LA BASE DEL CEPILLO 1 2 3 7 6 4 5 8 9 10 13 11 12 14 17 16 15 38 39 19 18 24 22 28 25 26 27 29 32 31 33 33 30 35 36 37 34 40 41 20 21 23 ...

Page 31: ...ADJUSTER 1 19 604812 GASKET FOAM BRUSH MTR 1 ASSEMBLY CONJUNTO Y INCLUDED IN ASSEMBLY INCLUIDO EN EL CONJUNTO D RECOMMENDED STOCK ITEMS ARTICULOS RECOMENDADOS REF PART DESCRIPTION QTY 20 604803 DBRUSH ASSEMBLY 1 Y 21 140125 DBEARING 2 Y 22 230429 DBLOCK BEARING 2 Y 23 230348 DPULLEY BRUSH DOUBLE V 1 24 230349 DBELT BRUSH DRIVE 2 501086 DASM BASE ROLLER BRACKET 1 Y 25 605317 ROLLER BASE HOUSING FRO...

Page 32: ... Y 1 609194 UPHOLSTERY TOOL 1 Y 2 609196 ADAPTOR 1 Y 3 609193 DUSTING BRUSH 1 Y 4 609195 EXTENSION WAND 1 ASSEMBLY CONJUNTO Y INCLUDED IN ASSEMBLY INCLUIDO EN EL CONJUNTO D RECOMMENDED STOCK ITEMS ARTICULOS RECOMENDADOS PARA MANTENER EN EXISTENCIA REPLACEMENT BAGS BOLSAS DE REPUESTO 1 2 REF PART DESCRIPTION QTY 1 611787 DBAG PAPER CARTON OF 100 1 2 900034 DBAG CLOTH 1 ...

Reviews: