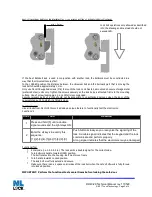
Step 1. Put the input cable through the center hole of the safe door. Using the mounting screws, mount the
input onto the safe door. Tighten the screws.
Step 2. Using the mounting screws, mount the lock in the correct posi on on the inside of the safe door. Plug
the input connector into the ENT slot on the lock.
LOCK CAM MUST BE IN THE “LOCK OPEN” POSITION.
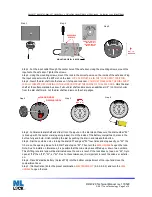
Step 3. Insert the dial shaft into the lock un l it stops on lock cam.
YOU MUST MAKE SURE THE DIAL SHAFT
IS FULLY INSERTED BY LOOKING IN THE LOCK CAM FROM THE INSIDE OF THE SAFE DOOR.
Mark the dial
shaft at the surface marked by arrow. Pull out dial shaft and measure an additional 1/2” (12.7mm) shorter
from the dial shaft mark. Cut the dial shaft and remove the sharp edges.
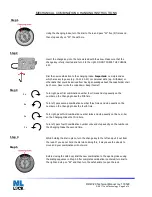
Step 4. Put dial onto dial shaft and slide it into the input un l the dial stops. Make sure the dial number “92”
is lined up with the center mark (opening index). From the inside of the battery compartment, press in the
butt on fully and hold. Finish installing the dial by pushing the dial in and release the button.
Step 5. Dial the combina on by turning the dial LEFT and pass “50” four times and stop exactly on “50” the
fi h me on the opening index. Turn RIGHT and stop on “92”. Then turn the
SAFE HANDLE
to open the lock.
Note: Due to installa on tolerances, it is possible that the code may have shifted up or down two numbers.
This shifting is normal and will be eliminated once the code is reset. If the lock does not open on “50”, try to
open at “48” then “49”, “51”, or “52”. Due to these tolerances, it is important to reset the code a er installa-
on.
Step 6. Place 9V alkaline battery (Duracell TM) into the bottom compartment of the input and close the
compartment door.
Step 7. (No Illustration) Enter the preset combination
ELECTRONICALLY
(5-5-5-5-5-5) and turn the
SAFE
HANDLE
to open the lock.
RR40•20 Technical Manual rev. 170528
© 2017 Lock Technology Page
!
of
!
3
4
Installation Instructions 071717
Page 1 of 1
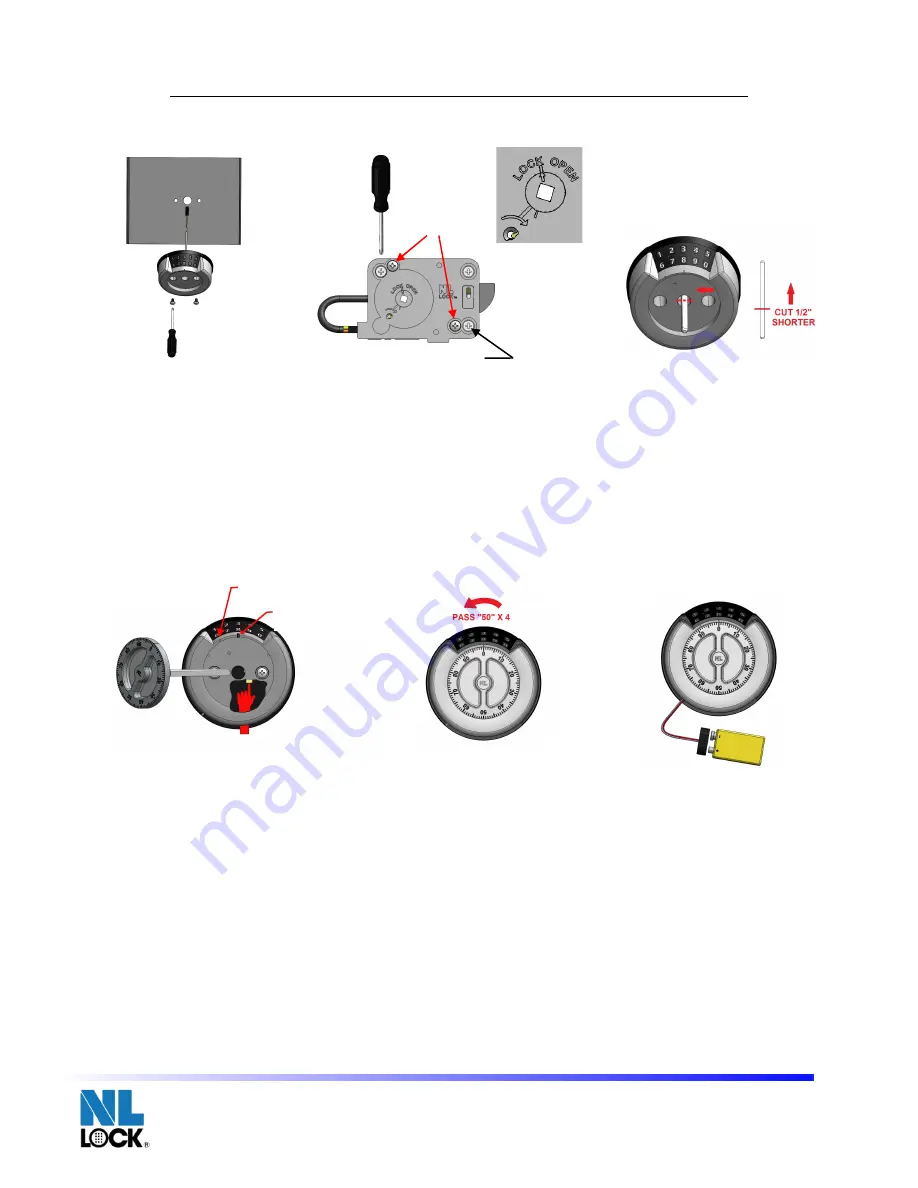
Step 1. Put the input cable through the center hole of the safe door. Using the moun9ng screws, mount the
input onto the safe door. Tighten the screws.
Step 2. Using the moun9ng screws, mount the lock in the correct posi9on on the inside of the safe door. Plug
the input connector into the ENT slot on the lock.
LOCK CAM MUST BE IN THE “LOCK OPEN” POSI-
TION.
Step 3. Insert the dial shaC into the lock un9l it stops on lock cam.
YOU MUST MAKE SURE THE DIAL
SHAFT IS FULLY INSERTED BY LOOKING IN THE LOCK CAM FROM THE INSIDE OF THE SAFE
DOOR.
Mark the dial shaC at the surface marked by arrow. Pull out dial shaC and measure an addi9onal
1/2” (12.7mm) shorter from the dial shaC mark. Cut the dial shaC and remove the sharp edges.
Step 1
Step 6
Step 4
Step 3
Step 2
Step 4. Put dial onto dial shaC and slide it into the input un9l the dial stops. Make sure the dial number “92”
is lined up with the center mark (opening index). From the inside of the baSery compartment, press in the
buSon fully and hold. Finish installing the dial by pushing the dial in and release the buSon.
Step 5. Dial the combina9on by turning the dial LEFT and pass “50” four 9mes and stop exactly on “50” the
fiCh 9me on the opening index. Turn RIGHT and stop on “92”. Then turn the
SAFE HANDLE
to open the
lock.
Note: Due to installa9on tolerances, it is possible that the code may have shiCed up or down two numbers.
This shiCing is normal and will be eliminated once the code is reset. If the lock does not open on “50”, try to
open at “48” then “49”, “51”, or “52”. Due to these tolerances, it is important to reset the code aCer installa-
9on.
Step 6. Place 9V alkaline baSery (Duracell ™) into the boSom compartment of the input and close the com-
partment door.
Step 7. (No Illustra9on) Enter the preset combina9on
ELECTRONICALLY
(5-5-5-5-5-5) and turn the
SAFE
HANDLE
to open the lock.
®
Lock Technology
Redundant RotoBolt Installation Instructions - Dual Basic (DB20
•
XX)
Step 5
CHANGE INDEX
OPENING INDEX
DO NOT MOVE LOCK
CAM FROM THIS
POSITION DURING
ENTIRE INSTALL.
MOUNTING SCREW (3 REQ’D)
ASSEMBLY
SCREWS
DUET ROTOBOLT INSTALLATION INSTRUCTIONS - DB20-XX ENTRY

