Nixeus NX-EDG274K User Manual Download Page 33

33 


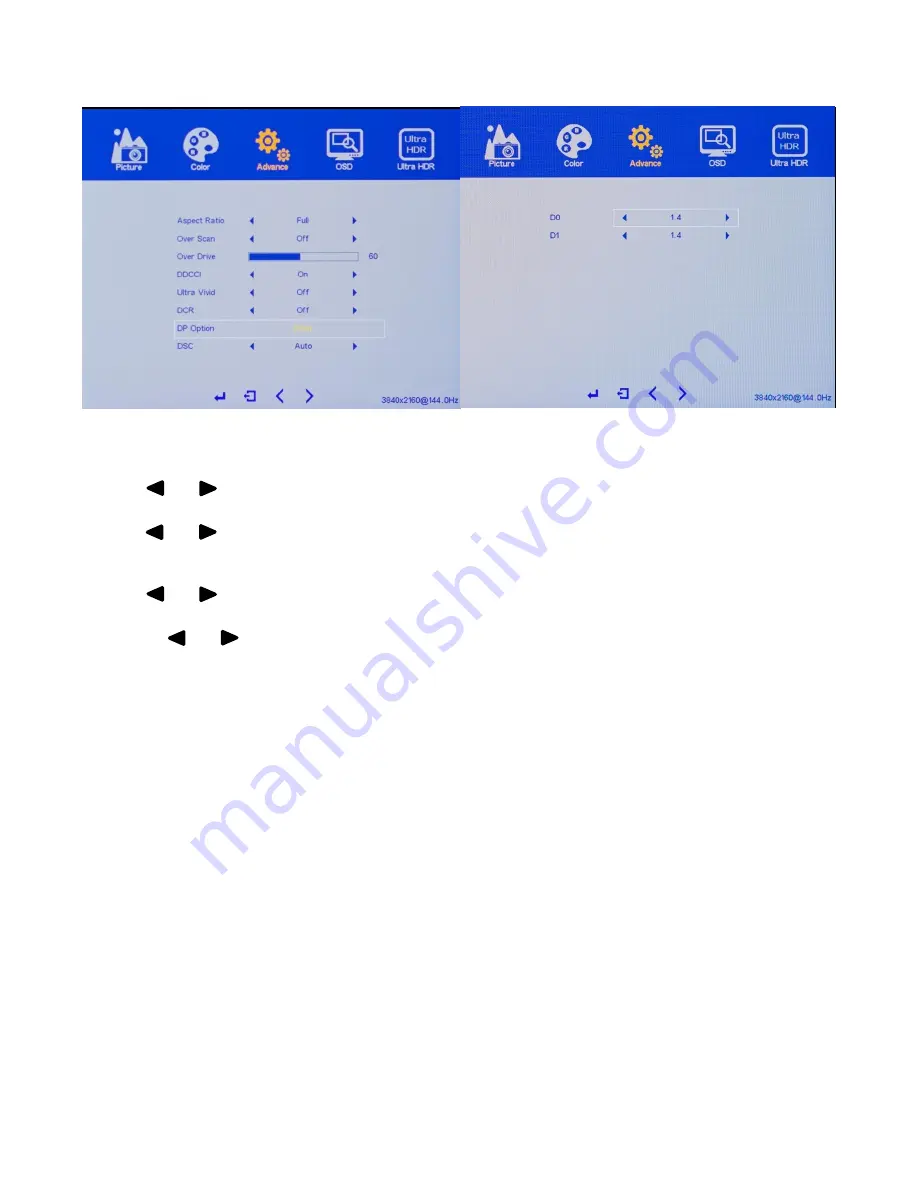
DP OPTION (DisplayPort Option) 


a) To bring up the OSD Main Menu, press 

[M]. 

b) Using the 


and        buttons, navigate to ADVANCE and press 

[M] 

to enter the ADVANCE sub-menu. 

c) Using the 


and        buttons, navigate to DP OPTION and press 

[M]

 to enter into settings for the two 

DisplayPort inputs

d) Using the 


and        buttons, navigate to the desired DisplayPort inputs D0 or D1 and press 

[M].


e) Next use the


and        buttons to set the DisplayPort input to either 1.1, 1.2, or 1.4 and press 

[M] 

to confirm the 

settings. 

f) Last, press 

[E]


to exit out of the ADVANCE sub-menu or proceed to the next ADVANCE setting you want to adjust. 

Note: To support the NX-EDG274K native full 3840 x 2160 (4K) resolution with native 144Hz refresh rate, please leave 
the DP OPTION settings at 1.4 (DisplayPort 1.4) for but DisplayPort inputs (D0 and D1) since at that setting the monitor is 
also backwards compatible to the other DisplayPort settings. 


Summary of Contents for NX-EDG274K

Page 1: ...1 NX EDG274K User Manual Version 8 1 2020 www nixeus com...

Page 2: ...rature Presets 17 Color Temperature USER 18 User Settings Red Green Blue Adjustment for Color Calibration 18 19 Color Effect Presets 20 Color Effect User 21 22 Color Format 23 Print and Color Manageme...

Page 3: ...Color Enhance 47 Light Enhance 48 On Screen Display OSD AUDIO Sub Menu 49 Volume 49 Mute 50 Audio Source 51 Warranty Information 52 53 Electronics Recycling and Proper Electronics Disposal 54 Nixeus T...

Page 4: ...by Nixeus If any power connections are missing please contact Nixeus for a replacement Using un authorized power connectors may damage your monitor and void your warranty 7 During operation please do...

Page 5: ...sed the image persistence may remove the image persistence Please contact Nixeus if you need assistance in removing image persistence CAUTION Serious brand incidental image or after image will not dis...

Page 6: ...re installed with 4 screws DisplayPort 1 4 Cable x 1 Stand Base with 1 x Tool less screw Power Adapter and Power Cable x 1 Installing the Base Stand Please refer to the quick start guide for the insta...

Page 7: ...splayPort 1 4 compliant cable and source device support DisplayPort 1 4 with DSC Blue Audio Output Port For connecting your headphones desktop speakers sound bard or any other audio speaker device For...

Page 8: ...your hand carefully twist the monitor s shaft left or right to desired orientation Monitor Height Adjustment Make sure the NX EDG274K is on a stable level surface Using both hands slide the slide the...

Page 9: ...ends symbols on the front and not the texts right below the buttons See picture below M Menu Button Press to display the On Screen Display OSD menu or enter sub menus or to confirm Left Arrow Button P...

Page 10: ...s you to adjust the sound volume of the monitor s speaker or your external speakers headphone connected to the monitor s 3 5mm audio port Right Arrow Button Volume Hot Key a Press the button to bring...

Page 11: ...nitor or the symbols in the OSD Menu to avoid confusion with the actual buttons M Menu Button Press to display the On Screen Display OSD menu or enter sub menus or to confirm Left Arrow Button Press t...

Page 12: ...rightness both the BACKLIGHT and BRIGHTNESS settings need to be adjusted at the same time accordingly a To bring up the OSD Main Menu press M b Using the and buttons navigate to PICTURE and press M to...

Page 13: ...djusted at the same time accordingly a To bring up the OSD Main Menu press M b Using the and buttons navigate to PICTURE and press M to enter the PICTURE sub menu c Using the and buttons navigate to B...

Page 14: ...e and buttons navigate to PICTURE and press M to enter the PICTURE sub menu c Using the and buttons navigate to CONTRAST and M d Next use the and buttons to adjust the CONTRAST to your desired setting...

Page 15: ...s M to enter the PICTURE sub menu c Using the and buttons navigate to SHARPNESS and M d Next use the and buttons to adjust the SHARPNESS to your desired settings and press M to confirm the settings e...

Page 16: ...OS PC use GAMMA settings at 2 2 and MAC OS use GAMMA settings at 1 8 a To bring up the OSD Main Menu press M b Using the and buttons navigate to COLOR and press M to enter the COLOR sub menu c Using t...

Page 17: ...press M b Using the and buttons navigate to COLOR and press M to enter the COLOR sub menu c Using the and buttons navigate to COLOR TEMPERATURE and press M d Next use the and buttons to adjust the CO...

Page 18: ...GREEN BLUE using a display colorimeter is recommended for color accuracy a To bring up the OSD Main Menu press M b Using the and buttons navigate to COLOR and press M to enter the COLOR sub menu c Usi...

Page 19: ...se the and buttons to adjust the settings from 0 to 255 to your desired color settings and press M to confirm the settings g Next use the and buttons to navigate to either USER RED USER GREEN or USER...

Page 20: ...enu press M b Using the and buttons navigate to COLOR and press M to enter the COLOR sub menu c Using the and buttons navigate to COLOR EFFECT and press M d Next use the and buttons to adjust the COLO...

Page 21: ...he individual HUE and SATURATION settings for the monitor a To bring up the OSD Main Menu press M b Using the and buttons navigate to COLOR and press M to enter the COLOR sub menu c Using the and butt...

Page 22: ...to any of the individual HUE and SATURATION settings and press M NOTE Repeat steps above if you want to continue to adjust each individual setting e Last press E to exit out of the COLOR EFFECT USER o...

Page 23: ...ns navigate to COLOR and press M to enter the COLOR sub menu c Using the and buttons navigate to COLOR FORMAT and press M d Next use the and buttons to adjust the COLOR FORMAT to your desired settings...

Page 24: ...lor output a To bring up the OSD Main Menu press M b Using the and buttons navigate to COLOR and press M to enter the COLOR sub menu c Using the and buttons navigate to PCM and press M d Next use the...

Page 25: ...SD Main Menu press M b Using the and buttons navigate to COLOR and press M to enter the COLOR sub menu c Using the and buttons navigate to HUE and press M d Next use the and buttons to adjust the HUE...

Page 26: ...OSD Main Menu press M b Using the and buttons navigate to COLOR and press M to enter the COLOR sub menu c Using the and buttons navigate to SATURATION and press M d Next use the and buttons to adjust...

Page 27: ...VANCE and press M to enter the ADVANCE sub menu c Using the and buttons navigate to ASPECT RATIO and press M d Next use the and buttons to adjust the ASPECT RATIO to your desired settings and press M...

Page 28: ...gate to ADVANCE and press M to enter the ADVANCE sub menu c Using the and buttons navigate to OVER SCAN and press M d Next use the and buttons to adjust the OVER SCAN to your desired settings and pres...

Page 29: ...ault OVER DRIVE Setting is 63 a To bring up the OSD Main Menu press M b Using the and buttons navigate to ADVANCE and press M to enter the ADVANCE sub menu c Using the and buttons navigate to OVER DRI...

Page 30: ...to adjust Note DDCI is a display data channel command interface for remote diagnosis and control Based on the DDC CI protocol users can use the mouse and a user friendly software interface to complete...

Page 31: ...ss M to enter the ADVANCE sub menu c Using the and buttons navigate to ULTRA VIVID and press M d Next use the and buttons to adjust the ULTRA VIVID to either OFF LOW MEDIUM or HIGH and press M to conf...

Page 32: ...o bring up the OSD Main Menu press M b Using the and buttons navigate to ADVANCE and press M to enter the ADVANCE sub menu c Using the and buttons navigate to DCR and press M d Next use the and button...

Page 33: ...0 or D1 and press M e Next use the and buttons to set the DisplayPort input to either 1 1 1 2 or 1 4 and press M to confirm the settings f Last press E to exit out of the ADVANCE sub menu or proceed t...

Page 34: ...VANCE and press M to enter the ADVANCE sub menu c Using the and buttons navigate to DSC and press M d Next use the and buttons to adjust the DSC to either OFF or ON and press M to confirm the settings...

Page 35: ...for G Sync a To bring up the OSD Main Menu press M b Using the and buttons navigate to ADVANCE and press M to enter the ADVANCE sub menu c Using the and buttons navigate to FreeSync in page 2 of the...

Page 36: ...Menu press M b Using the and buttons navigate to OSD and press M to enter the OSD sub menu c Using the and buttons navigate to RESET and press M d Last press E to exit out of the OSD sub menu or proc...

Page 37: ...u press M b Using the and buttons navigate to OSD and press M to enter the OSD sub menu c Using the and buttons navigate to MENU TIME press M d Next use the and buttons to adjust the MENU TIME from 10...

Page 38: ...ess M b Using the and buttons navigate to OSD and press M to enter the OSD sub menu c Using the and buttons navigate to OSD H POSITION press M d Next use the and buttons to adjust the OSD H POSITION f...

Page 39: ...Menu press M b Using the and buttons navigate to OSD and press M to enter the OSD sub menu c Using the and buttons navigate to OSD V POSITION press M d Next use the and buttons to adjust the OSD V POS...

Page 40: ...nd buttons navigate to OSD and press M to enter the OSD sub menu c Using the and buttons navigate to LANGUAGE press M d Next use the and buttons to adjust the LANGUAGE for the OSD to change between EN...

Page 41: ...ttons navigate to OSD and press M to enter the OSD sub menu c Using the and buttons navigate to OSD TRANSPARENCY press M d Next use the and buttons to adjust the OSD TRANSPARENCY for the OSD to change...

Page 42: ...g the and buttons navigate to OSD and press M to enter the OSD sub menu c Using the and buttons navigate to OSD ROTATE press M d Next use the and buttons to adjust the OSD ROTATE for the OSD orientati...

Page 43: ...nu c Using the and buttons navigate to HDR press M d Next use the and buttons to adjust the HDR setting for AUTO OFF or FORCE ST 2084 and press M to confirm the settings e Last press E to exit out of...

Page 44: ...ns navigate to HDR press M d Next use the and buttons to adjust the HDR setting for FORCE ST 2084 and press M to confirm the settings e Using the and buttons navigate to DARK ENHANCE and press M to en...

Page 45: ...ns navigate to HDR press M d Next use the and buttons to adjust the HDR setting for FORCE ST 2084 and press M to confirm the settings e Using the and buttons navigate to SHARP ENHANCE and press M to e...

Page 46: ...e to HDR press M d Next use the and buttons to adjust the HDR setting for FORCE ST 2084 and press M to confirm the settings e Using the and buttons navigate to HDR CONTRAST and press M to enter the OS...

Page 47: ...to HDR press M d Next use the and buttons to adjust the HDR setting for FORCE ST 2084 and press M to confirm the settings e Using the and buttons navigate to COLOR ENHANCE and press M to enter the OSD...

Page 48: ...to HDR press M d Next use the and buttons to adjust the HDR setting for FORCE ST 2084 and press M to confirm the settings e Using the and buttons navigate to LIGHT ENHANCE and press M to enter the OSD...

Page 49: ...age two to AUDIO and press M to enter the OSD sub menu c Using the and buttons navigate to VOLUME press M d Next use the and buttons to adjust the VOLUME for your preferred speaker volume settings bet...

Page 50: ...he right or left to page two to AUDIO and press M to enter the OSD sub menu c Using the and buttons navigate to MUTE press M d Next use the and buttons to adjust the MUTE to DISABLE or ENABLE to unmut...

Page 51: ...n Menu press M b Using the and buttons navigate all the way to the right or left to page two to AUDIO and press M to enter the OSD sub menu c Using the and buttons navigate to AUDIO SOURCE press M d N...

Page 52: ...ers or the liquidators expressly disclaim their warranty obligation whereas the product is being sold As Is without any warranty RMA Return Merchandise Authorization Request The customer shall return...

Page 53: ...AGE COMPUTER FAILURE OR MALFUNCTION FAILURE OF OTHER EQUIPMENT OR COMPUTER PROGRAMS TO WHICH NIXES S PRODUCT IS CONNECTED WITH LOSS OF INFORMATION OR DATA CONTAINED IN STORED ON OR INTEGRATED WITH ANY...

Page 54: ...reenhouse gas emissions and avoid air water pollution For more information regarding electronics recycling and proper disposal of electronics please visit http www nixeus com recycle Nixeus Technology...

Reviews: