3
The Ninja Master Prep is an indispensable kitchen tool that is perfect for blending,
chopping, mixing or pureeing when preparing your favorite recipes. For best results, be
sure to carefully read all the instructions contained in the manual before using this
appliance.
OPERATING INSTRUCTIONS
400 Watt Power Head
The 400 watt power head operates on
120V., 60 Hz. electrical power. Never
allow the power head to become wet
when plugged into an electrical outlet.
WARNING
: The power head should
never be immersed in water or any
other liquid.
CAUTION
: Make sure that the power
head is unplugged from the electrical
outlet and that the blades have stopped
turning before attaching or removing
any accessory.
Using the Master Prep Pitcher
CAUTION
:
Blades are sharp! Use
extreme caution when handling the
blades. Always hold them by the
hub.
IMPORTANT:
Never run the
appliance empty.
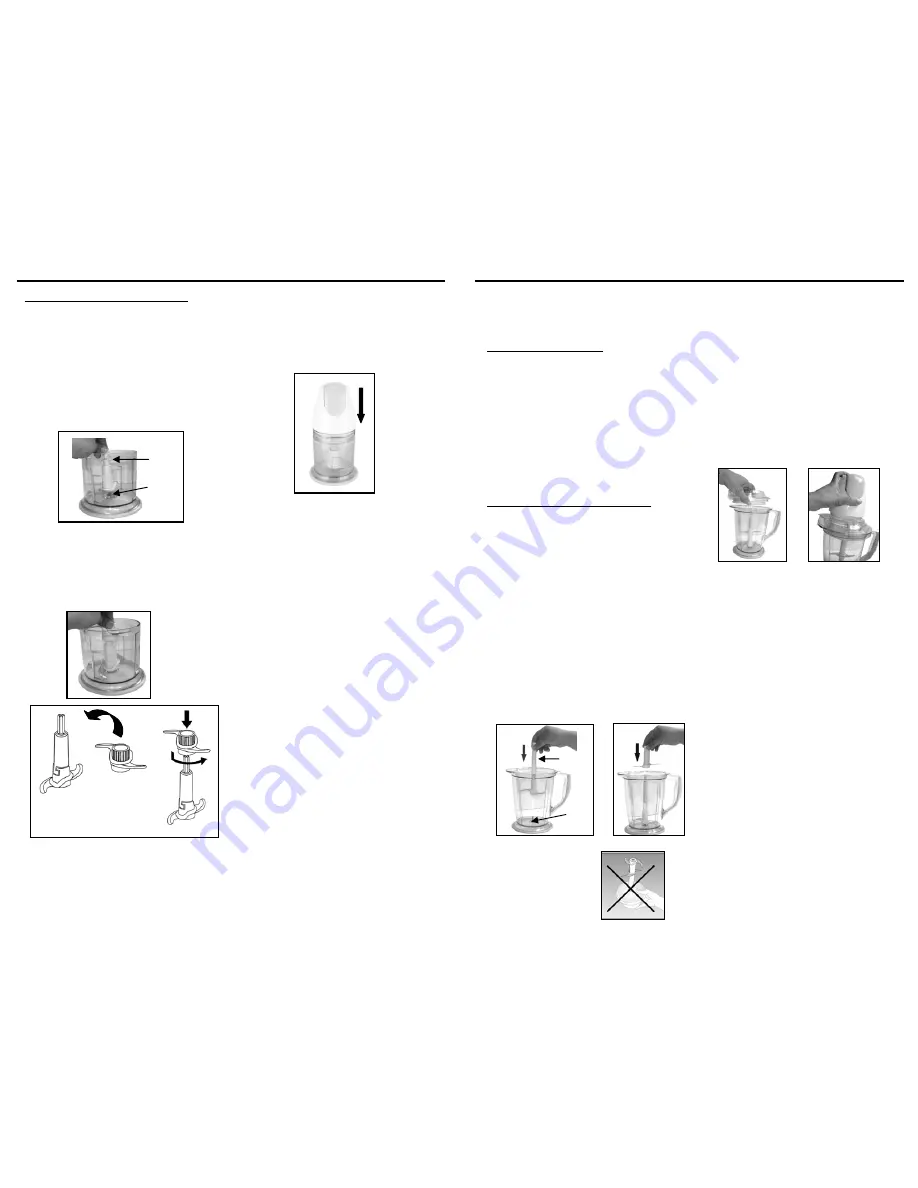
1. Place the master prep pitcher on a
clean, dry, level surface.
2. Holding the lower blade by the shaft,
place it onto the spindle pin inside
the master prep pitcher and then
carefully slide the upper blade onto
the shaft of the lower blade. Make
sure that the upper blade slides
down into the slots of the lower
blade shaft. (Fig. 1, Fig. 2) Make
sure that when you are inserting the
upper blade, the blades are on the
bottom.
Fig. 1
Fig. 2
WARNING
:
Do not
try
to place the blades
onto the power head
and then into the
Master prep pitcher.
(Fig. 3)
Fig. 3
3. Add the ingredients to be processed
into the master prep pitcher.
4. Place the pitcher splash guard onto
the top of the master prep pitcher.
(Fig. 4)
5. Place the power head on top of the
pitcher splash guard making sure
that it is securely in place. (Fig. 5)
Do not
attempt to operate the
appliance without the safety splash
guard in place.
Fig. 4
Fig. 5
6. To start the appliance, press on the
On/Off Pulse button located on the
top of the power head. To stop the
appliance, remove your fingers from
the On/Off Pulse button. In order to
obtain a better quality of chopping,
operate the appliance by using the
“pulse” method. If the ingredients
stick to the side of the master prep
pitcher, stop the appliance, remove
the power head and the splash
guard. Use a spatula to dislodge the
pieces and then replace the splash
guard and the power head. Continue
processing.
NOTE
: Do not operate the appliance
continuously for more than 20
seconds at a time.
7. Hold the master prep pitcher firmly
while depressing the On-Off/Pulse
button to ensure the unit stays in
place.
8. Make sure that the blades have
stopped completely before removing
the splash guard.
9. Remove the blade assembly by its
shaft before you empty the contents
of the master prep pitcher.
10.
Never
add ingredients into the
master prep pitcher before placing
the blade assembly in first.
Shaft
Spindle
ATTENTION:
Faites attention de ne
pas tenir l’assemblage par les lames,
car ces dernières sont très affûtées.
4. Placez les aliments que vous désirez
préparer dans le bol Master Prep et
placez le pare-éclaboussures sur le
bol.
MODE D'EMPLOI
10
Utilisation du bol Master Prep
ATTENTION:
Les lames sont
tranchantes! Soyez très prudent
lorsque vous manipulez les lames.
Tenez-les toujours par le moyeu.
IMPORTANT:
Ne faites jamais tourner
l'appareil à vide.
1. Placez le bol Master Prep sur une
surface propre, sèche et plate.
2. Tenez la lame inférieure par le moyeu,
placez-la sur la tige à l'intérieur du bol
Master Prep. (Fig. 6)
3. Insérez prudemment la lame
supérieure sur la lame inférieure et
faites la tourner jusqu'à ce qu'elle soit
verrouillée sur la lame inférieure.
(Fig. 7, Fig. 8)
IMPORTANT:
Assemblez toujours les
lames à l'intérieur du conteneur.
Tige
Broche
Fig. 6
Lame
Supérieure
Fig. 8
Lame Inférieure
Lames Assemblées
Fig. 7
REMARQUE
:
N'ajoutez pas plus de 2
tasses d'ingrédients secs ou 1 tasse
d'ingrédients liquides, car cela
demandera trop d'effort au moteur et
pourrait provoquer un débordement.
5. Placez le bloc-moteur sur le bol
Master Prep (Fig. 9)
6. Branchez le cordon d'alimentation
dans la prise de courant.
7. Pour faire démarrer l'appareil,
appuyez sur le bouton de marche/
arrêt «ON/OFF» d’impulsion, situé en
haut du bloc-moteur. Pour arrêter
l'appareil, relâchez le bouton de
marche/arrêt «ON/OFF» d’impulsion.
Pour de meilleurs résultats de
hachage, utilisez la méthode par
«impulsion». Si les ingrédients collent
aux parois du bol Master Prep,
arrêtez l'appareil, enlevez le bloc-
moteur et le pare-éclaboussures.
Utilisez une spatule pour déloger les
morceaux et replacez le pare-
éclaboussures et le bloc-moteur.
Continuez la préparation.
REMARQUE
: Ne faites pas
fonctionner l'appareil continuellement
pendant plus de 20 secondes à la fois.
Faites attention de ne pas trop hacher.
Pour des aliments grossièrement hachés,
utilisez plusieurs impulsions courtes
jusqu'à l'obtention de la consistance
désirée.
8. Tenez le bol Master Prep fermement
tout en appuyant sur le bouton de
marche/arrêt «ON/OFF» d’impulsion
a fin de vous assurer que l'appareil
reste bien en place.
9. Vérifiez que les lames ont
complètement fini de tourner avant
d'enlever le pare-éclaboussures.
Fig. 9
Summary of Contents for Master Prep QB900C 30
Page 2: ......


