


9
10
www.ninjacoffee.eu
0800 862 0453
5
Once the time, brew size, and brew type have been set, allow
the Delay Brew to flash and lock in or press the Delay Brew
button to activate the Delay Brew. When the Delay Brew is
activated, the light on the Delay Brew button will illuminate
and an audible signal will play to verify the Delay Brew is set.
6
The Delay Brew time is now set and your Ninja
Coffee Bar
®
will automatically brew at the time you programmed.
NOTE:
To deactivate the Delay Brew cycle, press the Delay
Brew button once more and the light on the Delay Brew
button will turn off. Any change to the selected brew size or
starting any other brew will cancel the programmed Delay
Brew.
7
Place the appropriate-sized vessel under brew basket for the
selected size.
IMPORTANT:
Make sure the
Drip Stop is in the open position.
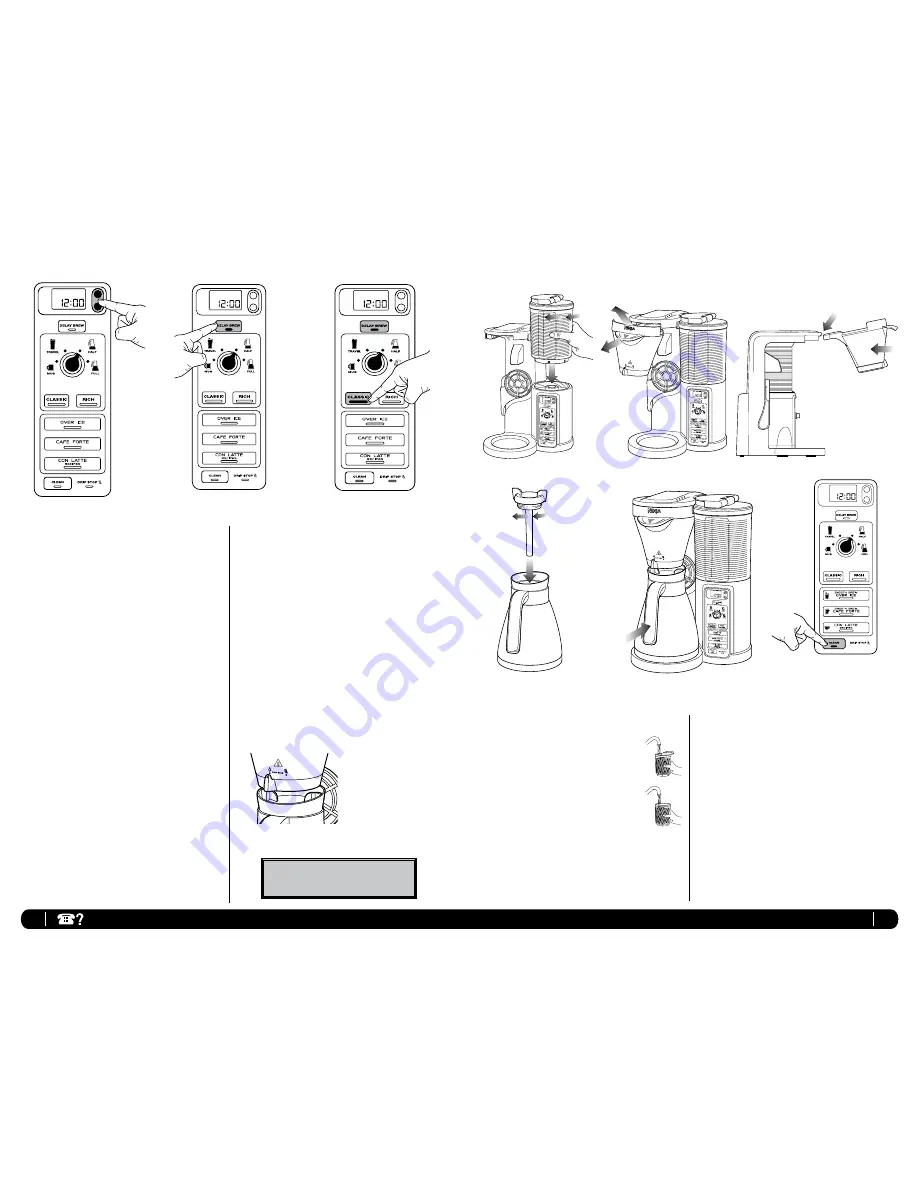
1
Place the brewer on a dry, clean and level surface.
2
Holding the water reservoir by the grip, twist
anticlockwise
to remove. Either flip the lid top
over or remove lid by twisting
anticlockwise
to remove. Fill with water up to, but not
exceeding the Max Fill line (1.35 L). To replace
the water reservoir, place on top of the base
and twist clockwise until a click indicates it is
locked in place.
(Fig. 4)
3
Pull
the brew basket out and angle up slightly to
remove it from the brewer.
(Fig. 5)
To reinsert, align the brew
basket with the rails and slide back into the brewer.
(Fig. 6)
4
Once the brew basket is in place,
push
all the way into place
until you hear a slight click.
Assembly
H
M
Fig. 4
Fig. 7
H
M
Fig. 8
5
Twist the brew-through lid clockwise onto the thermal carafe
to lock into place.
(Fig. 7)
6
Center the thermal carafe below the brew basket.
(Fig. 8)
NOTE
: Do not use any coffee for the first two brew cycles in
order to clean the brewer.
7
Plug the brewer into an electrical outlet.
8
Once all parts are securely in place, press the Clean button to
thoroughly clean the machine before first use.
(Fig. 9)
9
Once the clean cycle has completed discard the water in the
carafe and repeat, beginning from step 2, with one more
clean cycle of water before first use.
H
M
Fig. 9
Fig. 6
Fig. 5
H
M
TO SET THE CLOCK
1
Plug the power cord into an electrical outlet. The clock will
flash on the control panel to indicate that the time has not
been set.
2
Press the H (hour) or M (minute) button until you reach the
current time.
(Fig. 1)
3
After 5 seconds the clock will stop flashing and the clock will
be set.
NOTE:
If the clock stops flashing and does not display the
correct time of day, pressing the H (hour) or the M (minute)
button at any time will again will cause the clock to flash
again. You can now re-program the correct time of day by
following the steps above.
NOTE:
If you unplug the brewer or in the event of an extended
power loss, you will need to reset the clock the next time the
brewer is plugged in.
TO SET THE DELAY BREW TIME
1
Press Delay Brew. The Delay Brew button will illuminate and
the clock will begin to flash “00:00” or the last delay brew
time that was set.
(Fig. 2)
2
While the clock is flashing, press the H (hour) or M (minute)
button to set the time that you would like the delay brew to
begin.
3
Once the proper time has been set, select the size of the
vessel that you would like to brew.
4
Select the Brew Type that you desire from the flashing
buttons. The selected brew type will be lit.
(Fig. 3)
Setting the Clock & Delay Brew
Fig. 1
H
M
H
M
H
M
H
H
H
M
M
M
H
M
Fig. 2
H
M
H
M
Fig. 3
H
M
H
M
Go to www.ninjacoffee.eu for more
information and how-to videos.


