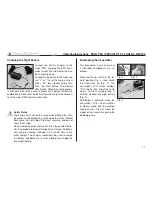
Nine Eagles SOLO PRO 130 Operating Instructions Manual Download Page 15

15

Important Notes

Take-off: 

use the 3D switch for aerobatics only.


To take off, slow-

ly and steadily increase rotor speed until the model is hovering 
approximately at eye-level. At the same time adjust the trims until 
the helicopter is flying stably and hovering over one point. At low 
height (approx. 10 - 15 cm above the ground) the model cannot be 
trimmed accurately due to the turbulence generated by the rotor. 

Landing

: slowly and steadily reduce the throttle setting until the 

model descends and touches down. Never reduce the throttle 
setting abruptly.
After the landing disconnect the flight battery from the receiver, 
and only then switch the transmitter off.

Caution

: Stopping (obstructing) the rotor blades when they are 

turning can cause serious damage to the mechanical system, 
and may even result in a fire. If the propeller is forcibly stopped, 
immediately move the throttle stick back to Idle!

Note regarding the flight battery:

 as soon as you notice a red-

uction in motor power, land immediately and disconnect the bat-
tery. Never continue flying until the battery is flat, as this causes 
a deep-discharge condition which results in permanent damage. 
Allow the battery to cool down before recharging it.

Replacing the rotor blades:

 If a rotor blade is damaged, replace 

it immediately. When fitting the new rotor blade, tighten the retai-
ning screw just to the point where the blade still swivels smoothly.

Operating Instructions - SOLO PRO 130 EC145 RTF 2.4 GHz No. NE2522

Ideally the first flight should take place in a large indoor space 
devoid of obstructions. If you have to fly the model in the open air, 
wait for a day with 

totally flat calm conditions

. We recommend 

that you ask an experienced helicopter pilot to help you during 
the first few flights. 

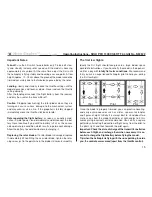
Once the model is properly trimmed, you can practise hovering, 
and carry out manoeuvres such as circles, squares, rectangles 
and figures-of-eight. Initially it is always best to stand about two 
metres away from the model, behind or at right-angles to it; this 
avoids giving incorrect control commands. You can fly a square 
pattern by alternating the direction of flight: away from the pilot, to 
the pilot's right, and then towards the pilot again.

Important: Check the state of charge of the transmitter batteries 

before each flight, and recharge them when necessary.


It is es-

sential to charge the flight battery before flying the model. 

Tip: when the helicopter is flying with the nose pointing towards 

you, the controls are reversed (apart from the throttle control).

Pilot

Pilot

Pilot

The first few flights

Summary of Contents for SOLO PRO 130

Page 1: ...Operating Instructions SOLO PRO 130 EC145 RTF 2 4 GHz No NE2522...

Page 2: ...2 Operating Instructions SOLO PRO 130 EC145 RTF 2 4 GHz No NE2522...

Page 3: ...xis the helicopter rotates to right or left Elevator The model s movement around the lateral axis forward or reverse flight Roll The model s movement around the longitudinal axis sideways movement to...

Page 4: ...rts Please bear in mind that motors and speed controllers may become hot when operating It is essential to avoid touching such parts Do not stand close to the hazard area around rotating parts when an...

Page 5: ...standard personal third party insurance policies In order to fly model aircraft you will need to extend the cover of your existing policy or take out specific insurance Check your insurance policy and...

Page 6: ...ngth approx 240 mm Weight approx 86 g Motor 1412 brushless motor Power supply LiPo battery 3 7 V 600 mAh RC functions Pitch axis roll collective pitch and throttle Recommended accessories 8 x 8005 NiM...

Page 7: ...in order to activate the new mode Gyro gain switch Trainer Switches Servo travel reduction Throttle trim Stick Collective pitch motor speed and roll On Off switch Roll trim Push button Level select Ad...

Page 8: ...djustment Neckstrap lug Operating display Gyro gain switch Trainer Switches After changing mode you must switch the transmitter off and then on again in order to activate the new mode Transmitter desc...

Page 9: ...shplate type display Dual Rate display Roll tail rotor channel display Throttle pitch axis channel display Gyro gain display Normal flight Throttle curve normal Throttle curve 3D Collective pitch curv...

Page 10: ...the first flight Operating Instructions SOLO PRO 130 EC145 RTF 2 4 GHz No NE2522 Pitch axis servo Roll servo Collective pitch servo Tail rotor motor Rotational speed Climb Yaw left Pitch forward Desce...

Page 11: ...me a constant warning tone is emitted Connect the flight battery Fig 3 Re binding is complete when the transmitter s LCD screen switches to Normal mode and the warning sound ceases Do not move the mod...

Page 12: ...must only be charged with a suitable charger never connect the battery directly to a mains power supply Never charge or discharge a battery in bright sunlight or close to a heater or open fire Do not...

Page 13: ...r s support frame and connect the battery Fig 2 Take care not to touch the throttle rotor speed control Do not move the model for a minimum of three seconds otherwise the initialisation process will n...

Page 14: ...nsmitter off Disconnect the appropriate ball link You can adjust the pushrod length by turning the ball link clockwise or anti clockwise Re connect the ball link Repeat this step until the swashplate...

Page 15: ...ool down before recharging it Replacing the rotor blades If a rotor blade is damaged replace it immediately When fitting the new rotor blade tighten the retai ning screw just to the point where the bl...

Page 16: ...off adjust the roll trim until the model remains in a stable hover 16 Trim settings Mode 2 Throttle trim If the rotor starts to move without the throttle stick being touched or does not respond to sti...

Page 17: ...the model in Mode 2 Operating Instructions SOLO PRO 130 EC145 RTF 2 4 GHz No NE2522 Landing Yaw right Pitch back Roll left Lift off Yaw left Pitch forward Roll right Lift off Yaw left Pitch forward Ro...

Page 18: ...Receiver 15 NE252211 Main frame 16 NE252216 LiPo battery 3 7 V 520 mAh 17 NE252026 Brushless speed controller 10 A 18 NE252212 Landing gear 19 NE252009 Ballrace set 2 20 NE252203 Main gearwheel 21 NE2...

Page 19: ...19 Operating Instructions SOLO PRO 130 EC145 RTF 2 4 GHz No NE2522 22 23 24 25 25 23 23 23 23 5 22 5...

Page 20: ...your unwanted equipment to your local council collection point or recycling centre This requirement applies to mem ber countries of the European Union as well as other non European countries with a s...

Reviews: