


8
Charging the flight battery
Connect the battery
charger to the mains
PSU, and plug the PSU
into a mains socket.
The red monitor LED on
the charger lights up,
and the charger emits a brief "beep". Connect the battery to the
charger. The charger emits a brief "beep"; during the charge pro-
cess the green monitor LED on the charger flashes.
When the charge process is complete, you will hear a further brief
"beep", and the green monitor LED on the charger glows constantly.
Disconnect the battery from the charger, then disconnect the mains
PSU from the wall socket.
Safety Notes
The battery must not be left unsupervised during the char-
ge process or be placed on an inflammable surface. Protect
from damp. Do not subject it to direct sunshine, and do not
cover the charger.
Do not charge batteries that are hot to the touch. Allow batte-
ries to cool down to ambient temperature. Charge the battery
only using the charger included in the set; do not use any
other charger. The charger should only be used to charge
the battery included in the set. Not suitable for charging the
transmitter battery!
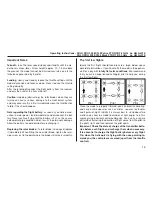
Model description:
1. Triple-axis gyro system, ensuring stable, accurate flight.
2. The high-performance brushless motor provides ample power
for advanced 3D flying.
3. FUTABA S-FHSS receiving system for binding to all current
FUTABA S-FHSS transmitters.
4. This helicopter is capable of indoor flight times of around 6 to
7 minutes with a fully charged battery.
5. The ideal model for pilots who have experience flying collec-
tive-pitch helicopters.
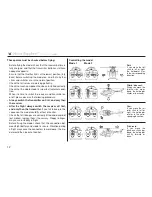
Please note the following points in order to avoid confusion
in the model description:
The model's nose faces away from the pilot; the tail boom points
towards the pilot. The pilot's left-hand side is the left-hand side of
the model, and the pilot's right-hand side is the right-hand side of
the model. The rotor head faces up, and the landing skids face
down (see illustration).
right
left
top
bottom
front
rear