A-16 - FORM NO. 56041556 - Retriever
™
6250 / SR 1800
A-16 / ENGLISH
SIDE BROOM MAINTENANCE
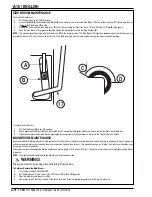
To adjust the Side Broom...
1
Put the side broom in the DOWN position.
2
Loosen the Handle (A) and slide the Stop Bracket (B) up or down to lower or raise the Side Broom (13). The farther the Lever (17) travels up in the slot,
the lower the Side Broom (13) will be.
3
When in the Down position, the Side Broom (13) should be contacting the floor from the 10 O’Clock (C) to the 3 O’Clock (D) area shown.
4
Once the Side Broom (13) is properly adjusted, tighten the Handle (A) to secure the Stop Bracket (B).
NOTE: The machine should be stored with the Side Broom (13) in the raised position. The Side Broom (13) should be replaced when the bristles are worn to
a length of 3 inches (7.62 cm) or it becomes ineffective. The Side Broom stop must be re-adjusted when ever the broom has been replaced.
To replace the Side Broom...
1
Put the Side Broom (13) in the UP position.
2
Reach under the Side Broom (13) and remove the large T-Handle Nut holding the side broom on and remove the broom and plastic disc.
3
Install the new broom and plastic disc by aligning the three alignment pins and pushing on. Re-install the T-Handle Nut and tighten.
MAIN BROOM MAINTENANCE
Since the Main Broom Motor always turns in the same direction, the bristles on the broom eventually become curved, reducing sweeping performance. Sweeping
performance can be improved by removing the broom and turning it around (end-for-end). This procedure, known as “rotating” the main broom, should be done
once every 30 hours of operation.
The main broom should be replaced when the bristles are worn to a length of 2-1/2 inches (6.35 cm). The main broom stop must be re-adjusted when the broom
is replaced.
NOTE: The machine should be stored with the Main Broom in the raised position.
WARNING!
The engine must not be running when performing this procedure.
To Rotate or Replace the Main Broom...
1
Turn the Ignition Key Switch (52) OFF.
2
Put the Main Broom Raise / Lower (ON / OFF) Lever (53) in the DOWN position.
3
Open the Main Broom Access Door (15).
4
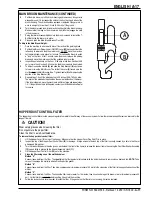
Remove the large T-Bolt from the side of the broom idler arm. Pivot the idler arm assembly out of the main broom core.
A
B
17
C
D


