FORM NO. 56041516 - ConvertaMAX
™
28/34, I-MAX
™
28HD/34HD, BA 750/850 - 19
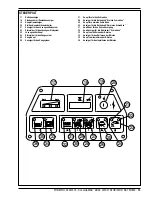
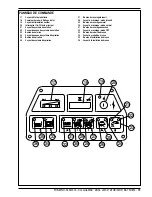
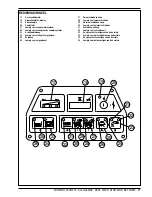
FUNCTIONAL DESCRIPTION OF CONTROL BUTTONS:
The controls were designed with
one touch operation
in mind. For single pass scrubbing the user can simply depress one button and all systems on the machine
will be ready to go.
For most single-pass scrubbing operations, the operator should only need to use the middle three buttons on the control panel. These are the Scrub Mode Off,
Normal Scrub, and Heavy Scrub buttons. For this reason these buttons are outlined in bright white on the control panel while the other buttons are outlined in gray.
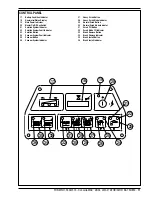
Solution Button (23) - This button is used to select the mode of operation for the solution system. There are 3 modes of operation for this system. The modes
are OFF, AUTO, MOMENTARY ON. Following is a description of each mode and how they are selected.
OFF MODE: In this mode the solution flow is turned off. As mentioned in the following, when a scrub mode is selected, the solution system will be placed in the
AUTO mode. If it is desired to scrub without dispensing solution, the solution can be turned off by pressing this button.
AUTO MODE: This mode is automatically selected when a scrub mode is selected. In this mode the solution flow will be turned on whenever forward or reverse
direction is selected via the Drive Paddle (3). The solution flow will be turned off otherwise.
MOMENTARY ON MODE: This mode can only be selected when the scrub mode is OFF. Solution can be dispensed by pressing and holding the solution button.
Solution will be dispensed for as long as the button is held. This is for pre-wetting the floor prior to scrubbing.
Vacuum Button (25) - This button is used to select the mode of operation for the vacuum/squeegee system. There are 3 modes of operation for this system. These
modes are OFF, AUTO, ON. Following is a description of each mode and how they are selected.
OFF MODE: In this mode the vacuum is off and the squeegee is in the up position. As mentioned in the following, when a scrub mode is selected, the vacuum
system will be placed in the AUTO mode. If it is desired to double-scrub (scrub without recovering the solution) the vacuum system can be turned off by pressing
this button.
AUTO MODE: This mode is automatically selected when a scrub mode is selected. In this mode the squeegee will be in the down position unless the reverse
direction is selected via the Drive Paddle. The vacuum will turn on if either direction is selected. While in this mode the vacuum will remain on for 10 seconds after
the Drive Paddle returns to the neutral position. This is so that the solution in the squeegee and hose can be drawn into the tank. This mode can be selected
independently of the scrub mode by pressing and releasing the vacuum button.
ON MODE: In this mode the squeegee will remain in the UP position and the vacuum will be on regardless of the Drive Paddle (3) position. This mode is selected
by pressing and holding the Vacuum Button (25) for approximately 1.5 seconds.
The vacuum mode must first be OFF before entering this mode
. This mode is
included in the event an external wand is to be used with this machine or if the operator wants to clean the squeegee using the vacuum hose.
Heavy Scrub Button (27) - Pressing the heavy scrub button will enable the scrub system and set the scrub pressure to the last selected value for the heavy scrub
mode. The status display will momentarily display the scrub pressure setting. This is indicated by “PA” followed by a number. Subsequent presses of the heavy
scrub button will step the pad pressure setting through the allowable range up to the maximum value programmed for the heavy scrub mode. Once the maximum
value is reached the pressure setting will step back to (normal scrub limit + 1). The factory default maximum for the heavy scrub mode is (commercial) or 12
(industrial). The following will occur when this button is pressed:
•
The scrub deck will be lowered
•
The vacuum and solution systems will be enabled (vacuum and solution modes = AUTO)
•
As soon as a direction is commanded by the Drive Paddle (3) (forward or reverse) the brushes will start turning and the vacuum will turn on.
Normal Scrub Button (29) - Pressing the normal scrub button will enable the scrub system and set the scrub pressure to the last selected value for the normal
scrub mode. The status display will momentarily display the scrub pressure setting. This is indicated by “PA” followed by a number. Subsequent presses of the
normal scrub button will step the pad pressure setting through the allowable range up to the maximum value programmed for the normal scrub mode. Once the
maximum value is reached the pressure setting will step back to 1. The factory default maximum for the normal scrub mode is 4. The following will occur when
this button is pressed:
•
The scrub deck will be lowered
•
The vacuum and solution systems will be enabled (vacuum and solution modes = AUTO)
•
As soon as a direction is commanded by the Drive Paddle (3) (forward or reverse) the brushes will start turning and the vacuum will turn on.
Scrub Off Button (31) - Pressing this button when the unit is in a scrub mode will cause the following to occur:
•
The scrub brushes will turn off
•
The scrub deck will raise to the UP position
•
The solution flow will be stopped
•
The first time that this button is pressed, the vacuum/squeegee system will NOT be turned off. This is so that any remaining water may be picked up without
having to turn the vacuum back on. If this button is pressed a second time (pressed after the scrub mode has been turned off) the squeegee will raise
and the vacuum will shut off after a 10-second delay.
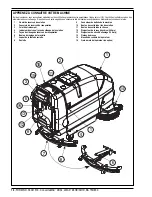
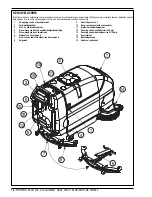
Brush Remove Button (33) – To remove the brushes from the machine, have the machine stationary and the Brush Deck (14) in the “RAISED” position. The
Brush Remove Indicator (34) will be yellow when it is okay to activate the remove feature, otherwise it will be off.
•
Press and release the pad/brush remove button. The Brush Remove Indicator (34) will turn green to show that the remove process is activated.
•
The scrub motor will run for a brief period and then stop abruptly. This should cause the pads/brushes to drop off of the drive lugs.
Brush Install Button (35) – Have the machine stationary and the Brush Deck (14) in the “RAISED” position. The Brush Install Indicator (36) will be yellow when
it is okay to activate the install feature, otherwise it will be off.
•
Place the pads/brushes under the scrub deck so that the pads/brushes are centered under the drive lugs.
•
Press and release the pad/brush install button. The Brush Install Indicator (36) will turn green to show that the install process is activated.
•
The scrub deck will lower and the scrub motors will run momentarily to engage the pads/brushes. If the pads/brushes do not engage fully, press and hold
the install button to activate the scrub motors.
•
To scrub, press either the Normal (29) or Heavy Scrub Button (27).
•
To raise the scrub deck, press the Scrub Off Button (31).

