background image

12 

Nikon Imaging Centre @ King’s College London


4.


If  you  want  to  conduct  Z-stacks  alongside  multipoint  imaging  it  is  better  to  use  relative  Z-stacks  in  the 
symmetric and asymmetric options.  

5.


Select either the optimal suggested step size or define the number of steps. 

6.


Press 

Run now

 to acquire. 

Saving Data 

Whenever  you  use  the 

Capture

  button  you  will  need  to  manually  save  each  acquired  image  (ND  acquisition  can 

autosave). 

1.


Got to the 

File 

menu and save the image in 

ND2 format. 

This will store the complete setup of the microscope 

in the metadata of the image. Using the ND2 format also means that you can reuse the acquisition/camera/ND 
acquisition settings at a later date (see below for details).  

2.


Save your data to a folder on Datadrive E:/ and at the end of the session transfer your files to the network 
storage drive (N:/LiveCellData). 

Data is kept for a maximum of 1 week in the documents folders and 1 month 

on the network drive. 


3.


Instr

uctions on how to connect the network drive to your King’s 

computer can be found when you login to 

your PPMS account, go to documents and select the N drive access document.  
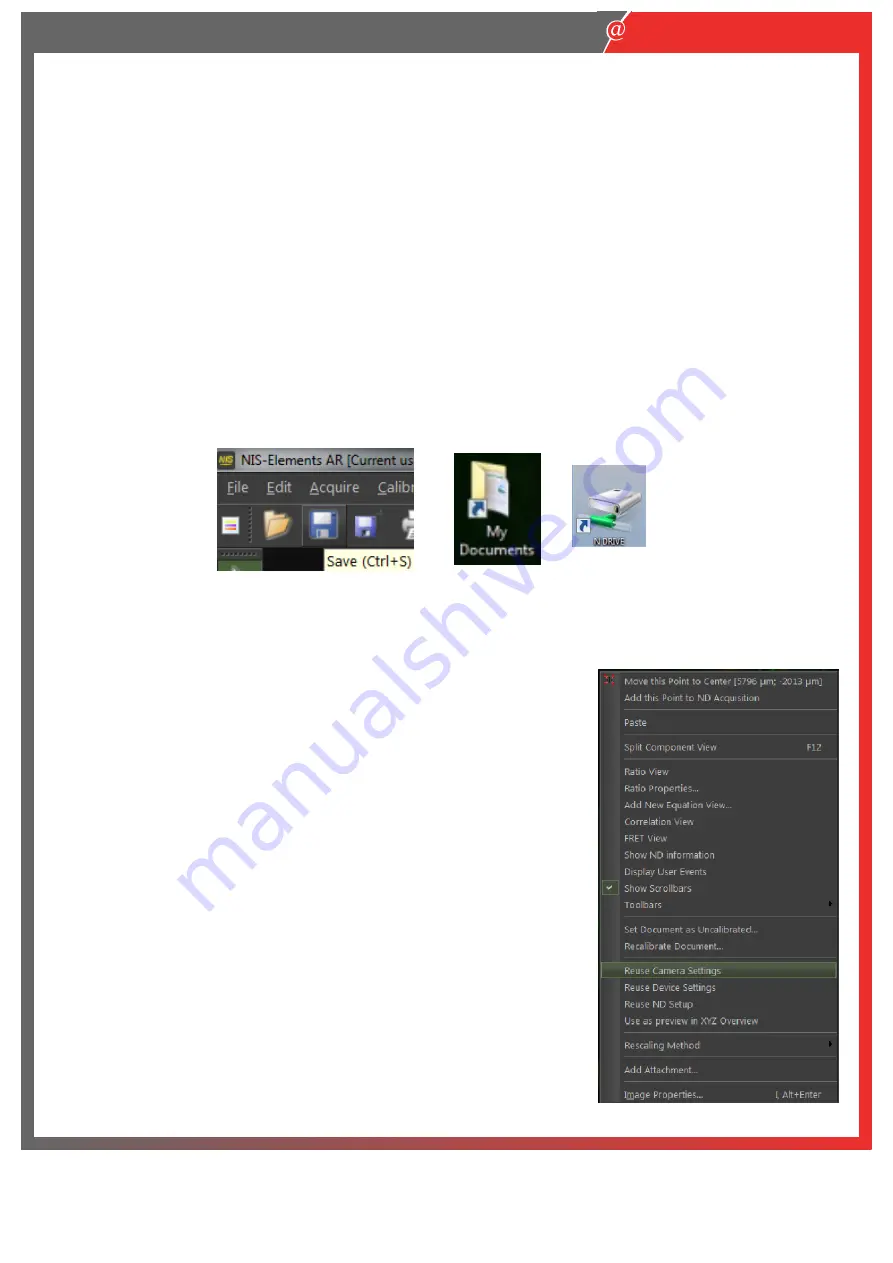
Reusing settings 

1.


When  comparing  images;  such  as  for  fluorescent  intensity  it  is 
important to keep the settings the same to enable a fair comparison. To 
re-apply  the  same  settings  from  an  image,  open  image  in  the  NIS 
software, right click and select 

reuse camera settings

 and 

reuse device 

settings

2.


You can also 

reuse ND setup

 for keeping the same settings in the ND 

acquisition window.  

3.


When  reusing  settings  check  the  Ti2  pad  and  the  camera  settings  to 
ensure that they have been applied correctly.  


Nikon 

Imaging Centre 

King’s College London 

Fig. 29 

Fig. 30 

Summary of Contents for Live Cell 2

Page 1: ...Live Cell 2 guide NIKON IMAGING CENTRE KING S COLLEGE LONDON King s College London Nikon Imaging Centre ...

Page 2: ...r joystick The speed of movement is indicated on the joystick display panel denoting slow movement 3 Objective Lenses on the live cell system are 4x 10x 20x and 40x dry objectives Check the correction collar is set to 0 17 on the 20x and 40x objective lenses for imaging through standard 1 5 coverglass the collar can be adjusted for thicker samples 60x and 100x objectives can be added to the system...

Page 3: ...don Nikon Imaging Centre King s College London Objective selector Light path Fig 5 Intensity dial Transmitted light on off Condenser element selector Fig 6 Fig 7 Epi fluorescence shutter Epi fluorescence filter turret Fig 8 PFS on off z speed ...

Page 4: ...s accompanied by an audible alarm which can be silenced by pressing the alarm indicator on the touch screen 2 Selecting temperature or CO2 opens a second window where the set point can be adjusted Fig 13 The values can be changed using the buttons Confirm the settings by pressing set 3 For CO2 the valve on the tank needs to be adjusted to ensure that it is entering the system correctly open the to...

Page 5: ...4 Nikon Imaging Centre King s College London Fig 11 Fig 12 Nikon Imaging Centre King s College London Fig 13 Press to set CO2 concentration ...

Page 6: ...cus on your Fully close the field iris by turning it anticlockwise Fig 14 2 Using the adjustment knob move the condenser whilst looking through the eyepiece until you see the octagonal field iris Turning the knob towards you to bring the condenser lens close to the sample Adjust the condenser focus so that the outline of the field iris is sharp and in focus Fig 15 3 If required centre the field ir...

Page 7: ...f the configurations from the eyes group of configurations These configurations 1 Set the light path to EYE 2 Set the filter in the turret to that relevant to the dye being used 3 Make sure that the fluorescence lamp is turned on and use the microscope base for control of the fluorescence shutter 4 Transmitted light imaging can be achieved using the relevant OC and using the lamp on off but on the...

Page 8: ...7 Acquiring a colour image DS U3 camera 1 Select the colour camera BF optical configuration from the OC Panel Fig 16 2 Focus on the sample and adjust the detector settings so that you can see the surface 3 Set the transmitted light to 100 4 Move to a blank region of the sample Fig 19 and select Auto White in the DS Fi2 setting window Fig 18 This will ensure that your images have the correct white ...

Page 9: ...y if these means setting a very long exposure time 4 The PE pad can be used to adjust the intensity of the LED lamp This defaults to 100 but can be reduced if the sample is prone to photobleaching or phototoxicity 5 The camera used for fluorescence imaging has two resolution options which vary the number of pixels in the image This can be changed with the channel settings however if a multicolour ...

Page 10: ...which will require the user to stop the acquisition after the desired period 3 Other ND acquisition modes can be added to the timelapse e g z stacks multipoints which when checked and set up in the ND acquisition window are added to the image sequence NOTE multidimensional parameters will affect the achievable frame interval of the timelapse Clicking timing will allow you to see if the interval is...

Page 11: ... menu bar 5 Select the objective for capturing the image set the number of fields in XY and whether the tiling should scan around the current position of the stage or with the stage position being the top left Set the overlap to 15 and select blending making sure image registration is checked Fig 27 6 Large image files can either be saved as the whole large image the single frames as TIFFs or both...

Page 12: ... any previously saved z positions 2 Three options are available for setting Z stack limits Top and Bottom mark the limits of the stack Symmetric mark the centre of the stack and Asymmetric set the number of slices above and below the centre 3 For the top bottom option whilst live imaging adjust the focus to find the top of your sample use the Z value as a guide and click Top Focus back through the...

Page 13: ...drive E and at the end of the session transfer your files to the network storage drive N LiveCellData Data is kept for a maximum of 1 week in the documents folders and 1 month on the network drive 3 Instructions on how to connect the network drive to your King s computer can be found when you login to your PPMS account go to documents and select the N drive access document Reusing settings 1 When ...

Page 14: ...xt hour leave all the components on except for the CO2 if you have used it and just exit the software 2 Remember to transfer your data from the datadrive to livecelldata 3 Remove your sample from the microscope stage 4 Lower the objective fully using the manual focus wheel and move the stage to the central position 5 If no user is due on the system after you shut down all components in reverse ord...

Reviews: