background image

4

In

tr

oduc

tion

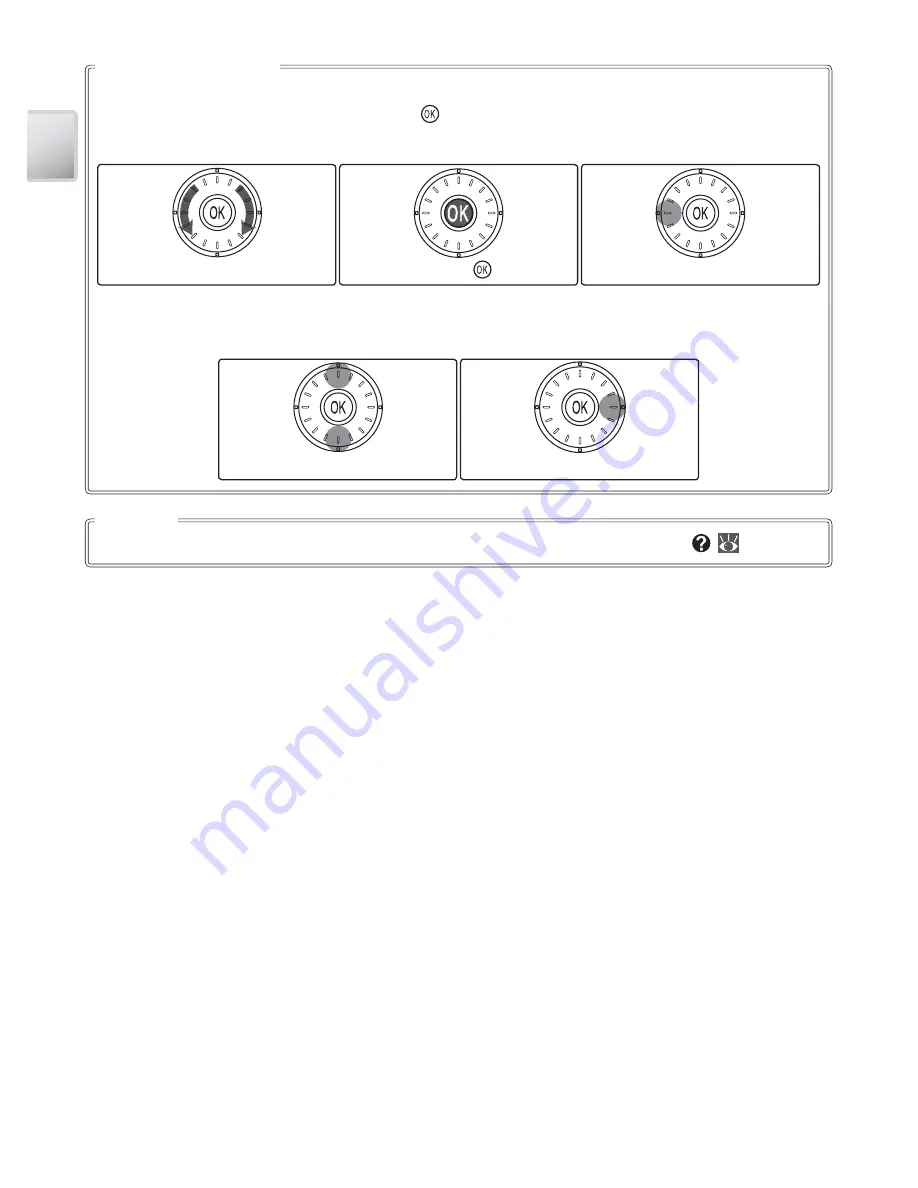
The rotary multi selector is used to navigate the camera menus.  Rotate in either direction 
to highlight items and press the center ( ) to select.  To cancel and return to the previous 
menu, press the rotary multi selector to the left.

The Rotary Multi Selector

Rotate: highlight

Press center ( ): select

Press left: cancel

Items can also be highlighted by pressing the rotary multi selector up, down, left, or 
right.

For help on the current menu or menu item, press the zoom control to 

T

 ( ; 

 17).

Menu Help

Press up or down

Press right

Summary of Contents for COOLPIX S6

Page 1: ...ademarks of Adobe Systems Inc ImageLink and the Im ageLink print system logo are trademarks of Eastman Kodak Company Pictmotion is powered by muvee Technologies PictBridge is a trademark D Lighting technology is provided by Apical Limited Face priority AF technology is provided by Identix All other trade names mentioned in this manual or the other documentation provided with your Nikon product are...

Page 2: ...Start Guide Memory Cards Pictures taken with this camera can be stored in the camera s internal memory or on removable memory cards If a memory card is inserted all new pictures will be stored on the memory card and delete play back and format operations will apply only to the pictures on the memory card The memory card must be removed before the internal memory can be formatted or used to store d...

Page 3: ...ipment in the presence of flammable gas as this could result in explosion or fire Handlethecamerastrapwithcare Never place the strap around the neck of an infant or child Keepoutofreachofchildren Particular care should be taken to prevent infants from putting the batteries or other small parts into their mouths Observecautionwhenhandlingbatteries Batteries may leak or explode if improperly handled O...

Page 4: ...quipment Do not use this device in a hospital or on board an airplane without first obtaining the permission of hospital or airline staff Useappropriatecables When connecting cables to the input and output jacks use only the cables provided or sold by Nikon for the purpose to main tain compliance with product regulations Handlemovingpartswithcare Be careful that your fingers or other objects are not ...

Page 5: ...nterference Statement This equipment has been tested and found to comply with the limits for a Class B digital de vice pursuant to Part 15 of the FCC rules These limits are designed to provide reasonable pro tection against harmful interference in a resi dential installation This equipment generates uses and can radiate radio frequency energy and if not installed and used in accordance with the in...

Page 6: ...gital apparatus meets all require ments of the Canadian Interference Causing Equipment Regulations ATTENTION Cet appareil numérique de la classe B respecte toutes les exigences du Règlement sur le maté riel brouilleur du Canada RSS 210 14 Exposure of Humans to RF Fields The installer of this radio equipment must ensure that the antenna is located or pointed such that it does not emit RF field in ex...

Page 7: ...mpany Also do not copy or reproduce passports is sued by the government licenses issued by public agencies and private groups ID cards and tickets such as passes and meal coupons Comply with copyright notices The copying or reproduction of copyrighted creative works such as books music paint ings woodcut prints maps drawings movies and photographs is governed by national and international copyrigh...

Page 8: ...back 18 Mode 18 Viewing Pictures 19 Using the Flash 20 Taking Pictures with the Self Timer 22 Macro Close up Mode 23 One Touch Portrait Mode 24 Scene and Scene Assist Modes 26 Scene Mode 26 Scene Assist Mode 32 Movies 35 Recording Movies 35 The Movie Menu 36 Movie Playback 37 Voice Recordings 38 Viewing Pictures on the Camera 41 Viewing Multiple Pictures Thumbnail Playback 41 Deleting Pictures 41 ...

Page 9: ...61 White Balance 62 Exp 63 Continuous 63 Best Shot Selector BSS 65 ISO Sensitivity 65 Color Options 66 AF Area Mode 66 Playback Options The Playback Menu 67 Print Set 67 Slide Show 68 Delete 68 Protect 68 Transfer Marking 68 Small Pic 69 Copy 69 Basic Camera Setup The Setup Menu 70 Menus 70 Quick Startup 70 Welcome Screen 71 Date 71 Monitor Settings 73 Date Imprint 74 AF Assist 75 Sound Settings 7...

Page 10: ...ix Technical Notes 77 Optional Accessories 77 Caring for the Camera 78 Error Messages 80 Troubleshooting 83 Appendix 86 Specifications 91 Index 94 ...

Page 11: ...ikon specifically for use with this Nikon digital camera are engineered and proven to operate within the operational and safety requirements of this electronic circuitry THE USE OF NON NIKON ELECTRONIC ACCESSORIES COULD DAMAGE THE CAMERA AND MAY VOID YOUR NIKON WARRANTY For more information about Nikon brand accessories contact a local authorized Nikon dealer EN EL8 rechargeable battery Holographic...

Page 12: ...ld liable for damages or lost profits that may result from product malfunction Life Long Learning As part of Nikon s Life Long Learning commitment to ongoing product support and edu cation continually updated information is available on line at the following sites For users in the U S A http www nikonusa com For users in Europe and Africa http www europe nikon com support For users in Asia Oceania ...

Page 13: ...LED 21 Built in flash 20 Lens 79 Lens cover closed Lens cover Power switch 14 Shutter release button 16 Power on lamp 14 Speaker 37 39 44 49 51 Microphone 35 38 44 One touch portrait button 24 See also D lighting 43 Zoom control 15 See also thumbnail playback 41 playback zoom 42 help 17 Wireless LED 00 ...

Page 14: ...ory card slot cover 10 12 Indicator lamp 11 16 36 38 64 Flash lamp 20 delete button 19 41 42 Rotary multi selector 4 17 mode button 5 17 menu button 17 61 67 70 Monitor 6 7 78 79 Battery chamber 10 Memory card slot 12 Tripod socket Multi connector 8 52 53 56 60 Battery latch 10 center button 4 17 transfer button 53 햴 햴 햲 햲 햳 햳 ...

Page 15: ...cel and return to the previous menu press the rotary multi selector to the left The Rotary Multi Selector Rotate highlight Press center select Press left cancel Items can also be highlighted by pressing the rotary multi selector up down left or right For help on the current menu or menu item press the zoom control to T 17 Menu Help Press up or down Press right ...

Page 16: ...e recording 38 Movie 35 Scene assist 32 Auto 18 Wireless 00 Pressing the button during shooting or playback displays a mode selection menu 17 The Mode Button Playback Modes Pictmotion 48 List by date 46 Voice playback 39 Calendar 45 Playback 41 ...

Page 17: ...hooting and playback actual display varies with current camera settings Shooting Playback 01 01 2006 01 01 2006 01 01 2006 00 00 00 00 00 00 100NIKON 100NIKON 100NIKON 9999 JPG 9999 JPG 9999 JPG 9999 9999 9999 9999 9999 9999 4 1 2 3 5 6 7 9 10 11 12 13 18 17 16 15 14 8 Start Start Start ...

Page 18: ... Image mode 61 19 Exposure compensation 25 31 63 20 Color option 66 21 White balance 62 22 Best Shot Selector BSS 65 23 Continuous shooting mode 63 1 Current folder 89 2 File number and type 89 3 Internal memory memory card indicator 14 4 Battery level indicator 14 5 Volume indicator 37 39 44 6 Voice memo recording guide 44 7 Voice memo playback guide 44 8 Current frame number total number of fram...

Page 19: ...ector 9 USB connector 53 56 Camera connector Charge the camera battery 11 View pictures on a television 52 Copy pictures to a computer 52 Print pictures via direct USB connec tion 55 Placing the Camera in the COOL STATION Removing the Camera The multi connector shouldbefullyinserted in the COOL STATION camera connector as shown Remove the camera as shown ...

Page 20: ...Connect the power cord 햲 햲 and plug the adapter into the COOL STATION or camera 햳 햳 making sure the plugs are in the correct orienta tion Plug the adapter in 햴 햴 and check that the power lamp is lit 햵 햵 COOL STATION Camera 햲 햲 햳 햳 햴 햴 햵 햵 The EH 64 AC Adapter The supplied power cord is intended solely for use with the EH 64 and is for domestic use only It may be necessary to purchase another cable...

Page 21: ...ing the Battery Inserting the battery upside down or backwards could damage the camera Check to be sure the battery is in the correct orientation 4 Close the battery chamber memory card slot cover Batteries Read and follow the warnings and cautions on pages ii iii and 79 of this manual Removing the Battery Turn the camera off before removing or inserting batteries To eject the battery open the batt...

Page 22: ...ra off 3 Charge the battery The indicator lamp next to the camera monitor will blink green as the battery charges If the lamp flickers rapidly the camera is not correctly inserted or the battery is faulty Reinsert the cam era or replace the battery Charging is complete when the indicator lamp stops blinking a fully exhausted battery will re charge in about two hours Remove the cam era from the COOL ...

Page 23: ...t formatting permanently deletes all pic tures and other data on the memory card Be sure to make copies of any pictures you wish to keep before beginning formatting To begin formatting rotate the rotary multi selector to highlight Yes and then press the button Do not turn the camera off or remove the batteries or memory card until formatting is complete CARD IS NOT FORMATTED Format No Confirm 1 Tur...

Page 24: ... the battery chamber memory card slot cover and press the card in to partially eject the card The card can then be removed by hand The Write Protect Switch SD cards are equipped with a write protect switch Pictures can not be recorded or deleted and the memory card can not be formatted when this switch is in the lock position Write protect switch ...

Page 25: ...gs the monitor will turn off altogether if no operations are performed for about a minute during shooting and playback stand by mode 75 The camera will turn off automatically if no operations are performed for another three minutes and the monitor will turn on Power switch Power on lamp On Camera on Blinks Monitor has turned off to save power see below Flickers Battery exhausted Recharge or change ba...

Page 26: ...in Indicator is displayed when zoom control is pressed Optical zoom up to 3 Indicator turns yellow when digital zoom is in effect Holding the control to T for about two seconds at 3 zoom will trigger digital zoom allowing the subject to be magnified up to 4 more for a total of magnification of 12 Digital Zoom Unlike optical zoom digital zoom does not increase the amount of detail visible in the pictu...

Page 27: ...sult in blurred pictures The flash may fire if the subject is poorly lit Focus and Shutter Release The camera features a two stage shutter release button First lightly press the shutter release button about halfway stopping when you feel resistance Once the camera has focused press the shutter release button the rest of the way down to release the shutter and take a picture During Recording While pi...

Page 28: ...selection from the shooting or playback mode menus press the button and follow the steps below 4 Select and exit to previous menu 1 Highlight menu item 3 Highlight option For help on the current menu press the zoom control to T Press the button to display the options for the se lected item To return to the original menu press the zoom control to T or press the button to return to shoot ing or play...

Page 29: ...ng mode menu 3 Highlight 4 Select and exit to mode 5 Frame subject in center focus area 6 Focus 7 Take picture If lighting is poor AF assist il luminator may light when camera focuses and flash may fire when picture is taken 20 21 Hold the camera steadily in both hands keeping your fin gers and other objects away from the lens flash self timer lamp and microphone Holding the Camera If is displayed in ...

Page 30: ... Pictures To delete the picture currently displayed in the moni tor press the button A confirmation dialog will be displayed highlight one of the following options and press the button No Exit without deleting the picture Yes Delete the picture Erase image s Erase image s Erase image s Confirm Confirm Confirm No Yes Yes Yes The Rotary Multi Selector As an alternative to rotating the rotary multi se...

Page 31: ...ure is taken Use to fill in illuminate shad ows and back lit subjects Slow sync Flash illuminates main subject slow shutter speeds are used to capture background at night or under dim light 3 Make selection to exit without changing mode wait five seconds Selection is shown by icon in display Selection for mode is stored in memory even when camera is off 2 Confirm Confirm Confirm Flash Highlight mode ...

Reviews: