background image

E

9

Re

fere

nce
 S

ecti

on

Q

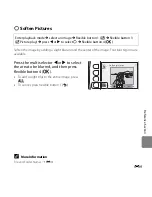
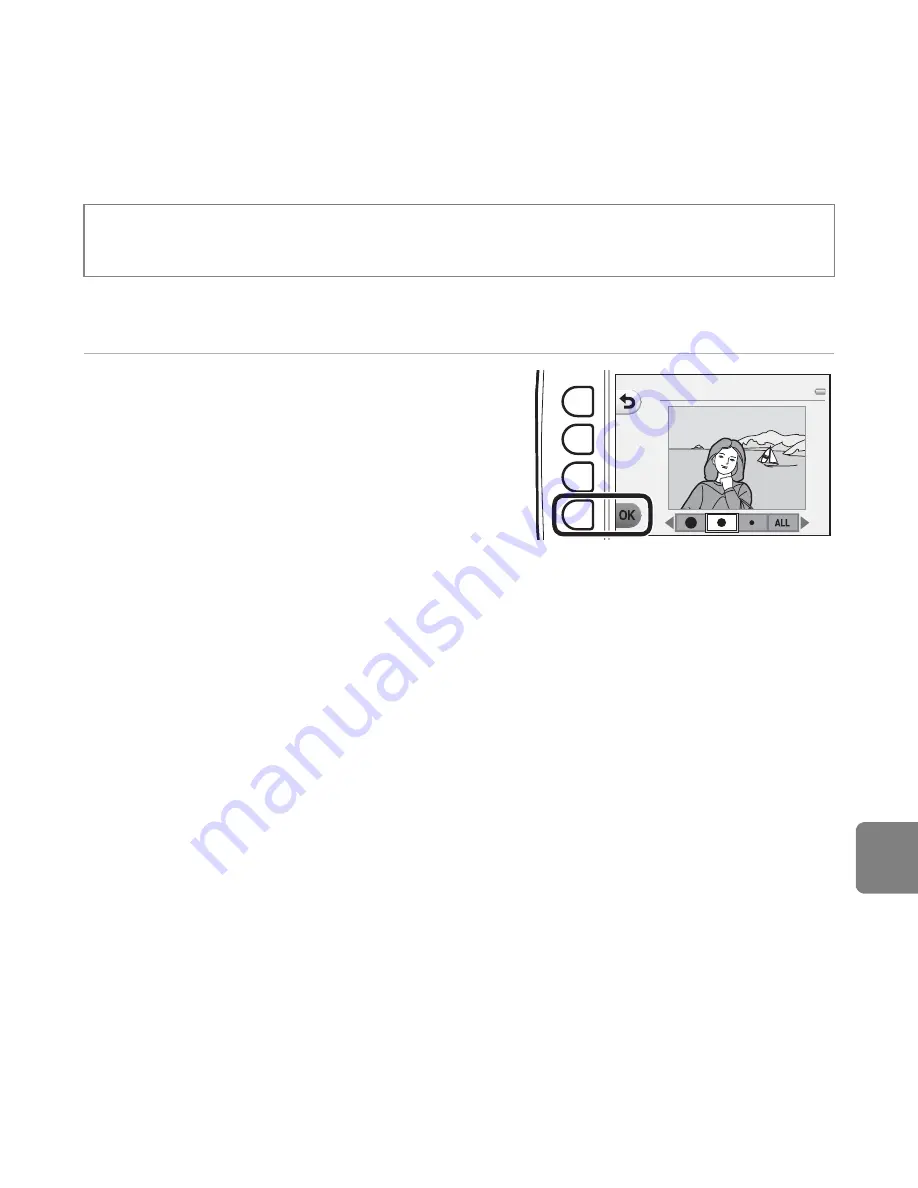
 Soften Pictures

Soften the image by adding a slight blur around the center of the image. Four blur regions are 
available.

Press the multi selector 

J

 or 

K

 to select 

the area to be blurred, and then press 
flexible button 4 (

O

).

To add a slight blur to the entire image, press 

k

.

To cancel, press flexible button 1 (

Q

).

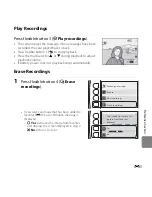
Enter playback mode 

M

 select an image 

M

 flexible button 1 (

V

M

 flexible button 3 

(

V

Picture play) 

M

 press 

J

 or 

K

 to select 

Q


M

 flexible button 4 (

O

)

Soften pictures

C

More Information

File and Folder Names 


E

61

Summary of Contents for COOLPIX S31

Page 1: ...DIGITAL CAMERA Reference Manual ...

Page 2: ...lance settings are adjusted for underwater shooting so that colors are reproduced accurately You ll have plenty of shots to remember your underwater adventures by Add voice messages to your pictures Exchange Messages A 66 You can add messages to your pictures Enjoy listening to recorded messages and recording replies to messages Use this feature to exchange messages with friends and family or to c...

Page 3: ...on Parts of the Camera and Basic Operations The Basics of Shooting and Playback Shooting Features Playback Features Recording and Playing Back Movies General Camera Setup Reference Section Technical Notes and Index ...

Page 4: ...ore using the camera please read the information in For Your Safety A ix and Important Shockproof Waterproof Dustproof Condensation A xv and familiarize yourself with the information provided in this manual After reading please keep this manual handy and refer to it to enhance your enjoyment of your new camera ...

Page 5: ...About This Manual If you want to start using the camera right away see The Basics of Shooting and Playback A 9 To learn about the parts of the camera and basic operations see Parts of the Camera and Basic Operations A 1 ...

Page 6: ...buttons or messages displayed on a computer monitor appear in bold In this manual images are sometimes omitted from monitor display samples so that monitor indicators can be more clearly shown Illustrations and monitor content shown in this manual may differ from the actual product Icon Description B This icon indicates cautions and information that should be read before using the camera C This ic...

Page 7: ... imaging nikon com Use Only Nikon Brand Electronic Accessories Nikon COOLPIX cameras are designed to the highest standards and include complex electronic circuitry Only Nikon brand electronic accessories including battery chargers batteries and AC adapters certified by Nikon specifically for use with this Nikon digital camera are engineered and proven to operate within the operational and safety r...

Page 8: ...anscribed stored in a retrieval system or translated into any language in any form by any means without Nikon s prior written permission Nikon reserves the right to change the specifications of the hardware and software described in these manuals at any time and without prior notice Nikon will not be held liable for any damages resulting from the use of this product While every effort was made to ...

Page 9: ...d The copying or reproduction of stamps issued by the government and of certified documents stipulated by law is prohibited Cautions on certain copies and reproductions The government has issued cautions on copies or reproductions of securities issued by private companies shares bills checks gift certificates etc commuter passes or coupon tickets except when a minimum of necessary copies are to be...

Page 10: ...able software potentially resulting in the malicious use of personal image data Ensuring the privacy of such data is the user s responsibility Before discarding a data storage device or transferring ownership to another person erase all data using commercial deletion software or format the device and then completely refill it with images containing no private information for example pictures of em...

Page 11: ...ized service representative for inspection Do not disassemble Touching the internal parts of the camera or Battery Charger could result in injury Repairs should be performed only by qualified technicians Should the camera or Battery Charger break open as the result of a fall or other accident take the product to a Nikon authorized service representative for inspection after unplugging the product ...

Page 12: ...ter be sure it is unplugged Use only a Rechargeable Li ion Battery EN EL12 included Charge the battery by inserting it in a Battery Charger MH 65 included When inserting the battery do not attempt to insert it upside down or backwards Do not short or disassemble the battery or attempt to remove or break battery insulation or casing Do not expose the battery to flame or to excessive heat Do not imm...

Page 13: ...rve these precautions could result in fire or electric shock Do not handle the plug or battery charger with wet hands Failure to observe this precaution could result in electric shock Do not use with travel converters or adapters designed to convert from one voltage to another or with DC to AC inverters Failure to observe this precaution could damage the product or result in overheating or fire Us...

Page 14: ...d result in burns or fire Avoid contact with liquid crystal Should the monitor break care should be taken to avoid injury caused by broken glass and to prevent liquid crystal from the monitor touching the skin or entering the eyes or mouth Turn the power off when using inside an airplane or the hospital Turn the power off while inside the airplane during take off or landing Follow the instructions...

Page 15: ...that interference will not occur in a particular installation If this equipment does cause harmful interference to radio or television reception which can be determined by turning the equipment off and on the user is encouraged to try to correct the interference by one or more of the following measures Reorient or relocate the receiving antenna Increase the separation between the equipment and rec...

Page 16: ...tices for customers in Europe CAUTIONS RISK OF EXPLOSION IF BATTERY IS REPLACED BY AN INCORRECT TYPE DISPOSE OF USED BATTERIES ACCORDING TO THE INSTRUCTIONS This symbol indicates that this product is to be collected separately The following apply only to users in European countries This product is designated for separate collection at an appropriate collection point Do not dispose of as household ...

Page 17: ...the Nikon s in house test U S Department of Defense test method standard This drop test drops 5 cameras in 26 directions 8 edges 12 corners and 6 faces from a height of 122 cm 48 in to make sure that one to five cameras pass the test if any defect is detected during the test another five cameras are tested to make sure that the test criteria are satisfied for one to five cameras bDo not subject th...

Page 18: ...charged service Do not use the camera deeper than 5 m 16 4 ft underwater Do not subject the camera to water pressure by exposing it to rapid flowing water or waterfalls Your Nikon warrantee may not cover troubles caused by water seeping inside the camera due to improper handling of the camera The waterproof performance of this camera is designed to work for fresh water and seawater only The inner ...

Page 19: ...of a car on a boat on the beach or near a heating device for a long period of time This could cause deterioration of the waterproof performance Before Using the Camera Underwater 1 Make sure that there are no foreign substances inside the battery chamber memory card slot cover Any foreign substances such as sand dust or hair inside the battery chamber memory card slot cover should be removed with ...

Page 20: ...ons such as rapids or waterfalls This camera does not float in water Make sure not to drop the camera underwater Cleaning After Using the Camera Underwater After using the camera underwater clean the camera within 60 minutes If you leave the camera in wet conditions where salt particles or other foreign substances adhere to it this could cause damage discoloration corrosion a bad smell or deterior...

Page 21: ...ubstances can cause the camera to malfunction wash the camera thoroughly 2 Wipe off water droplets with a soft cloth and dry the camera in the well ventilated and shady place Place the camera on a dry cloth to dry it Water will flow out from openings in the microphone or speakers Do not dry the camera with hot air from a hair dryer or clothes dryer Do not use chemicals such as benzine thinner alco...

Page 22: ...also seep inside the battery chamber memory card slot cover in locations such as waterproof packing hinges memory card slot or terminals If that happens wipe the water off with a dry soft cloth If the cover is closed when the inside is wet this could cause condensation or malfunction If the microphone or speaker openings are clogged with water droplets the sound may deteriorate or become distorted...

Page 23: ...ay cause fogging condensation on the inside of the monitor lens or flash window This is not a camera malfunction or defect bEnvironmental conditions that are likely to cause condensation inside of the camera Fogging condensation may occur on the inside of the monitor lens or flash window in the following environmental conditions where there are sharp temperature changes or high humidity The camera...

Page 24: ...r 5 Shooting Mode 5 Playback Mode 6 Using the Flexible Buttons 7 The Basics of Shooting and Playback 9 Preparation 1 Charge the Battery 10 Preparation 2 Insert the Battery 12 Preparation 3 Insert a Memory Card 14 Internal Memory and Memory Cards 15 Preparation 4 Set the Display Language Date and Time 16 Step 1 Turn the Camera On 20 Turning the Camera On and Off 21 Step 2 Frame a Picture 22 Using t...

Page 25: ...aying Back Movies 77 Recording Movies 78 Playing Back Movies 81 General Camera Setup 83 Camera Settings Menu 84 Reference Section E1 Have Fun with Pictures E2 E Exchange Messages E2 Leave a Message E2 Leave a Reply E4 Play Recordings E5 Erase Recordings E5 V Picture Play E7 Picture Play Features E7 Q Soften Pictures E9 f Add Starbursts E10 W Add a Fisheye Effect E11 M Add a Diorama Effect E12 Z To...

Page 26: ...irmware Version E49 Connections E50 Connecting the Camera to a TV E50 Connecting the Camera to a Printer E52 Connecting the Camera to a Printer E53 Printing Individual Images E55 Printing Multiple Images E57 Additional Information E61 File and Folder Names E61 Optional Accessories E63 Error Messages E64 Technical Notes and Index F1 Caring for the Product F2 The Camera F2 The Battery F5 The Battery...

Page 27: ...describes the parts of the camera and also explains how to use basic camera features The Camera Body 2 Attaching the Camera Strap 4 The Monitor 5 Shooting Mode 5 Playback Mode 6 Using the Flexible Buttons 7 If you want to start using the camera right away see The Basics of Shooting and Playback A 9 ...

Page 28: ...ody 9 8 7 6 6 5 4 3 2 1 1 Shutter release button 24 2 Power switch power on lamp 20 3 Flash 35 4 Self timer lamp 37 AF assist illuminator 84 5 b e movie record button 78 6 Eyelets for camera strap 4 7 Speaker 82 8 Microphone 78 9 Lens with protective glass ...

Page 29: ...6 2 Monitor 5 3 Flash lamp 35 4 Multi selector H Telephoto 23 I Wide angle 23 5 c shooting playback mode button 26 6 Battery chamber memory card slot cover 12 14 7 Battery chamber 12 8 Memory card slot 14 9 USB audio video output connector 68 10 Waterproof packing xvi xvii 11 Tripod socket F19 ...

Page 30: ...4 Parts of the Camera and Basic Operations Attaching the Camera Strap Pass the strap through either the left or right strap eyelet and attach the strap 2 1 ...

Page 31: ... 30s 1m 1m 5m 5m 29m 0s 29m 0s 999 999 9999 9999 29m 0s 29m 0s 1 Flexible icons 7 2 Date not set indicator 19 84 E64 3 Shutter speed 25 4 Aperture value 25 5 Flash mode 35 6 Change colors icon 49 7 Self timer indicator 37 8 Smile timer 39 9 Shoot at intervals icon 44 10 Battery level indicator 20 11 Zoom indicator 23 12 Shooting mode 34 42 13 Movie recording time 57 78 14 Number of exposures remai...

Page 32: ...el indicator 20 8 Crop indicator 64 9 Volume 82 10 Switch to full frame 65 11 Playback mode 66 12 Movie message recording time 66 E5 13 Current image number 26 14 Internal memory indicator 26 C If Information Is Not Displayed During Shooting Mode and Playback Mode Apart from certain information such as the battery level focus indicator or focus area information is not displayed if no operations ar...

Page 33: ... menu is displayed you can change various settings In this document the flexible buttons are referred to as flexible button 1 through flexible button 4 in order from top to bottom 15m 0s 15m 0s 780 780 4 4 15 30 15 30 15 05 2013 15 05 2013 Shooting mode Playback mode Flexible button 1 Flexible button 2 Flexible button 3 Flexible button 4 Flexible button 1 Flexible button 2 Flexible button 3 Flexib...

Page 34: ...f timer Self timer Exchange messages Have fun with pictures Picture play Make photo albums Shooting mode Playback mode Welcome screen Camera settings Date and time Brightness Print date Camera settings Electronic VR AF assist Date Print date Off Press H or I to display other pages To select an item press the flexible button next to the item The last setting selected including the default setting i...

Page 35: ...Charge the Battery 10 Preparation 2 Insert the Battery 12 Preparation 3 Insert a Memory Card 14 Preparation 4 Set the Display Language Date and Time 16 Shooting Step 1 Turn the Camera On 20 Step 2 Frame a Picture 22 Step 3 Focus and Shoot 24 Playback Step 4 Play Back Images 26 Step 5 Delete Images 28 ...

Page 36: ... included Battery Charger MH 65 by sliding the battery forward 1 and then press down until it locks into place 2 The CHARGE lamp starts flashing when charging starts A fully exhausted battery charges in about 2 hours and 30 minutes When charging is complete the CHARGE lamp lights See Understanding the CHARGE Lamp A 11 3 When charging is complete remove the battery and then unplug the charger ...

Page 37: ...otes About the Battery Charger Be sure to read and follow the warnings in For Your Safety A ix thoroughly before using the battery charger Be sure to read and follow the warnings in The Battery Charger F6 thoroughly before using the battery charger B Notes About the Battery Be sure to read and follow the warnings in For Your Safety A ix thoroughly before using the battery Be sure to read and follo...

Page 38: ...row 1 and fully insert the battery 2 When the battery is inserted correctly the battery latch will lock the battery in place B Inserting the Battery Correctly Inserting the battery upside down or backwards could damage the camera Be sure to check that the battery is in the correct orientation 3 Close the battery chamber memory card slot cover Charge the battery before the first use or when the bat...

Page 39: ...ion The camera battery and memory card may be hot immediately after using the camera Observe caution when removing the battery or memory card B Opening and Closing the Battery chamber Memory Card Slot Cover Do not open and close the battery chamber memory card slot cover in a sandy or dusty environment or with wet hands If the cover is closed without removing foreign particles water may seep insid...

Page 40: ...t cover Turn off the camera before opening the cover 2 Insert a memory card Slide the memory card in until it clicks into place B Inserting a Memory Card Inserting a memory card upside down or backwards could damage the camera and the memory card Be sure to check that the memory card is in the correct orientation 3 Close the battery chamber memory card slot cover Memory card slot ...

Page 41: ... can be saved either in the camera s internal memory approx 26 MB or on a memory card To use the camera s internal memory for shooting or playback first remove the memory card B Formatting a Memory Card The first time you insert a memory card that has been used in another device into this camera be sure to format it with this camera All data stored on a memory card is permanently deleted when the ...

Page 42: ...a clock and the menu background setting screen are displayed 1 Press the power switch to turn on the camera When the camera is turned on the power on lamp green lights and then the monitor turns on the power on lamp turns off when the monitor turns on 2 Press the multi selector J or K to display the desired language and then press flexible button 4 O 3 Press flexible button 3 R Yes Language Set ti...

Page 43: ...ime Press H or I Apply the setting Select the minute setting and then press flexible button 4 O Press flexible button 3 m to enable daylight saving time When the daylight saving time function is enabled m is displayed in the monitor Press flexible button 3 m again to disable the daylight saving time function 6 Press flexible button 3 R Yes Year Month Day Date format Month Day Year Day Month Year D...

Page 44: ...round image to be displayed when a menu or setting screen is displayed and then press flexible button 4 O To restore the default background image press flexible button 3 P The camera enters shooting mode and you can take pictures using A Point and shoot A 20 Menu background ...

Page 45: ...settings menu to set the date and time A 84 E39 C The Clock Battery The camera s clock is powered by an internal backup battery The backup battery is charged when the main battery is inserted into the camera or when the camera is connected to an optional AC adapter and can provide several days of backup power after about 10 hours of charging If the camera s backup battery becomes exhausted the dat...

Page 46: ... no memory card is inserted in the camera and images are saved in the internal memory approx 26 MB The number of exposures remaining depends on the amount of available memory in the internal memory or memory card and also varies depending on the Photo size setting under Choose a size A 54 Display Description F Battery level high G Battery level low Prepare to charge or replace the battery Battery ...

Page 47: ...le the monitor turns off the camera enters standby mode and the power on lamp flashes If no operations are performed for approx another three minutes the camera turns off automatically While the camera is in standby mode the monitor turns back on if you perform any of the following operations Press the power switch shutter release button c shooting playback mode button or b e movie record button T...

Page 48: ...cts away from the lens flash and microphone 2 Frame the picture Aim the camera at the desired subject 15m 0s 15m 0s 780 780 C When Using a Tripod We recommend using a tripod to stabilize the camera in the following situations When shooting in dimly lit conditions with the flash mode A 35 set to y Flash off When zooming in on the subject ...

Page 49: ...e maximum optical zoom position you can use the digital zoom to magnify the image further by up to about 4 15m 0s 15m 0s 780 780 Zoom indicator Zoom out Zoom in Maximum optical zoom Digital zoom enabled Optical zoom Digital zoom C Digital Zoom and Interpolation Unlike optical zoom digital zoom uses a digital imaging process known as interpolation to magnify images resulting in slight deterioration...

Page 50: ...ea turns green When you are using digital zoom the camera focuses on the subject in the center of the frame and the focus area is not displayed When the camera has focused the focus indicator A 5 lights in green While the shutter release button is pressed halfway the focus area or focus indicator may flash in red This indicates that the camera is unable to focus Modify the composition and then pre...

Page 51: ... may result in camera shake and blurred images Press the button gently B Notes About Saving Data After taking pictures or recording movies the number of exposures remaining or the remaining recording time flashes while images or movies are being saved Do not open the battery chamber memory card slot cover Image and movie data could be lost and the camera or memory card could be damaged B Notes Abo...

Page 52: ...lay the next image Press K Press and hold J or K to scroll quickly through images Remove the memory card from the camera to play back images saved in the camera s internal memory C is displayed near the current image number To return to shooting mode press the c shooting playback mode button shutter release button or the b e movie record button c shooting playbackmode button Displays the previous ...

Page 53: ...es in which the face A 60 was detected at the time of shooting are displayed depending upon the orientation of the detected face the images are automatically rotated for playback display except images captured using Shoot at intervals and Take a series of pictures C More Information Playback Zoom A 64 Thumbnail Display A 65 Features Available in Playback Mode Playback Menu A 66 ...

Page 54: ...image is deleted o Erase selected pictures Multiple images can be selected and deleted A 29 k Erase all pictures All images currently saved are deleted To exit without deleting press flexible button 1 Q 3 Press flexible button 3 R Yes Deleted images cannot be recovered To exit without deleting press flexible button 4 S No 4 4 15 30 15 30 15 05 2013 15 05 2013 Erase this picture only Erase Erase se...

Page 55: ...e all check marks 2 Add check marks to all images that you want to delete and then press flexible button 4 O to confirm the selection A confirmation dialog is displayed Follow the instructions displayed in the monitor Erase selected pictures B Notes About Deletion Deleted images cannot be recovered Copy important images to a computer before deleting them from the camera If you delete an image that...

Page 56: ...30 ...

Page 57: ...ting conditions and the kind of pictures you want to take Features Available in Shooting Mode Shooting Menu 32 A Point and Shoot 34 Using the Flash 35 Using the Self timer 37 Using the Smile Timer 39 Choose a Style Shooting Suited to Scenes and Effects 42 Decorate 48 Change Colors 49 Change Sounds 52 Choose a Size 54 Features That Cannot Be Used Simultaneously 58 Focusing 60 ...

Page 58: ... the shutter about 10 seconds after you press the shutter release button You can also set the smile timer 37 39 g More picture options Choose a style Allows you to select the scene settings and effects used for shooting 42 Decorate Allows you to add a frame around your images when taking pictures Seven different frames are available 48 Change colors Allows you to select b Brighter darker or c More...

Page 59: ...button sounds 52 Choose a size Set the size of photos still images and movies 54 Camera settings Allows you to change a number of general settings 84 Flexible button Option Description A B Features That Cannot Be Used Simultaneously Some settings cannot be used with other functions A 58 ...

Page 60: ...aries depending on the composition of the picture When the camera detects a person s face it focuses on that face A 60 The skin softening feature makes the skin tones in people s faces appear smoother A 41 The flash may fire when shooting in low light When shooting in low light the use of a tripod is recommended The camera does not detect the scene when the digital zoom is being used C Notes About...

Page 61: ...Flash w Auto flash The flash fires automatically when lighting is dim k is displayed in the shooting screen when this feature is enabled y Flash off The flash does not fire We recommend using a tripod to stabilize the camera when shooting in dark surroundings S is displayed in the shooting screen when this feature is enabled x Always fire flash The flash fires whenever a picture is taken Use to fi...

Page 62: ...sh Lamp The flash lamp indicates the status of the flash when you press the shutter release button halfway On The flash fires when a picture is taken Flashing The flash is charging The camera cannot take pictures Off The flash does not fire when a picture is taken If the battery level is low the monitor turns off while the flash is charging C Effective Range of the Flash The flash has a range of a...

Page 63: ...tter release button When using the self timer use of a tripod is recommended 1 Press flexible button 2 j 10 s M is displayed When Y Smile timer is selected the camera uses face detection to detect a person s face and then automatically releases the shutter when a smile is detected A 39 2 Frame the picture and press the shutter release button halfway Focus and exposure are set Enter shooting mode M...

Page 64: ...mer lamp flashes while the timer is counting down About one second before the shutter is released the lamp stops flashing and glows steadily When the shutter is released the self timer is set to b Off To stop the timer before a picture is taken press the shutter release button again 9 9 F3 3 F3 3 1 250 1 250 B Features That Cannot Be Used Simultaneously Some settings cannot be used with other func...

Page 65: ...A 60 3 Wait for the subject to smile Do not press the shutter release button If the camera detects the smiling face of the person framed by the double border the shutter is automatically released After the camera releases the shutter it continues to detect faces and smiles and releases the shutter again if it detects a smiling face 4 Stop shooting You can turn off the smile timer by turning the ca...

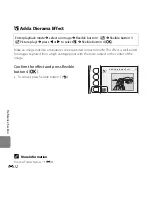
Page 66: ...era off if no operations are performed in the following situations The camera does not detect any faces The camera detected a face but cannot detect a smile C When the Self timer Lamp Flashes When using smile timer the self timer lamp flashes when the camera detects a face and flashes quickly immediately after the shutter is released C Releasing the Shutter Manually The shutter can also be release...

Page 67: ... more person s faces up to three and processes the image to soften facial skin tones B Notes About Skin Softening It may take more time than usual to save images after shooting Under some shooting conditions the desired skin softening results may not be achieved or skin softening may be applied to areas of the image where there are no faces ...

Page 68: ...ble button 1 Q Enter shooting mode M flexible button 3 g M flexible button 2 g Choose a style H Shoot close ups A 43 default setting X Photograph food A 43 O Shoot at intervals A 44 J Shoot under water A 45 I Take a series of pictures A 45 K Photograph fireworks A 46 L Mirror A 46 Q Take soft pictures A 47 M Create a diorama effect A 47 Shoot close ups B Features That Cannot Be Used Simultaneously...

Page 69: ...etting can be changed A 35 The self timer can be set but Y Smile timer is not available A 37 39 X Photograph food The camera automatically zooms to the closest position at which it can shoot The closest distance at which the camera can focus varies depending on the zoom position When the zoom is set to a position where the zoom indicator turns green the camera can focus on subjects as close as abo...

Page 70: ...minute Approx 210 images Shoot every 5 minutes Approx 40 images When using this feature use a fully charged battery to prevent the camera from turning off unexpectedly When the camera detects a person s face it focuses on that face A 60 If no faces are detected the camera focuses on the subject in the center of the frame Press the shutter release button all the way down to capture the first image ...

Page 71: ... flash may be unable to light the entire subject at distances of less than 50 cm 1 ft 8 in The flash is set to y Flash off but the setting can be changed A 35 The self timer can be set but Y Smile timer is not available A 37 39 I Take a series of pictures The camera captures a series of still images that allow you to clearly see detailed movements in a moving subject When the camera detects a pers...

Page 72: ...le position the camera can focus on subjects as close as about 5 cm 2 in from the front of the protective glass The camera focuses on the area in the center of the frame The right half of the screen is shaded The unshaded left half is flipped to become the image of the right half Frame the subject so that the image becomes laterally symmetrical over the center line of the screen The camera focuses...

Page 73: ...etting can be changed A 35 The self timer can be set but Y Smile timer is not available A 37 39 M Create a diorama effect This effect is well suited for images captured from a high vantage point with the main subject in the center of the image The closest distance at which the camera can focus varies depending on the zoom position When the zoom is set to a position where the zoom indicator turns g...

Page 74: ... frame 2 Frame the subject and take a picture The frame is added to the picture Enter shooting mode M flexible button 3 g M flexible button 3 A Decorate Decorate B Notes About Decorate The area that is captured becomes smaller when a thicker frame is selected When using borderless printing to print images that you have added frames to the frames may not be printed Images captured using Decorate ca...

Page 75: ...ector button J or K to select the brightness vividness or to select the color you want to highlight The screen displayed when b Brighter darker is selected in step 1 is used here as an example Refer to the following information for details about each setting b Adjusting Brightness Exposure Compensation A 51 c Adjusting Vividness Saturation A 51 P Highlight Colors A 51 Press flexible button 3 P to ...

Page 76: ...Features That Cannot Be Used Simultaneously Some settings cannot be used with other functions A 58 C Notes About Change Colors The Brighter darker More vivid less vivid and Highlight colors settings are saved in the camera s memory even after the camera is turned off Images adjusted with Change colors are indicated by R 15m 0s 15m 0s 780 780 ...

Page 77: ...ness Saturation You can adjust the overall vividness of the image Press J and move the cursor to the left to make the overall image more dull Press K and move the cursor to the right to make it more vivid P Highlight Colors Keep one specified color in the image and change the other colors to black and white Press the multi selector J or K to move the cursor and select the color to highlight Bright...

Page 78: ...hen using Take a series of pictures A 45 or when recording movies the shutter sound is not heard If you select z the shutter sound and the sound heard when the focus has been locked are muted x Pick a button sound Allows you to select the beep heard when the camera switches between shooting and playback modes when using the menus when the camera is connected to a computer or printer etc Regardless...

Page 79: ...o cancel press flexible button 1 Q The screen displayed when y Pick a shutter sound was selected in step 1 is shown here as an example but the procedure is the same if you select x Pick a button sound 3 Press flexible button 4 O The sound is set Pick a shutter sound Pick a shutter sound B Features That Cannot Be Used Simultaneously Some settings cannot be used with other functions A 58 ...

Page 80: ...pixels by printer resolution dpi and multiplying by 2 54 cm 1 in However at the same image size images printed at higher resolutions will be printed smaller than the size indicated and those printed at lower resolutions will be printed larger than the size indicated Enter shooting mode M flexible button 4 l M flexible button 3 C Choose a size M flexible button 2 A Photo size Photo size1 Size1 pixe...

Page 81: ...mber of images that can be saved may also vary depending on the type of memory card being used If the number of exposures remaining is 10 000 or more the number of exposures remaining display shows 9999 To confirm the number of images that can be saved in the internal memory approx 26 MB remove the memory card from the camera and then check the number of remaining exposures displayed in the monito...

Page 82: ...memory the setting is fixed at H Small 640 The frame rate is approx 30 frames per second for all movie frame sizes Enter shooting mode M flexible button 4 l M flexible button 3 C Choose a size M flexible button 3 N Movie frame size Movie frame size Image size number of pixels Aspect ratio G Large 720p default setting 1280 720 16 9 H Small 640 640 480 4 3 C Notes About Frame Rates The frame rate is...

Page 83: ...imum size for a single movie is 4 GB and the maximum recording time for a single movie is 29 minutes even when there is sufficient free space on the memory card When recording a movie the remaining recording time that is displayed is the amount of recording time available for one movie If the camera becomes hot movie recording may stop before these limits are reached To confirm the maximum length ...

Page 84: ...en Highlight colors option is enabled Decorate Smile timer A 39 Decorate cannot be used when taking pictures using smile timer Choose a style A 42 Decorate cannot be used when any option in Choose a style is enabled Change colors Smile timer A 39 Change colors cannot be used when taking pictures using smile timer Choose a style A 42 Change colors cannot be used when any option in Choose a style is...

Page 85: ...vals Take a series of pictures or Photograph fireworks Digital zoom Smile timer A 39 Digital zoom cannot be used when taking pictures using smile timer Choose a style A 42 Digital zoom cannot be used when taking pictures using Shoot under water Take soft pictures or Create a diorama effect Restricted function Option Description ...

Page 86: ...to 3 The face closest to the center of the frame 15m 0s 15m 0s 780 780 B Notes About Face Detection The camera s ability to detect faces depends on a variety of factors including whether or not the subject is facing the camera Additionally the camera may be unable to detect faces in the following situations When faces are partially hidden by sunglasses or otherwise obstructed When faces take up to...

Page 87: ...e frame 1 Aim the camera at the subject so that the subject is in the center of the frame 2 Press the shutter release button halfway Confirm that the focus area turns green Focus and exposure are locked 3 Continue holding down the shutter release button halfway and recompose the picture Be sure to maintain the same distance between the camera and the subject 4 Press the shutter release button the ...

Page 88: ...hat subject appear very dark No contrast between the subject and surroundings e g a portrait subject wearing a white shirt is standing in front of a white wall Several objects are at different distances from the camera e g an animal inside a cage Subjects with repeating patterns window blinds buildings with multiple rows of similarly shaped windows etc Subject is moving rapidly In the situations n...

Page 89: ...4 Thumbnail Display 65 Features Available in Playback Mode Playback Menu 66 Connecting the Camera to a TV Computer or Printer 68 Using ViewNX 2 70 Installing ViewNX 2 70 Transferring Images to the Computer 73 Viewing Images 75 4 4 15 30 15 30 15 05 2013 15 05 2013 Exchange messages Have fun with pictures Picture play Make photo albums ...

Page 90: ...f shooting except when viewing an image captured using Shoot at intervals or Take a series of pictures If the camera detected multiple faces when the image was captured press H I J or K to display a different face To zoom in on an area of the image where there are no faces press flexible button 3 H and then press H Press flexible button 1 S to return to full frame playback mode h Crop Creating a C...

Page 91: ...iew multiple images on one screen making it easy to find the image you want Press J or K to select an image and the selected image is magnified and displayed at the center of the screen Select an image and press H and the selected image is displayed in the full frame playback mode 15 30 15 30 15 05 2013 15 05 2013 7 7 Image thumbnail display Full frame display H I ...

Page 92: ...cture play1 Allows you to edit your pictures using a variety of features E7 Make photo albums1 Allows you to display images similarly to a photo album E17 Z View Favorites Allows you to add your favorite images to favorites This makes it easier to find the images you are looking for You can also protect selected images from accidental deletion E19 Slide show Allows you to play back images saved in...

Page 93: ...es Allows you to delete all images A 28 A 28 l Settings More playback options Allows you to select a date and view images that were captured on that date or play back images added to favorites E27 E29 Print order retouch Allows you to copy or rotate images or create a small copy of the current image You can also specify the image to be printed and the number of copies to be printed E30 E33 E34 E35...

Page 94: ...rinter Before connecting the camera to an external device make sure the remaining battery level is sufficient and turn the camera off For information about the connection methods and subsequent operations refer to the documentation included with the device in addition to this document 3 1 2 Insert the plug straight USB audio video output connector How to open the cover ...

Page 95: ...k images and movies Connection method Connect the camera to the computer s USB input jack with the included USB Cable UC E16 Before connecting to a computer install ViewNX 2 on the computer using the included ViewNX 2 CD ROM For information about using the ViewNX 2 CD ROM and transferring images to a computer see page 70 Printing images without using a computer E53 If you connect the camera to a P...

Page 96: ... the included ViewNX 2 CD ROM Installing ViewNX 2 An Internet connection is required Compatible Operating Systems Windows Windows 8 Windows 7 Windows Vista Windows XP Macintosh Mac OS X 10 6 10 7 10 8 Refer to the Nikon website for details on system requirements including the latest information on operating system compatibility Your Imaging Toolbox ViewNX 2 ...

Page 97: ...ot available click Region Selection to choose a different region and then choose the desired language the Region Selection button is not available in the European release Click Next to display the installation window 3 Start the installer We recommend clicking Installation Guide in the installation window to check the installation help information and system requirements before installing ViewNX 2...

Page 98: ...ed ViewNX 2 consisting of the three modules below Nikon Transfer 2 For transferring images to the computer ViewNX 2 For viewing editing and printing transferred images Nikon Movie Editor For basic editing of transferred movies Panorama Maker for creating a single panorama photo using a series of separate images 6 Remove the ViewNX 2 CD ROM from the CD ROM drive ...

Page 99: ...e camera on To transfer images that are saved in the camera s internal memory remove the memory card from the camera before connecting it to the computer SD card slot If your computer is equipped with an SD card slot the card can be inserted directly in the slot SD card reader Connect a card reader available separately from third party suppliers to the computer and insert the memory card 3 1 2 B C...

Page 100: ...isplayed select Import File using Nikon Transfer 2 and click OK 2 Double click Import File If the memory card contains a large number of images it may take a while for Nikon Transfer 2 to start Wait until Nikon Transfer 2 starts 2 Transfer images to the computer Confirm that the name of the connected camera or removable disk is displayed as the Source on the Options title bar of Nikon Transfer 2 1...

Page 101: ...puter operating system to eject the removable disk corresponding to the memory card and then remove the card from the card reader or card slot Viewing Images Start ViewNX 2 Images are displayed in ViewNX 2 when transfer is complete Consult online help for more information on using ViewNX 2 C Starting ViewNX 2 Manually Windows Double click the ViewNX 2 shortcut icon on the desktop Mac OS Click the ...

Page 102: ...76 ...

Page 103: ...ing and Playing Back Movies Recording and Playing Back Movies You can record movies by simply pressing the b e movie record button Recording Movies 78 Playing Back Movies 81 15m 0s 15 m 0s 7 80 7 8 0 7m30s 7m30s ...

Page 104: ...720p 1280 720 A 56 When recording movies the angle of view i e the area visible in the frame is narrower compared to that of still images 2 Press the b e movie record button to start recording a movie The camera focuses on the subject in the center of the frame Focus areas are not displayed during recording When movie frame size is set to G Large 720p 1280 720 the monitor display changes to a 16 9...

Page 105: ...m turns off The sounds of multi selector operation autofocus lens drive movement and aperture operation when brightness changes may be recorded Smear F4 visible in the monitor with movie recording is recorded with movies Avoiding bright objects such as the sun reflections of the sun and electric lights is recommended Depending on the distance to the subject or the amount of zoom applied subjects w...

Page 106: ...ording The current setting for Shoot close ups A 43 Photograph food A 43 Shoot under water A 45 Brighter darker A 51 or More vivid less vivid A 51 is applied when recording movies Confirm settings before starting movie recording The self timer A 37 can be used When the self timer is enabled the camera starts recording 10 seconds after you press the b e movie record button The flash does not fire Y...

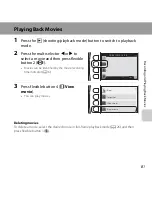
Page 107: ...a movie and then press flexible button 2 Z Movies can be identified by the movie recording time indicator A 6 3 Press flexible button 4 G View movie You can play movies Deleting movies To delete a movie select the desired movie in full frame playback mode A 26 and then press flexible button 3 n 10s 10s 15 30 15 30 15 05 2013 15 05 2013 Favorites View Slide show View movie ...

Page 108: ... the button to pause playback The following operations can be performed while playback is paused E Press to advance the movie by one frame Press and hold to advance the movie frame by frame F Press to rewind the movie by one frame Press and hold to rewind the movie frame by frame A Press the button to resume playback End S Press the button to return to full frame playback mode 5s 5s Paused During ...

Page 109: ... the l camera settings menu See Using the Flexible Buttons A 7 for information about using the camera s menus For further details about each setting refer to l Camera Settings in the Reference Section E38 Welcome screen Camera settings Date and time Brightness Camera settings Choose a size Change sounds Settings ...

Page 110: ...u to imprint the shooting date on images E41 Electronic VR Allows you to choose whether to use electronic VR vibration reduction when taking still pictures E42 AF assist Allows you to enable and disable the AF assist illuminator E43 Format memory Format card Allows you to format the internal memory or the memory card E44 Language Allows you to change the camera s display language E45 Menu backgrou...

Page 111: ...ges E2 V Picture Play E7 D Make Photo Albums E17 View F Favorites E19 m Slide Show E21 G View Movie E26 Settings Z More Playback Options E27 z Print Order Retouch E30 l Camera Settings E38 Connections Connecting the Camera to a TV E50 Connecting the Camera to a Printer E52 Additional Information File and Folder Names E61 Optional Accessories E63 Error Messages E64 ...

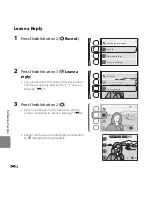
Page 112: ...ge Leave a Message 1 Press flexible button 2 q Record 2 Press flexible button 2 I Leave a message You cannot select this option if the image already has a message attached to it Leave a Reply E4 Enter playback mode M select an image M flexible button 1 V M flexible button 2 E Exchange messages Record Exchange messages Play recordings Erase recordings Leave a message Record Leave a reply ...

Page 113: ... saved when you press flexible button 4 O in step 4 You can re record the message as long as you do not press flexible button 4 Press flexible button 3 A to play back the message Press flexible button 1 Q before or after recording a message to return to step 2 4 Press flexible button 4 O Message recorded is displayed and the message is attached to the image Images that have a recorded message are ...

Page 114: ...essage attached to it Leave a Message E2 3 Press flexible button 2 q Once recording starts the operations are the same as explained in Leave a Message E2 Images that have a recorded reply are indicated by I displayed during playback Record Exchange messages Play recordings Erase recordings Leave a message Record Leave a reply 20s 20s 4 4 15 30 15 30 15 05 2013 15 05 2013 ...

Page 115: ...just playback volume If battery power runs out playback stops automatically Erase Recordings 1 Press flexible button 4 L Erase recordings If you select an image that has been added to favorites E19 a confirmation message is displayed R Yes Removes the image from favorites and displays the screen displayed in step 2 S No Returns to step 1 10s 10s Record Exchange messages Play recordings Erase recor...

Page 116: ...tes About Exchange Messages When an image with messages attached is deleted both the image and its messages are deleted Messages cannot be recorded for an image that already has two messages attached to it To change the contents of the recording delete the message and then re record it This camera cannot attach messages to images captured with another make or model of digital camera C More Informa...

Page 117: ...mage look as if it were captured with a fisheye lens This effect is well suited for images captured using Shoot close ups A 43 M Add a diorama effect E12 Make an image look like a miniature scene captured in macro mode This effect is well suited for images captured from a high vantage point with the main subject in the center of the image Z Toy camera E13 Make an image look as if it were shot with...

Page 118: ...ature last When combining the crop feature with another editing feature other than Decorate apply the crop feature last C Original and Edited Images Copies created with editing functions excluding Rotate pictures are not deleted if the original images are deleted The original images are not deleted if copies created with editing functions are deleted Edited copies are saved with the same shooting ...

Page 119: ...or J or K to select the area to be blurred and then press flexible button 4 O To add a slight blur to the entire image press k To cancel press flexible button 1 Q Enter playback mode M select an image M flexible button 1 V M flexible button 3 VPicture play M press J or K to select Q M flexible button 4 O Soften pictures C More Information File and Folder Names E61 ...

Page 120: ...r street lights This effect is suitable for night scenes Confirm the effect and press flexible button 4 O To cancel press flexible button 1 Q Enter playback mode M select an image M flexible button 1 V M flexible button 3 VPicture play M press J or K to select f M flexible button 4 O Add starbursts C More Information File and Folder Names E61 ...

Page 121: ...ptured using Shoot close ups A 43 in the shooting menu Confirm the effect and press flexible button 4 O To cancel press flexible button 1 Q Enter playback mode M select an image M flexible button 1 V M flexible button 3 VPicture play M press J or K to select W M flexible button 4 O Add a fisheye effect C More Information File and Folder Names E61 ...

Page 122: ...a high vantage point with the main subject in the center of the image Confirm the effect and press flexible button 4 O To cancel press flexible button 1 Q Enter playback mode M select an image M flexible button 1 V M flexible button 3 VPicture play M press J or K to select M M flexible button 4 O Add a diorama effect C More Information File and Folder Names E61 ...

Page 123: ...ell suited for landscapes Confirm the effect and press flexible button 4 O To cancel press flexible button 1 Q Enter playback mode M select an image M flexible button 1 V M flexible button 3 VPicture play M press J or K to select Z M flexible button 4 O Toy camera C More Information File and Folder Names E61 ...

Page 124: ...fault setting Use to achieve a vivid photoprint effect 2 Black and white Save images in black and white 3 Sepia Save images in sepia tones 4 Cyanotype Save images in cyan blue monochrome To cancel press flexible button 1 Q Enter playback mode M select an image M flexible button 1 V M flexible button 3 VPicture play M press J or K to select d M flexible button 4 O Change colors C More Information F...

Page 125: ... Press the multi selector J or K to select a color and then press flexible button 4 O To cancel press flexible button 1 Q Enter playback mode M select an image M flexible button 1 V M flexible button 3 VPicture play M press J or K to select P M flexible button 4 O Highlight colors C More Information File and Folder Names E61 ...

Page 126: ... select a frame and then press flexible button 4 O The frame is added to the picture and saved as a new copy To cancel press flexible button 1 Q Press flexible button 3 c to remove the frame Enter playback mode M select an image M flexible button 1 V M flexible button 3 VPicture play M press J or K to select A M flexible button 4 O Decorate B Notes About Decorate The frame is placed on top of the ...

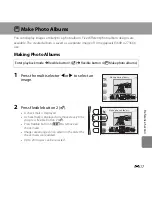
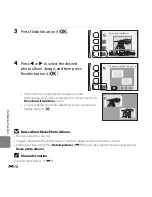
Page 127: ... the multi selector J or K to select an image 2 Press flexible button 2 S A check mark is displayed A check mark is displayed or removed every time you press flexible button 2 S Press flexible button 3 P to remove all check marks Images are arranged in an album in the order the check marks were added Up to 20 images can be selected Enter playback mode M flexible button 1 V M flexible button 4 D Ma...

Page 128: ...ns to Have fun with pictures menu To cancel before the photo album has been created press flexible button 1 S Make photo albums Choose an album design B Notes About Make Photo Albums Movies cannot be selected Images captured with another make or model of digital camera cannot be selected Editing functions other than Rotate pictures E33 cannot be added to images created using Make photo albums C Mo...

Page 129: ...le button 2 F The image is added to favorites You cannot add an image to favorites if it has already been added j is displayed when viewing images that have been added to favorites Up to 200 images can be added to favorites Enter playback mode M flexible button 2 Z M flexible button 2 F Favorites 15 15 15 30 15 30 15 05 2013 15 05 2013 15 30 15 30 15 05 2013 15 05 2013 4 4 B Adding Images to Favor...

Page 130: ...ng Images from Favorites Press the multi selector J or K to select the image you want to remove from favorites and then press flexible button 3 s The selected image is removed from favorites 15 15 15 30 15 30 15 05 2013 15 05 2013 ...

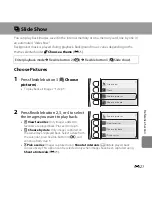
Page 131: ...u want to play back F View favorites Only images added to favorites are played back Proceed to step 3 G Choose by date Only images captured on the same day are played back Select a date from the calendar press flexible button 4 O and continue from step 3 O Pick a series Images captured using Shoot at intervals A 44 are played back consecutively This option can be selected only when images have bee...

Page 132: ...t image or J to display the previous image Press and hold K or J to fast forward or rewind Press H or I during playback to adjust the volume of the background music 4 End the slide show or restart it The screen shown on the right is displayed when the slide show is paused S Returns to the screen displayed in step 1 E Displays the next image F Displays the previous image A Resumes playback Start Sl...

Page 133: ... 2 K or flexible button 3 J to select the folder and then press flexible button 4 O 3 Press flexible button 3 n Pick a speed 4 Press flexible button 2 Fast flexible button 3 Normal default setting or flexible button 4 Slow to select a desired speed Choose pictures Pick a series Pick a speed Next series Choose pictures Previous series Choose pictures Pick a series Pick a speed Fast Pick a speed Nor...

Page 134: ...E24 Reference Section 5 Press flexible button 4 O 6 Press flexible button 2 A Start The slide show begins Choose pictures Pick a series Pick a speed Start Slide show Choose pictures Choose a theme ...

Page 135: ...mated default setting o Pop art or p Classic 3 Press flexible button 2 A Start The slide show begins Start Slide show Choose pictures Choose a theme Animated Choose a theme Pop art Classic Start Slide show Choose pictures Choose a theme B Notes About Slide Show Only the first frame of movies is displayed The maximum playback time is up to about 30 minutes A 21 ...

Page 136: ...E26 Reference Section G View Movie Allows you to play back movies A 81 Available when a movie is displayed Enter playback mode M flexible button 2 Z M flexible button 4 G View movie ...

Page 137: ... are selected based on the selected date The first image captured on that date is displayed A white background of a date indicates that images were recorded on that date Press flexible button 2 K to display the next month Press flexible button 3 J to display the previous month Enter playback mode M flexible button 4 l M flexible button 2 Z More playback options View by date More playback options V...

Page 138: ... 2 Press flexible button 4 S to return to full frame playback mode A 26 15 30 15 30 15 05 2013 15 05 2013 4 4 B Notes About View by Date The 9000 most recent images can be displayed Images that were captured when the camera s date and time were not set are treated as images captured on January 1 2013 Only the first frame of movies is displayed Images cannot be edited when they are played back usin...

Page 139: ...ail playback mode Press flexible button 1 Q to return to the screen displayed in step 1 Press flexible button 4 S to return to full frame playback mode A 26 View by date More playback options View favorites 15 30 15 30 15 05 2013 15 05 2013 4 4 B Notes About View Favorites Images cannot be edited when they are played back using View favorites Only the first frame of movies is displayed ...

Page 140: ...y and a memory card 1 Press flexible button 2 h Copy 2 Press flexible button 2 or 3 to select the copy source and destination k Camera to card Copies images from internal memory to memory card l Card to camera Copies images from memory card to internal memory Enter playback mode M flexible button 4 l M flexible button 3 z Print order retouch M flexible button 2 y Retouch Copy Retouch Rotate pictur...

Page 141: ...image 5 Press flexible button 2 S A check mark is displayed next to the image A check mark is displayed or removed each time you press flexible button 2 S Press flexible button 3 P to remove all check marks Repeat steps 4 and 5 to select additional images 6 Press flexible button 4 O to apply image selection A confirmation dialog is displayed 7 Press flexible button 3 R Yes Images are copied Select...

Page 142: ...led the print order settings are not copied C If Memory contains no images Is Displayed If a memory card that contains no images is inserted into the camera Memory contains no images is displayed when the camera is switched to playback mode You can copy images from the camera s internal memory to the memory card by pressing a flexible button and then selecting flexible button 3 z Print order retou...

Page 143: ...to 180 degrees in either direction 1 Press flexible button 3 d Rotate pictures 2 Press flexible button 2 e or flexible button 3 f The image is rotated 90 degrees 3 Press flexible button 4 O The displayed orientation is applied and the orientation information is saved with the image Copy Retouch Rotate pictures Small picture Rotate pictures Rotate pictures B Notes About Rotate Pictures This camera ...

Page 144: ...e button 2 D or flexible button 3 E to select the size of the image and then press flexible button 4 O A new edited copy is saved as a separate image with a compression ratio of 1 16 To cancel press flexible button 1 Q Copy Retouch Rotate pictures Small picture Small picture 1024 768 1024 768 C More Information File and Folder Names E61 ...

Page 145: ...amera 1 Press flexible button 2 o Select images 2 Select images up to 99 and the number of copies up to nine of each Press the multi selector J or K to select images and then press flexible button 2 X or flexible button 3 Y to set the number of copies for each Images selected for printing are indicated by a check mark icon and the numeral indicating the number of copies to be printed If no copies ...

Page 146: ...int the shooting date on all images in the print order Info Print shooting information shutter speed and aperture value on all images in the print order Date and Info turn on and off each time you press the corresponding flexible button Press flexible button 4 O to complete the print order Date Print order Info When Date is selected ...

Page 147: ... captured Changing the Date and time setting in the camera settings menu after an image has been captured has no effect on the date printed on the image C Canceling Existing Print Order Press flexible button 3 P Delete print order in step 1 E35 of a Print Order to remove print marking from all images and cancel the print order C Print Date When shooting date is imprinted on images using the Print ...

Page 148: ...exible button 4 l Camera settings M flexible button 2 I Welcome screen Option Description h Off The camera enters shooting or playback mode without displaying the welcome screen i On default setting The camera displays an animated welcome screen and then enters shooting or playback mode How often you use the camera and how many pictures you have taken with the camera affects the displayed characte...

Page 149: ...ector to set each item displayed on the screen Select an item Press K or J changes between D M Y hour minute Edit the highlighted item Press H or I Apply the setting Select the minute setting and then press flexible button 4 O When using the camera in an area where daylight saving time is in effect press flexible button 3 m to adjust the camera s time for daylight saving time When the daylight sav...

Page 150: ...ightness The default setting is 3 Press the multi selector J or K to select the desired brightness and then press flexible button 4 O Enter shooting mode or playback mode M flexible button 4 l M flexible button 4 l Camera settings M flexible button 4 K Brightness Brightness ...

Page 151: ...5 2013 15 05 2013 B Notes About Print Date Imprinted dates form a permanent part of image data and cannot be deleted The date cannot be imprinted on images after they have been captured The date is not imprinted on movies and images captured using Take a series of pictures The date is saved using the format selected in the setup menu s Date and time option A 16 E39 C Print Date and Print Order Whe...

Page 152: ...subject is dark b Off default setting Electronic VR is disabled B Notes About Electronic VR Electronic VR is disabled while the flash is used If the exposure period exceeds a certain period of time electronic VR will not function Electronic VR cannot be used when using the following styles Shoot at intervals A 44 Take a series of pictures A 45 Photograph fireworks A 46 Even when electronic VR is s...

Page 153: ...or lights automatically when the subject is dimly lit The illuminator has a range of about 3 5 m 11 ft at the maximum wide angle position and about 2 0 m 6 ft 6 in at the maximum telephoto position When Photograph fireworks A 46 is selected under Choose a style the AF assist illuminator does not light Depending on the scene A 34 automatically selected by the camera when using A Point and shoot mod...

Page 154: ...menu Formatting a Memory Card When the memory card is inserted in the camera the Format card option appears in the camera settings menu Enter shooting mode or playback mode M flexible button 4 l M flexible button 4 l Camera settings M press I twice M flexible button 2 O Format memory N Format card All images will be deleted OK Format No All images will be deleted OK Format No B Notes About Formatt...

Page 155: ...amera settings M press I twice M flexible button 3 P Language Czech Finnish Danish Swedish German Vietnamese Default setting Turkish Spanish Ukrainian Greek Arabic French Bengali Indonesian Simplified Chinese Italian Traditional Chinese Hungarian Hindi Dutch Japanese Norwegian Korean Polish Marathi Brazilian Portuguese Persian European Portuguese Tamil Russian Telugu Romanian Thai ...

Page 156: ...default background image press flexible button 3 P Video Mode Adjust settings for connection to a TV Select from NTSC and PAL Enter shooting mode or playback mode M flexible button 4 l M flexible button 4 l Camera settings M press I twice M flexible button 4 Q Menu background Enter shooting mode or playback mode M flexible button 4 l M flexible button 4 l Camera settings M press I three times M fl...

Page 157: ...lash Self timer A 37 Off Choose a style A 42 Shoot close ups Hue adjustment in Photograph food A 43 Center Shoot at intervals A 44 Shoot every 30 seconds Decorate A 48 Frame 1 Adjustments made using Change colors A 49 Brighter darker 0 More vivid less vivid Normal Highlight colors No change Pick a shutter sound in Change sounds A 52 Standard sounds Pick a button sound in Change sounds A 52 Standar...

Page 158: ...o reset file numbering to 0001 delete all images saved in the internal memory or on the memory card A 28 before selecting Reset all The following menu settings will remain unaffected when menus are reset with Reset all Camera settings menu Welcome screen E38 Date and time E39 Language E45 and Video mode E46 Option Default value Brightness E40 3 Print date E41 Off Electronic VR E42 Off AF assist E4...

Page 159: ...re Version View the current camera firmware version Enter shooting mode or playback mode M flexible button 4 l M flexible button 4 l Camera settings M press I three times M flexible button 4 V Firmware Version COOLPIX S31 Ver x x ...

Page 160: ...3 to play back images or movies on the TV 1 Turn off the camera 2 Connect the camera to the TV Connect the yellow plug of the audio video cable to the video in jack and the white plug to the audio in jack on the TV 3 Set the TV s input to external video input See your TV s documentation for details 3 1 2 White Yellow ...

Page 161: ...ff B Notes About Connecting the Cable When connecting the cable be sure that the camera connector is properly oriented do not insert the cable at an angle and do not use excessive force When disconnecting the cable do not pull the connector at an angle B If the Images Are Not Displayed on the TV Be sure that the camera s Video mode E46 setting in the camera settings menu conforms to the standard u...

Page 162: ...rinter and print images without using a computer Follow the procedures below to print images Take pictures Select images for printing and number of copies using Print order option E35 Connect to the printer E53 Print images one at a time E55 Print multiple images E57 When printing is complete turn the camera off and disconnect the USB cable ...

Page 163: ...EH 62F Failure to observe this precaution could result in overheating or damage to the camera C Printing Images In addition to printing images transferred to a computer from your personal printer and printing over a direct camera to printer connection the following options are also available for printing images saved on the memory card Inserting the memory card into a DPOF compatible printer s car...

Page 164: ...operly oriented do not insert the cable at an angle and do not use excessive force When disconnecting the cable do not remove the cable at an angle 4 Turn on the camera When properly connected the PictBridge startup screen is displayed in the camera monitor followed by the Print selection screen 3 1 2 Print selection ...

Page 165: ...d below to print an image 1 Press the multi selector J or K to select an image to be printed and then press flexible button 4 O 2 Press flexible button 3 b Copies 3 Press H or I to select the desired number of copies up to nine and then press flexible button 4 O Print selection Start print Copies Paper size PictBridge 1 prints Copies 4 ...

Page 166: ...er size using settings on the printer select Default 6 Press flexible button 2 a Start print 7 Printing begins The screen returns to step 1 when printing is complete Start print Copies Paper size PictBridge 4 prints Paper size Default Start print Copies Paper size PictBridge 4 prints Cancel Printing 2 4 Current number of copies total number of copies ...

Page 167: ... selection screen is displayed press flexible button 3 p 2 Press the multi selector I and then press flexible button 2 c Paper size To exit the print menu press the flexible button 1 Q 3 Press J or K to select the paper size and then press flexible button 4 O To specify paper size using settings on the printer select Default Print selection Paper size Print menu Paper size Default ...

Page 168: ... each Images selected for printing are indicated by a check mark and the numeral indicating the number of copies to be printed If no copies have been specified for an image the selection is canceled Press flexible button 4 O when setting is complete When the screen shown on the right is displayed press flexible button 2 a Start print to start printing Press flexible button 1 Q to return to the Pri...

Page 169: ...enu DPOF printing Print images for which a print order was created using the Print order option E35 When the screen shown on the right is displayed press flexible button 2 a Start print to start printing Press flexible button 1 Q to return to the print menu To view the current print order press flexible button 3 B View images To start printing press flexible button 4 O Start print Print all images...

Page 170: ...l Printing 3 4 Current number of copies total number of copies C Paper Size The camera supports the following paper sizes Default the default paper size for the printer connected to the camera 3 5 5 in 5 7 in 100 150 mm 4 6 in 8 10 in Letter A3 and A4 Only sizes supported by the printer are displayed ...

Page 171: ... internal clock changes dates Note however that if the date changes while shooting continuously with Shoot at intervals or Take a series of pictures a new folder is not created until shooting stops Voice message file numbers are the same numbers as the images to which the messages are attached DSCN0001 JPG Identifier not shown on camera monitor Original still images and movies DSCN Message DSCA Me...

Page 172: ...Copy All images copies all folders from the source medium file names do not change but new folder numbers are assigned in ascending order starting from the largest folder number on the destination medium E30 When the current folder is numbered 999 and the file numbers reach 9999 no further images can be captured until the internal memory or memory card is formatted E44 or a new memory card is inse...

Page 173: ...nto the slot in the AC adapter then insert the AC adapter in the battery chamber While using the AC adapter the battery chamber memory card slot cover cannot be closed Do not pull the cord of the AC adapter If the cord is pulled the connection between the camera and power source is interrupted and the camera turns off Audio video cable Audio Video Cable EG CP14 ...

Page 174: ...rn off automatically Pressing the power switch also turns off the camera 21 Battery temperature is elevated The camera will turn off The battery has become hot The camera turns off automatically Allow the battery to cool down before turning it on again 21 The camera will turn off to prevent overheating Inside of the camera has become hot The camera turns off automatically Allow the camera to cool ...

Page 175: ...y card Select flexible button 3 R Yes to format the memory card F7 Out of memory Memory card is full Change the setting for Choose a size Photo size Delete images Insert new memory card Remove memory card and use internal memory 54 28 81 14 15 Image cannot be saved Error occurred while saving image Format internal memory or memory card E44 Camera has run out of file numbers Insert a new memory car...

Page 176: ...E30 File contains no image data File not created with this camera File cannot be viewed on this camera View file using a computer or the device used to create or edit this file All images are hidden No images available for a slide show E21 Lens error Lens error Turn camera off and then on again If error persists contact retailer or Nikon authorized service representative 20 Communications error Er...

Page 177: ...d in printer Remove the jammed paper and then press flexible button 3 R Resume to resume printing Printer error out of paper No paper is loaded in printer Load the specified size of paper and then press flexible button 3 R Resume to resume printing Printer error check ink Ink error Check ink and then press flexible button 3 R Resume to resume printing Printer error out of ink Running out of ink or...

Page 178: ...E68 ...

Page 179: ...nd Index Caring for the Product F2 The Camera F2 The Battery F5 The Battery Charger F6 Memory Cards F7 Cleaning and Storage F8 Cleaning F8 Storage F9 Troubleshooting F10 Specifications F17 Approved Memory Cards F22 Supported Standards F23 Index F24 ...

Page 180: ...r underwater make sure that the battery chamber memory card slot cover is firmly closed and then immerse the camera in a shallow container filled with freshwater for 10 minutes After using the camera underwater do not leave the camera wet for 60 minutes or more This could cause deterioration of the waterproofing performance B Prevent Water From Seeping Inside the Camera If the inside of the camera...

Page 181: ...camera malfunction B Avoid Sudden Changes in Temperature Sudden changes in temperature such as when entering or leaving a heated building on a cold day can cause condensation to form inside the device To prevent condensation place the device in a carrying case or a plastic bag before exposing it to sudden changes in temperature Do not expose the camera to high temperatures by leaving it on the bea...

Page 182: ...ay result in damage or malfunction Should the monitor break care should be taken to avoid injury caused by broken glass and to prevent the liquid crystal from the display touching the skin or entering the eyes or mouth Images in the monitor may be difficult to see under bright lighting The monitor is lit by an LED backlight Should the monitor begin to dim or flicker contact your Nikon authorized s...

Page 183: ...tside to take pictures in cold weather Keep spare batteries in a warm place and exchange as necessary Once warmed a cold battery may recover some of its charge Dirt on the battery terminals can prevent the camera from functioning Should the battery terminals become dirty wipe them off with a clean dry cloth before use If the battery will not be used for some time insert it in the camera and run it...

Page 184: ...N EL12 battery Replace the battery when it no longer holds a charge Used batteries are a valuable resource Please recycle used batteries in accordance with local regulations The Battery Charger Be sure to read and follow the warnings of For Your Safety A ix xii thoroughly before using the battery charger The included Battery Charger is for use only with a Rechargeable Li ion Battery EN EL12 ...

Page 185: ...emory card If there is data saved on the memory card that you wish to keep copy that data to a computer before formatting If the message Card is not formatted Format card is displayed when you insert a memory card the memory card must be formatted If there is data on the memory card that you do not want to delete press flexible button 4 S No Copy that data to a computer before formatting To format...

Page 186: ...e off the grime Monitor Remove dust or lint with a blower To remove fingerprints oil or other grime wipe the area with a soft dry cloth or an eyeglass cleaning cloth Do not wipe forcefully or wipe with a rough cloth otherwise the camera may be damaged or malfunction Body Remove dust or lint with a blower Wipe with a soft dry cloth After using the camera underwater or at the beach gently wipe off a...

Page 187: ...x once a month Do not store the camera with naphtha or camphor moth balls or in any of the following locations Next to equipment that produces strong electromagnetic fields such as televisions or radios Places that are exposed to temperatures below 10 C 14 F or above 50 C 122 F Places that are poorly ventilated or subject to humidity of over 60 Be sure to read and follow the warnings given in The ...

Page 188: ...disconnect and reconnect the AC adapter Note that although any data currently being recorded will be lost data that have already been recorded will not be affected by removing or disconnecting the power source 12 21 E63 Camera cannot be turned on Battery is exhausted 20 Camera turns off without warning Battery is exhausted Camera has turned off automatically to save power The camera turns off if t...

Page 189: ...ness Monitor is dirty Clean monitor 84 E40 F8 Date and time of recording are not correct If camera clock has not been set O flashes when shooting images and recording movies Images and movies saved before clock is set are dated 00 00 0000 00 00 or 01 01 13 00 00 respectively The shooting date and time of still images is not displayed during playback Set the correct time and date using Date and tim...

Page 190: ...e minutes the camera will turn off automatically Pressing the power switch also turns off the camera 21 Camera becomes hot The camera may become hot when recording movies for an extended period of time or when the camera is used in a hot area this is not a malfunction Problem Cause Solution A Cannot switch to shooting mode Disconnect USB cable 68 73 E53 No image captured when the shutter release b...

Page 191: ...of the sun and electric lights is recommended 79 F4 Bright specks appear in images captured with flash Flash is reflecting off particles in air Set the flash mode setting to y Flash off 35 Flash does not fire The flash mode is set to y Flash off Choose a style is set to a feature that disables the flash 35 43 Optical zoom cannot be used Optical zoom cannot be used while recording movies 79 Digital...

Page 192: ...e The subject is dark so shutter speed is too slow or ISO sensitivity is too high Noise can be reduced by using flash 35 Images are too dark underexposed The flash mode is set to y Flash off Flash is blocked by finger or other object Subject is beyond flash range Adjust exposure compensation 35 22 36 51 Images are too bright overexposed Adjust exposure compensation 51 Saving images takes time It m...

Page 193: ... diorama effect Toy camera Change colors Highlight colors Decorate Small picture or Crop These options cannot be used with movies Editing functions other than Rotate pictures cannot be added to images created using Make photo albums Editing functions other than Make photo albums Small picture and Rotate pictures cannot be added to images captured using Decorate Images cannot be edited when played ...

Page 194: ...ansfer 2 automatically For more information about Nikon Transfer 2 refer to help information contained in ViewNX 2 21 20 68 73 70 73 Images to be printed are not displayed Memory card contains no images Replace the memory card Remove the memory card to print images from the internal memory 14 Cannot select paper size with camera Paper size cannot be selected from the camera in the following situat...

Page 195: ...tion Electronic VR still pictures motion detection still pictures Autofocus AF Contrast detect AF Focus range W Approx 30 cm 1 ft T Approx 50 cm 1 ft 8 in Shoot close ups Photograph food Shoot under water Mirror Take soft pictures Create a diorama effect Highlight colors Approx 5 cm 2 in wide angle position All distances measured from center of front surface of the protective glass Focus area sele...

Page 196: ...an 2 spot digital zoom 2 or more Exposure control Programmed auto exposure and exposure compensation 2 0 2 0 EV in steps of 1 EV Shutter Mechanical and charge coupled electronic shutter Speed 1 2000 1 s 4 s Choose a style is set to Photograph fireworks Aperture Electronically controlled ND filter 3 AV selection Range 2 steps f 3 3 and f 9 3 W Self timer Approx 10 s smile timer Built in flash Range...

Page 197: ...included AC Adapter EH 62F available separately Battery life1 Still pictures Approx 260 shots when using EN EL12 Movies actual battery life for recording 2 Approx 2 h when using EN EL12 Tripod socket 1 4 ISO 1222 Dimensions W H D Approx 105 4 64 8 41 5 mm 4 2 2 6 1 7 in excluding projections Weight Approx 185 g 6 6 oz including battery and SD memory card Operating environment Temperature 10 C 40 C...

Page 198: ...ed for Choose a size Movie frame size Figures may vary with use the interval between shots and the length of time menus and images are displayed 2 Individual movie files can not exceed 4 GB in size or 29 minutes in length Recording may end before this limit is reached if camera temperature becomes elevated 3 Dropped from a height of 1 2 m 3 9 ft onto a surface of 5 cm 2 in thick plywood changes in...

Page 199: ... 05 A Rated output DC 4 2 V 0 7 A Supported rechargeable battery Rechargeable Li ion Battery EN EL12 Charging time Approx 2 hours and 30 minutes when no charge remains Operating temperature 0 C 40 C 32 F 104 F Dimensions W H D Approx 58 27 5 80 mm 2 3 1 1 3 1 in excluding power cable Length of power cable Approx 1 8 m 6 ft Weight Approx 70 g 2 5 oz excluding power cable B Specifications Nikon will...

Page 200: ...pports 2 GB cards Contact the manufacturer for details on the above cards We cannot guarantee camera performance when using memory cards made by other manufacturers SD memory card SDHC memory card 2 SDXC memory card 3 SanDisk 2 GB1 4 GB 8 GB 16 GB 32 GB 64 GB 128 GB TOSHIBA 2 GB1 4 GB 8 GB 16 GB 32 GB 64 GB Panasonic 2 GB1 4 GB 8 GB 16 GB 32 GB 64 GB Lexar 4 GB 8 GB 16 GB 32 GB 64 GB 128 GB 2 SDHC...

Page 201: ...nter without connecting the camera to a computer Trademark Information Microsoft Windows and Windows Vista are either registered trademarks or trademarks of Microsoft Corporation in the United States and or other countries Macintosh Mac OS and QuickTime are trademarks of Apple Inc registered in the U S and other countries Adobe and Acrobat are registered trademarks of Adobe Systems Inc SDXC SDHC a...

Page 202: ...dio video in jack 69 E50 Auto flash 35 Auto off 21 Autofocus 62 B Battery 10 12 19 Battery chamber 3 Battery charger 10 Battery level 20 Battery chamber memory card slot cover 3 Brightness 51 Brush xvi Button sound 52 C Camera settings 33 E38 Camera settings menu 84 Change colors playback mode E7 E14 Change colors shooting mode 32 49 Change sounds 33 52 CHARGE lamp 11 Choose a size 33 54 Choose a ...

Page 203: ...32 35 Flash lamp 3 Flash mode 35 Flash off 35 Flexible buttons 7 Focus 24 60 Focus indicator 5 Focus lock 61 Folder name E61 Format internal memory 84 E44 Format memory cards 15 84 E44 Formatting 15 84 E44 FSCN E61 Full frame playback mode 26 H Have fun with pictures 66 Highlight colors playback mode E7 E15 Highlight colors shooting mode 51 I Identifier E61 Imprinting date and time 19 E41 Internal...

Page 204: ...h food X 43 PictBridge 69 E52 F23 Picture play 66 E7 Play recordings E5 Playback 26 81 Playback menu 66 Playback mode 26 Playback zoom 64 Power 20 21 Power switch power on lamp 2 20 21 Pressing halfway 25 Print 69 E35 E55 E57 Print date 19 84 E41 Print order 67 E35 Print order option 19 E36 E37 Printer 69 E52 R Rechargeable battery 10 Rechargeable Li ion battery 10 Recording movies 78 Removing ima...

Page 205: ...ures I 45 Take soft pictures Q 47 Thumbnail display 65 Toy camera E7 Tripod socket 3 F19 TV 69 E50 U USB cable 69 73 E54 USB audio video output connector 3 68 73 E50 E54 Using skin softening 41 V Video mode 84 E46 View 66 E26 View by date 67 E27 View favorites 67 E29 View movie 66 E26 ViewNX 2 70 71 72 Vividness 51 Volume 82 E5 W Welcome screen 84 E38 Z Zoom 23 Zoom in 23 Zoom out 23 ...

Page 206: ...F28 ...

Page 207: ......

Page 208: ...reproduction in any form of this manual in whole or in part except for brief quotation in critical articles or reviews may be made without written authorization from NIKON CORPORATION CT2L01 11 6MN13211 01 ...

Reviews: