background image

78

The Playback Menu

Menu Guide

1

1

1

1

SELECT IMAGE

SELECT IMAGE(S)

ON

OFF

08 . 01.
2004
12 : 05

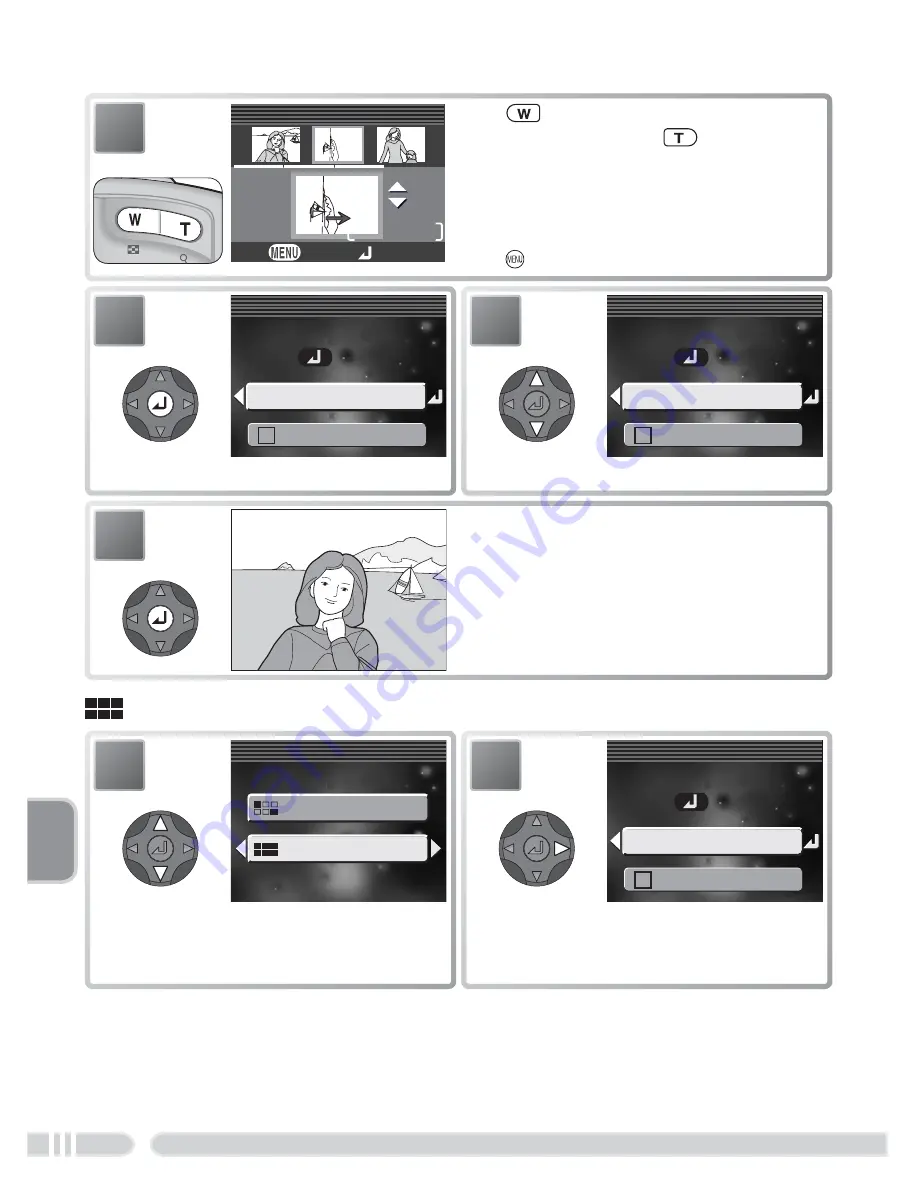
4

2/

Back

Set

5

Press 

  to rotate picture 90 ° left (


appears on picture) or 

 to rotate pic-

ture 90 ° right (

  appears on picture).  

Movies can not be rotated.  Repeat 
steps 3–5 to select additional pictures.  
To  exit without changing selection, 
press   button.

Pause

Pause

SLIDE SHOW

SLIDE SHOW

Start

Loop

7

Highlight 

Start

.

Pause

Pause

SLIDE SHOW

SLIDE SHOW

Start

Loop

6

Starting screen displayed.

8

Begin slide show.

 Viewing All Pictures in the Order Recorded

Pause

Pause

SLIDE SHOW

SLIDE SHOW

Start

Loop

2

Starting screen displayed.  Start 
slide show as described in steps 7–8, 

above.

SLIDE SHOW

SLIDE SHOW

Select image(s)

Select all

1

Highlight 

Select all

.

Summary of Contents for COOLPIX 4800

Page 1: ...En The Nikon Guide to Digital Photography with the DIGITAL CAMERA ...

Page 2: ...cro soft and Windows are registered trademarks of Microsoft Corporation The SD logo is a trademark of the SD Card Association PictBridge is a trademark All other trade names mentioned in this manual or the other documentation provided with your Nikon product are trademarks or registered trademarks of their respective holders ...

Page 3: ...on Do not use in the presence of flammable gas Do not use electronic equipment in the presence of flammable gas as this could result in explosion or fire Observe caution when using the camera strap Never place the strap around the neck of an infant or child Do not disassemble Touching the product s internal parts could result in injury In the event of malfunction the product should be repaired onl...

Page 4: ... input and output jacks use only the cables provided or sold by Nikon for the pur pose to maintain compliance with product regulations Keep out of reach of children Particular care should be taken to pre vent infants from putting the batteries or other small parts into their mouths CD ROMs The CD ROMs on which the software and manuals are distributed should not be played back on audio CD equip men...

Page 5: ...FCC requires the user to be notified that any changes or modifications made to this device that are not expressly approved by Nikon Corporation may void the user s authority to operate the equipment Interface Cables Use the interface cables sold or provided by Nikon for your equipment Using other interface cables may exceed the limits of Class B Part 15 of the FCC rules Notice for customers in the...

Page 6: ...the gov ernment has been obtained the copy ing or reproduction of unused postage stamps or post cards issued by the government is prohibited The copying or reproduction of stamps issued by the government and of cer tified documents stipulated by law is prohibited Cautions on certain copies and re productions The government has issued cautions on copies or reproductions of securities is sued by pri...

Page 7: ...tup 13 Basic Photography 15 Step 1 Select Mode 15 Step 2 Frame the Picture 16 Step 3 Focus and Shoot 18 Step 4 View the Results 21 Scene Mode 24 Assist and Scene Modes 24 Framing Assist 25 Portrait Assist 26 Landscape Assist 28 Sports Assist 30 Night Portrait Assist 31 Scene Mode 32 Taking Pictures for a Panorama 36 More on Photography 38 Using the Flash Flash Mode 38 Taking a Self Portrait Self T...

Page 8: ...ayback 51 Viewing Pictures on TV 52 Viewing Pictures on a Computer 53 Printing Pictures 57 Print Set 58 Printing Via Direct USB Connection 60 Menu Guide 64 The Shooting Menu 64 Image Mode 65 White Balance 67 Continuous 69 Best Shot Selector BSS 70 Sensitivity 71 Image Adjustment 72 Image Sharpening 73 AF Area Mode 74 Color Options 75 The Playback Menu 76 Slide Show 77 Delete 80 Protect 82 Auto Tra...

Page 9: ...r Settings 96 Sound Settings 97 Auto Off 98 Format memory Format Card 98 Language 99 Video Mode 99 Reset All 99 Firmware Version 100 Technical Notes 101 Optional Accessories 101 Caring for Your Camera 102 Error Messages 105 Troubleshooting 108 Specifications 111 Index 113 ...

Page 10: ...ce on digital imaging and photog raphy Additional information may be available from the Nikon representative in your area See the URL below for contact information http nikonimaging com Use Only Nikon Brand Electronic Accessories Nikon COOLPIX cameras are designed to the highest standards and include com plex electronic circuitry Only Nikon brand electronic accessories including battery chargers b...

Page 11: ...ion that may be helpful when using the camera This icon marks cautions informa tion that should be read before use to prevent damage to the camera This icon marks notes information that should be read before using the camera This icon indicates that more infor mation is available elsewhere in this manual or in the Quick Start Guide Memory Cards Pictures taken with this camera can be stored in the ...

Page 12: ...hone 43 46 51 Lens 103 111 Power switch 12 Eyelet for camera strap Built in Speedlight 38 Shutter release button 6 18 Self timer lamp 40 AF Assist illuminator LED 19 102 111 Speaker 47 51 97 Power on lamp 12 Attaching the Camera Strap Attach strap as shown below Repeat for second eyelet DC IN connector 9 Lens cover Lens not extended ...

Page 13: ...elete button 19 21 48 51 Multi selector 7 menu button 24 32 44 64 76 Mode dial 7 15 playback button 21 48 76 Diopter adjustment control 16 Memory card slot cover 10 Battery chamber cover 8 Battery chamber cover latch 8 Center of multi selector transfer button 7 53 Memory card slot 10 Eyelet for camera strap ...

Page 14: ...zone indicator 94 11 Self timer indicator 40 12 Date imprint indicator 95 13 Number of exposures remaining 15 66 Movie length 43 46 14 Flash mode 38 15 Focus areas and focus area selection guide 27 74 16 Image mode 65 17 Exposure compensation 42 18 Sensitivity gain indicator 27 71 19 Continuous shooting mode 69 20 Best Shot Selector BSS 70 21 White balance 67 22 Color option 75 23 Macro close up m...

Page 15: ... 9 Quick playback zoom indicator 22 10 Movie playback indicator 47 11 Voice memo icon 51 12 Image mode 65 13 Movie indicator 43 14 Protect icon 82 15 Print order icon 58 16 Transfer icon 83 17 Time of recording 13 18 Date of recording 13 1 Appears when batteries are running low Playback The following indicators appear in the monitor during playback 8 14 0008 0008 100 100NIKON 10 10 2004 2004 00 00...

Page 16: ...lease Button The camera has a two stage shutter release button When the button is pressed halfway the camera sets focus and exposure and the focus indicator is displayed in monitor or electronic viewfinder 18 Focus and exposure will remain locked while the shutter release button is pressed halfway To take the picture press the shutter release button the rest of the way down 14 14 14 14 Monitor on ...

Page 17: ...vie modes A simple point and shoot mode in which the majority of settings are controlled by the camera A shooting menu offers control over nine shoot ing options Setup 91 Choose this mode to display the setup menu where you can perform such tasks as set ting the camera clock and ad justing monitor brightness Scene 32 Choose from eleven scenes suited to different subjects or shooting conditions and...

Page 18: ...st time or after long period of disuse About two hours are required to charge battery when no charge remains 1Open the battery chamber cover Pressing battery chamber cover latch slide the cover in the direction shown and open the cover 1 2 2Insert the battery Insert the battery as shown in the label at the en trance to the battery chamber making sure that the positive and negative terminals are in...

Page 19: ...ad Battery Warnings Read and follow the battery warnings and cautions on pages i ii and 104 of this manu al together with any warnings and instructions supplied by the battery manufacturer Alternative Power Sources To power the camera continuously for extended periods use an EH 54 AC adapter Do not under any circumstances use another make or model of AC adapter Failure to observe this precaution c...

Page 20: ...mory only If a memory card is inserted the card is used for recording playback and de letion Formatting affects only the memory card not internal memory The memory card must be removed from the camera before internal memory can be formatted or used to record delete or view pictures To insert a memory card 4Close the memory card slot cover 3Insert the memory card Insert the memory card as shown in ...

Page 21: ...cards see The Setup Menu Format Card 98 The Write Protect Switch SD cards are equipped with a write protect switch to prevent accidental loss of data When this switch is in the lock position pictures can not be recorded deleted or edited and the card can not be formatted Do not lock the card when taking deleting or editing pictures or when transferring pictures to a computer 53 Removing Memory Car...

Page 22: ... the camera will enter standby mode to reduce the drain on the battery While the camera is in standby mode the power on lamp will flicker The camera will be reactivated when you Press the power on switch Press the button or press the shutter release button halfway Press the button to play pictures back Press the button to display the menu for the current mode Rotate the mode dial to select a new m...

Page 23: ...ulti selector down to highlight DaylightSaving and press center of multi selector When DaylightSaving is checked time will automatically be advanced one hour 94 To return to Step 4 press multi selector up to highlight current time zone The Camera Clock The camera clock is less accurate than most watches or household clocks Check the clock regularly against more accurate timepieces and reset as nec...

Page 24: ... 8 Edit Day order of Day Month and Year may differ in some areas DATE DATE D M Y D M Y 2004 08 00 00 01 9 Select Month Repeat steps 8 9 to edit Month Year hour and minute DATE DATE D M Y D M Y 2004 08 10 00 01 10 Highlight D M Y DATE DATE M D Y M D Y 2004 01 10 00 08 11 Choose order in which Day Month and Year will be displayed 12 Exit to mode currently selected with mode dial Note that time and d...

Page 25: ...om five modes according to light ing and creative intent 38 Default is AUTO The Battery Indicator The Shooting Menu auto mode offers a shooting menu of nine options that give full control over such settings as white balance and image sharpening 64 Display Description Low battery ready spare battery If flash fires mon itor will turn off while flash recharges NO ICON Battery fully charged Display De...

Page 26: ...e the zoom buttons to frame the subject in the center of the monitor or electronic viewfinder When Lighting Is Poor When lighting is poor sensitivity is raised to compensate and the image in the monitor may be slightly mottled This is normal and does not indicate a malfunction Viewfinder Focus If the image in the electronic viewfinder seems blurred rotate the diopter adjustment control until the i...

Page 27: ...speed zoom halfway for normal zoom Zoom out Zoom in Indicator shows amount of zoom 14 When the camera is zoomed in to maximum magnifica tion holding the button down for about one second will trigger digital zoom The zoom indicator will turn yellow Use the and buttons to adjust zoom in the digital zoom range To cancel digital zoom press until the zoom indicator turns white Digital Zoom In digital z...

Page 28: ...picture is taken Blinks red Flash charging Off Flash off or not required Focus indicator On green Subject in focus Blinks red Camera unable to focus Change composition and try again 2Take the picture Press the shutter release button the rest of the way down to take the picture To prevent blur press the shutter release button down smoothly Out of Memory If the camera displays the message OUT OF MEM...

Page 29: ...rtrait assist mode is selected or if Dusk Dawn Night landscape Close up Mu seum or Fireworks show is selected in scene mode 24 37 Manual is selected for AF area mode 74 and the center focus area is not se lected Getting Good Results with Autofocus Autofocus performs best when there is contrast between the subject and the back ground and the subject is evenly lit It does not perform well if the sub...

Page 30: ...Press shutter release button rest of way down to take picture Take picture 3 Focus and exposure are locked while shut ter release button is pressed halfway Recompose picture 2 Check that focus indicator glows steadi ly indicating that subject is in focus Check focus indicator 1 Position subject in center of frame and press shutter release button halfway Focus Do not change distance between camera ...

Page 31: ...ugh pictures without waiting for each image to be displayed at full resolution To scroll quickly to the desired frame keep the multi selector pressed To return to shooting mode press the button again Deleting Unwanted Pictures To delete the picture currently displayed in the monitor Erase 1 image s Erase 1 image s Yes No 1 Confirmation dialog displayed Erase 1 image s Erase 1 image s Yes No 2 High...

Page 32: ...Zoom picture in 3 Center of pic ture is displayed in monitor 3 0 Scroll Zoom 2 View other areas of picture Area currently visible indicated by display in bottom right corner of monitor 3 End zoom and return to playback 1 1 0001 0001 100 100NIKON 10 10 08 08 00 00 2004 2004 01 01 0001 100NIKON 10 08 00 2004 01 The zoom buttons can be used to zoom the picture in or out while quick playback zoom is i...

Page 33: ...olders can hold up to 200 pictures if you take a picture when the current folder contains 200 pictures a new folder will be created by adding one to the current folder number A new folder is created for each sequence of pictures taken using panorama assist If you take a picture when the current folder contains a picture numbered 9999 a new folder will be created and file numbering will begin again...

Page 34: ...compose your shots Scene Modes 32 37 Scene modes are selected by rotating the mode dial to and selecting the desired scene from a menu Mode Portrait assist 26 27 Landscape assist 28 29 Sports assist 30 Night portrait assist 31 Mode Party Indoor 33 Beach Snow 33 Sunset 33 Dusk Dawn 34 Mode Night landscape 34 Close up 34 Museum 34 Fireworks show 35 Mode Copy 35 Back light 35 Panorama assist 36 37 As...

Page 35: ...ing on the mode selected restrictions may apply to flash mode 38 the self timer 40 or macro close up 41 These restrictions are noted on the pages that follow The AF assist illuminator 19 is not available in framing assist mode 6 Position subject in framing guides and take picture 14 14 5 Return to shooting mode with fram ing guides displayed in monitor 14 14 3 Exit Set Portrait Portrait Portrait l...

Page 36: ...frame Camera will focus on subject in fram ing guide Exit Set Portrait Portrait Portrait left Portrait right Compose shot with sub ject centered in right half of frame Camera will focus on subject in fram ing guide Exit Set Portrait Portrait Portrait right Portrait close up Compose shot with sub ject s face in top half of frame Camera will fo cus on face area in fram ing guide Exit Set Portrait Po...

Page 37: ...in gray Flash mode the self timer macro mode and exposure compensation can not be ad justed while the focus area is highlighted in red Press the center of the multi selector to select the focus area before adjusting these settings Option Description Fixed Auto default If lighting is poor camera automatically raises sensitivity ISO equivalency to compensate ISO icon is displayed when sensitivity is...

Page 38: ...button is pressed halfway Landscape Landscape Exit Set Scenic view Architecture Photograph buildings Framing gird helps keep verticals and horizontals aligned with the frame Camera focuses at infinity AF indicator lights whenever shutter release button is pressed halfway Landscape Landscape Exit Set Architecture Group right Compose shot with por trait subjects at right and landmark or other object...

Page 39: ...h time shutter re lease button is pressed to prevent blurring hold camera steady until shooting is complete Picture with overall exposure closest to optimum is then selected from pictures with least under and over exposure Remaining four pictures are discarded Flash turns off automatically while exposure BSS is on Off default Exposure BSS off Image Mode Choose from High 2288 Normal 2288 Normal 160...

Page 40: ...be pressed in one motion without pausing halfway to check focus Camera focuses at about 5m 16 to infin ity at widest angle 6m 20 to infinity at maximum zoom AF indica tor lights whenever shutter release button is pressed halfway While shutter release button is fully pressed pictures will be taken at rate of about 1 5fps until icon is displayed Exit Set Sports Sports Sport spectator In addition to ...

Page 41: ... on subject in fram ing guide Exit Set Night Portrait Night Portrait Portrait left Portrait right Compose shot with sub ject centered in right half of frame Camera will focus on subject in fram ing guide Exit Set Night Portrait Night Portrait Portrait right Portrait close up Compose shot with sub ject s face in top half of frame Camera will fo cus on face area in fram ing guide Exit Set Night Port...

Page 42: ...ect 3 Highlight scene Highlighted scene shown by large icon and caption To exit without changing current selec tion press Exit Set Beach Snow Beach Snow 5 Return to shooting mode Icon for selected scene appears in display 14 14 4 Select highlighted scene Exit Set Beach Snow Beach Snow Depending on the scene selected restrictions may apply to flash mode 38 the self timer 40 macro close up 41 or foc...

Page 43: ...ge mode icon is high lighted The following scenes are available Exit Set IMAGE MODE IMAGE MODE Other modes can be selected Center focus area selected automatically Party Indoor Use for shots that include details of the background or to capture the effects of candlelight and other indoor back ground lighting AF assist illuminator 19 lights when lighting is poor Beach Snow Captures the brightness of...

Page 44: ...s the colors seen in the weak natural light before sunrise or after sunset Noise reduction 35 turns on at slow shutter speeds Camera focuses at infinity AF indicator lights whenever shutter release button is pressed halfway Other modes can be selected Center focus area selected automatically Manual 27 On Auto Close up Use to photograph flowers insects and other small objects at ranges as close as ...

Page 45: ...amera shake An ISO icon will be displayed to warn that pictures may be slightly mottled 14 14 Off Other modes can be selected Center focus area selected automatically Back light Use when light is coming from behind a portrait subject throwing their features into shadow AF assist illuminator 19 lights when lighting is poor Copy Provides clear pictures of text or drawings on a white board or in prin...

Page 46: ...st shot Other modes can be selected until first shot in each series is taken Center focus area selected automatically Taking Pictures for a Panorama 1 Select Panorama assist in scene menu as described in steps 1 4 of Scene Mode 32 2 Default pan direction displayed 14 14 Panorama assist Use when taking a series of pictures that will later be joined to form a single scene for example a panorama or 3...

Page 47: ...n the pan direction zoom flash mode macro close up mode exposure compensation and image mode 65 can not be adjusted nor pic tures deleted until the series is complete Storage Locations for Panoramas Each series of pictures taken at Panorama assist is stored in a separate folder with a name consisting of P_ preceded by a three digit folder number and followed by a three digit sequence number e g 10...

Page 48: ... looks directly at flash Not recom mended when quick shutter response is required When to use it Flash Cancel off Flash will not fire even when lighting is poor Use to capture natural lighting under dim light or where use of flash is prohibited If camera shake icon appears care should be taken to avoid blurring Slow sync Autoflashcombinedwith slow shutter speeds Use to capture both subject and bac...

Page 49: ... shake An ISO icon is displayed to warn that the picture may be slightly mottled The Camera Shake Icon When lighting is poor and the flash is off shutter speeds will slow and pictures may be blurred If the shutter speed required for exposure is very slow a camera shake warning be displayed Use of a tripod or support is recommended Flash Range Flash range varies with zoom position When the camera i...

Page 50: ...r left 14 14 1 14 14 Display self timer menu The Self Timer When using the self timer mount the camera on a tripod recommended or rest it on a flat level surface Selecting ON in the self timer menu automatically turns BSS off and sets the Continuous option in the shooting menu to Single 3 14 14 Exit menu to exit without changing mode wait two seconds Selection is shown by icon in display 4 14 14 S...

Page 51: ...ject at distances of less than 0 4m 15 7 widest angle or 1 0m 3 3 maximum zoom When taking close ups play each pic ture back after shooting to check the results In macro close up mode the camera focuses continuously even when the shutter re lease button is not pressed halfway There may be a slight loss of resolution at the borders of pictures taken at short ranges in macro close up mode or at a sc...

Page 52: ...ckground is much darker than the main subject This is because the camera in order to avoid extreme under or over exposure tends to lower exposure when the frame is very bright and raise exposure when the frame is very dark which can make naturally bright subjects look dim and naturally dark subjects appear over bright or washed out 1 0 0 0 0 3 0 0 3 14 14 Display exposure compensation menu 2 Highl...

Page 53: ...imit of available memory actual length of individual movies may vary with make of memory card Max length Option Description TV movie 640 Vertical interlacing is used for a frame size of 640 480 pixels suitable for television playback 24s 440s Small size 320 default Movies are recorded at a size of 320 240 49s 880s Smaller size 160 Movies are recorded at a size of 160 120 Small size allows longer m...

Page 54: ...ss multi selector to left 5 Smaller size 160 Small size 320 TV movie 640 MOVIE OPTIONS MOVIE OPTIONS Highlight mode To exit without changing mode press button Smaller size 160 Small size 320 TV movie 640 MOVIE OPTIONS MOVIE OPTIONS 4 Display MOVIE OPTIONS menu 3 MOVIE MOVIE Movie options Auto focus mode Highlight Movie options 2 MOVIE MOVIE Movie options Auto focus mode Display MOVIE menu 1 49s Se...

Page 55: ...ngle AF Continuous AF 3 Highlight desired focus mode 4 AUTO FOCUS MODE AUTO FOCUS MODE Single AF Continuous AF Make selection Option Description Single AF default Continuous AF Camera adjusts focus continuously Camera focuses when shutter release button is pressed half way Focus locks when focus operation is complete The movie menu also includes the following focus options To choose a focus option...

Page 56: ...ring recording Digital zoom maximum 2 can be used at any time both before and during recording Movies During recording do not touch the built in microphone To prevent the sound of the camera focusing from interfering with recording select a focus mode of Single AF The flash turns off automatically when movie mode is selected 38 The self timer 40 and exposure compensation 42 can not be used The pro...

Page 57: ...i selector to fast forward through movie Playback resumes when multi selector is released Jog advance When movie is paused advance one frame Jog rewind When movie is paused rewind one frame Stop End movie and return to full frame playback Resume Resume playback Direct Print Movies can not be printed via direct USB connection 60 Playback Volume The zoom buttons control volume during playback Press ...

Page 58: ... 08 00 00 2004 2004 01 01 0001 100NIKON 10 08 00 2004 01 1 1 3 3 2 2 4 4 To Description Press Delete highlighted picture Confirmation dialog will be displayed Press multi selector up or down to highlight option press center to select Select Yes to delete picture Select No to exit without deleting picture Highlight pictures Press multi selector up down left or right to highlight pictures Change num...

Page 59: ...view other pictures can cel zoom Zoom out Zoom decreases each time button is pressed To cancel zoom zoom picture out until entire picture is displayed W Crop picture 50 Confirmation dialog will be displayed Press multi selector up or down to highlight option press center to select Select Yes to create new picture con taining only area visible in monitor Select No to exit without creating cropped c...

Page 60: ...pped copies are stored as JPEG files compression ratio 1 8 with names of the form RSCNnnnn JPG where nnnn is a four digit number as signed automatically by the camera and are created with the same transfer marking and time and date of creation as the original print and protect at tributes are not set 58 82 Depending on the size of the original and the zoom ratio at the time the copy was created co...

Page 61: ...shutter release button is held down During recording icon blinks Re cording ends after about 20s or when shutter release button is released Do not touch microphone during recording Shutter button Play voice memo Pictures for which voice memo exists are marked by voice memo play back guide and icons Press shut ter release button to play voice memo Playback ends when voice memo ends or shutter relea...

Page 62: ... cover as shown at right and insert the black plug into the camera s interface connector Insert the yellow plug into the video in jack on the television or VCR Connect the white plug to the audio in jack 3Tune the television to the video channel If in doubt consult the documentation for your television or VCR 4Turn the camera on Press the button for about a second to turn the camera on The camera ...

Page 63: ...rating system and the USB option selected in the camera setup menu After consulting the follow ing table select the appropriate option using the USB item in the camera setup menu The default option is Mass Storage Viewing Pictures on a Computer PictureProject Transfer button Windows XP Home Edition Windows XP Professional Choose Mass Storage or PTP Mac OS X 10 1 5 or later Windows 2000 Professiona...

Page 64: ...orage 3 Display USB menu USB USB PTP Mass storage 4 Highlight PTP or Mass Storage SET UP SET UP 1 4 1 4 Welcome screen Date Date imprint 1 Select SETUP mode SET UP SET UP 3 4 3 4 Format memory Language USB 2 Highlight USB USB USB PTP Mass storage 5 Make selection ...

Page 65: ...ve operating systems with PTP selected in the USB menu disconnect the camera as described below Be sure to select Mass Storage before reconnecting the camera Windows 2000 Professional A dialog will be displayed welcoming you to the Found New Hardware Wizard Click Cancel to close the dialog and then disconnect the camera Windows Millennium Edition Me After displaying a message stating that the hard...

Page 66: ...ting the cable Windows XP Home Edition Windows XP Professional Click the Safely Remove Hardware icon in the taskbar and select Safely remove USB Mass Storage Device from the menu that appears Windows 2000 Professional Click the Unplug or Eject Hardware icon in the taskbar and select Stop USB Mass Storage Device from the menu that appears Windows Millennium Edition Me Click the Unplug or Eject Hard...

Page 67: ... Date option in the Print set menu 58 transfer the pictures using PictureProject and print them using the Print Metadata option see the PictureProject Reference Manual on CD Print Set and Digital Print Order Format DPOF The Print set option in the playback menu is used to create a digital print order list ing the pictures to be printed the number of prints and the information to be included on eac...

Page 68: ...rent picture and set num ber of prints to 1 Selected pictures marked by icon 08 01 2004 12 10 4 3 PRINT SELECTION PRINT SELECTION Back Set 5 Scroll through pictures Current pic ture shown at bottom of display 3 3 08 01 2004 12 10 4 3 PRINT SELECTION PRINT SELECTION Back Set 7 Use multi selector to specify number of prints up to 9 To deselect picture press multi selector down when num ber of prints...

Page 69: ...rint the time and date of recording on pictures recorded when Date or Date and time is selected for Date imprint The Print Order Icon During playback a print order icon appears on all pictures in the current print order 1 1 0001 100NIKON 10 2004 00 01 08 8 Press center of multi selector to complete print order and display menu of print options To print date of recording on all pictures in print or...

Page 70: ...t DPOF print order 63 Step 1 Set the USB option to PTP 60 Step 2 Connect the USB Cable 61 Before Printing Paper type tray and size selections are made from the printer see the printer manual for details Before printing make sure that the printer supports PictBridge Use a Reliable Power Source When printing pictures via direct USB connection be sure the battery is fully charged If in doubt recharge...

Page 71: ...in the camera monitor Step 3 Print Pictures To print selected pictures Cancel DPOF printing Print PictBridge PictBridge 1 Highlight Print Cancel Print all images Print selection PRINT PRINT 2 Display options 08 01 2004 12 20 4 4 Back Set PRINT SELECTION PRINT SELECTION 4 Display selection dialog Cancel Print all images Print selection PRINT PRINT 3 Highlight Print selection To print one copy of al...

Page 72: ... 6 CONFIRM CONFIRM Exit 8 View selected pictures Press multi se lector up right left or down to view pictures not visible in display 9 Display confirmation dialog Press multi selector up or down to highlight op tion press center to select Select Start print to start printing To interrupt printing press center of multi selector then turn camera off and disconnect USB cable Select Back to return to ...

Page 73: ...printing is complete Turn camera off and disconnect USB cable Printer ready Printer ready prints prints Cancel Start print Confirm 006 DPOF PRINTING DPOF PRINTING 1 4 2 5 3 6 CONFIRM CONFIRM Exit 4 Display print order Press multi selec tor up right left or down to view pictures not visible in display Printing 001 006 Cancel Done YOU MAY TURN OFF THE CAMERA Resume Printer ready Printer ready prints...

Page 74: ...ng the Reset all option in the setup menu 99 To display the shooting menu rotate the mode dial to and press the button To make a selection from the shooting menu Option Description Image mode Choose image size and quality 65 66 White balance Match white balance to the light source 67 68 Continuous Take pictures one at a time or in a sequence 69 BSS Turn the Best Shot Selector BSS on or off 70 Sens...

Page 75: ... monitors 17 or larger 9 7 3 2 1 8 1 024 768 Option Description Compression ratio Image Mode Pictures taken with a digital camera are recorded as im age files The size of the files and with it the number of images that can be recorded depends on the size and quality of the images image mode Before shoot ing choose an image mode according to how you plan to use the picture To reduce the amount of m...

Page 76: ...e bottom left corner of the display 14 Image mode TV screen 640 2220 123 110KB Normal 1600 480 27 500KB Normal 2288 250 14 1 0MB High 2288 125 7 1 9MB PC screen 1024 1035 57 230KB 256MB memory card Internal memory 13 5MB File size The following table shows the approximate number of pictures that can be stored in internal memory and on a 256 megabyte memory card in different image modes All figures...

Page 77: ...ing to the color of the light source This process is known as a white balance adjustment Daylight White bal preset Auto WHITE BALANCE WHITE BALANCE 1 3 1 3 Option Incandescent Use under incandescent lighting Auto White balance automatically adjusted to suit lighting conditions Best choice in most situations White bal preset Gray object used as reference to set white balance under unusual lighting ...

Page 78: ... camera will zoom in and the menu shown above at right will be displayed in the monitor WHITE BAL PRESET WHITE BAL PRESET Cancel Measure 14 Option Cancel Recalls the most recent value for preset white balance from the memory and sets white balance to this value Measure To measure a new value for white balance place a neutral gray object such as a piece of cardboard under the lighting that will be ...

Page 79: ...m in four rows to form a single picture measuring 2288 1712 pixels Image mode automatically set to Normal 2288 Restrictions on Camera Settings At settings other than Single the flash 38 and BSS 70 turn off and focus ex posure and white balance for all pictures are determined by the first shot in each series Continuous is automatically set to Single when the self timer is activated 40 or BSS is ena...

Page 80: ...an produce blurred pictures for example when the camera is zoomed in macro close up is in effect lighting is poor and the flash can not be used Exposure BSS Selecting this option displays sub menu shown at right Choose from Highlight BSS picture with smallest area of overexposure is selected Shadow BSS picture with smallest area of underexposure is selected Histogram BSS of pictures with least und...

Page 81: ... may however be associated with noise randomly spaced brightly colored pixels concentrated in dark parts of the image Option 50 Approximately equivalent to ISO 50 Recommended unless lighting is poor or faster shutter speeds are required e g when the subject is moving Noise may appear in pictures taken at settings above this value 100 Approximately equivalent to ISO 100 Description 200 Approximatel...

Page 82: ...rom dark to bright Auto Camera automatically adjusts contrast according to shooting condi tions Less contrast Picture processed to decrease difference between light and dark ar eas reducing contrast Recommended when light is very bright creating strong shadows on subject More contrast Picture processed to emphasize difference between light and dark areas enhancing contrast Useful when shooting und...

Page 83: ...the final picture Normal High Auto IMAGE SHARPENING IMAGE SHARPENING 1 2 1 2 Option Low Sharpening reduced below normal level Auto Camera sharpens edges for optimal results amount of sharpening varies from shot to shot High Pictures processed to increase sharpness making edges more dis tinct Normal Camera performs same standard level of sharpening on all images Off No sharpening performed Descript...

Page 84: ... focuses on subject in center focus area Can be used in com bination with focus lock 20 to focus on off center subjects Description Manual Focus Area Selection To select the focus area when Manual is selected for AF area mode 14 14 Selected focus area shown in gray 3 14 14 Highlight new focus area 2 14 14 Active focus area highlighted in red 1 14 14 Active focus area shown in gray Flash mode the s...

Page 85: ...r Subjects are recorded in their natural colors Vivid color Use for a vivid photoprint effect Black and white Pictures are recorded in black and white Cyanotype Pictures are recorded in blue tinted monochrome Description White Balance Selecting Black and white Sepia or Cyanotype automatically sets white balance 67 to Auto The original white balance setting is restored when Standard color or Vivid ...

Page 86: ...s for printing on DPOF compatible devices specify number of copies and information to be included on prints 58 59 Slide show View pictures in an automatic slide show 77 79 Delete Delete all or selected pictures 80 81 Protect Protect selected pictures from accidental deletion 82 Auto transfer Mark all or selected pictures for transfer to a computer turn auto transfer marking on or off 83 84 Small p...

Page 87: ...Select image s Select all 1 Highlight Select image s SELECT IMAGE SELECT IMAGE S ON OFF 08 01 2004 12 20 4 4 Back Set 2 Display selection dialog SELECT IMAGE SELECT IMAGE S ON OFF 08 01 2004 12 05 4 2 Back Set 3 Scroll through pictures Current picture displayed at bottom of monitor 1 1 1 1 SELECT IMAGE SELECT IMAGE S ON OFF 08 01 2004 12 05 4 2 Back Set 4 Select picture Selected picture marked by ...

Page 88: ...t additional pictures To exit without changing selection press button Pause Pause SLIDE SHOW SLIDE SHOW Start Loop 7 Highlight Start Pause Pause SLIDE SHOW SLIDE SHOW Start Loop 6 Starting screen displayed 8 Begin slide show Viewing All Pictures in the Order Recorded Pause Pause SLIDE SHOW SLIDE SHOW Start Loop 2 Starting screen displayed Start slide show as described in steps 7 8 above SLIDE SHOW...

Page 89: ...scription Press Pause slide show Menu shown at right will be dis played Highlight Restart and press multi selector to right to resume show Highlight End and press multi selector to right to end show Skip to next frame Press multi selector right to skip to next slide Hold multi selector down to fast forward through show Return to previous frame Press multi selector left to return to previous slide ...

Page 90: ...2004 12 05 4 2 Back Set ERASE SELECTED IMAGES ERASE SELECTED IMAGES 3 Scroll through pictures Current pic ture displayed at bottom of monitor ON OFF 08 01 2004 12 20 4 4 ERASE SELECTED IMAGES ERASE SELECTED IMAGES Back Set 2 Display selection dialog DELETE DELETE Erase selected images Erase all images 1 Highlight Erase selected images Erase 1 image s Erase 1 image s Erase 1 image s DELETE DELETE N...

Page 91: ...a icon are protected and can not be deleted 82 Deleting All Pictures DELETE DELETE Erase selected images Erase all images 1 Highlight Erase all images DELETE DELETE Erasing all images excluded No Yes 2 Confirmation dialog displayed Press multi selector up or down to highlight option press center to select Select Yes to delete all unprotected pictures Select No to exit without deleting pictures ...

Page 92: ...t PROTECT PROTECT ON OFF 08 01 2004 12 05 4 2 Back Set 2 PROTECT PROTECT ON OFF 08 01 2004 12 05 4 2 Back Set 1 Scroll through pictures Current pic ture displayed at bottom of monitor Select current picture Selected pic tures marked by icon Done 4 Complete operation 3 Repeat steps 1 2 to select ad ditional pictures To deselect picture select and press multi selector down To exit without changing s...

Page 93: ...d using Auto transfer To transfer more than 999 pictures use PictureProject or select and transfer pictures in batches of 999 or less The COOLPIX 4800 can not be used to transfer pictures selected for transfer with an other model of Nikon digital camera Use the COOLPIX 4800 to reselect the pictures The Icon Pictures that have been selected for transfer are identified by a icon When you connect the...

Page 94: ...button AUTO TRANSFER AUTO TRANSFER ON OFF 08 01 2004 12 20 4 4 Back Set 2 Display selection dialog AUTO TRANSFER AUTO TRANSFER ON OFF 08 01 2004 12 05 4 2 Back Set 4 Select current picture Selected pic tures marked by icon AUTO TRANSFER AUTO TRANSFER ON OFF 08 01 2004 12 05 4 2 Back Set 3 Scroll through pictures Current pic ture displayed at bottom of monitor Select image s All off All on AUTO TRA...

Page 95: ...nsfer marking and date and time of creation as the original but are otherwise independent of the original image and can be modified or deleted separately Print 58 and protect 82 attributes are not set when copies are created During playback copies are indicated by a gray bor der a or icon is displayed when copies are viewed full frame Save this image Save this image as displayed as displayed Yes N...

Page 96: ...re Selected pic tures marked by icon COPY COPY ON OFF 08 01 2004 12 20 4 4 Back Set COPY COPY 4 Display pictures CAMERA TO CARD CAMERA TO CARD Selected images All images 3 Highlight Selected images 1 Highlight copy from inter nal memory to memory card or copy from memory card to internal memory CAMERA TO CARD CAMERA TO CARD Selected images All images 2 Display menu ON OFF 08 01 2004 12 05 4 2 COPY...

Page 97: ...ures Select No to exit without copying pictures COPY COPY All images will be All images will be copied OK copied OK excluded excluded All images will be copied OK excluded No Yes Restrictions on Copying If the message IMAGE CANNOT BE SAVED is displayed the destination does not have enough memory to complete the operation Delete pictures or if copying to a memory card insert a new memory card The c...

Page 98: ...en after sorting are stored in the folder used before sorting began SORT BY DATE SORT BY DATE Sort pictures into folders by date No Yes Sort by Date Sort by date permanently renames all affected files and folders the original names can not be restored Print 58 and transfer 83 marking is lost but protect marking 82 is not affected Restrictions on Sorting Pictures will not be sorted if the current f...

Page 99: ... 2 Back Set 4 INSTANT INDEX INSTANT INDEX ON OFF 08 01 2004 12 05 4 2 Back Set 3 Scroll through pictures Current pic ture displayed at bottom of monitor Select current picture Number shows position of picture in print INSTANT INDEX INSTANT INDEX Select images Select all 1 Highlight Select images INSTANT INDEX INSTANT INDEX ON OFF 08 01 2004 12 20 4 4 Back Set 2 Display selection dialog INSTANT IND...

Page 100: ...f more than 16 pic tures are present in internal memory or on memory card multiple index prints will be created Select No to exit without creating index prints Index prints have an image mode setting of Normal 2288 and are stored in folders consisting of a three digit folder number followed by INDEX e g 101INDEX if the highest numbered folder is not already an index folder a new folder will be cre...

Page 101: ...oose how long display will remain on before turning off automatically to save power 98 Format memory Format card Format internal memory or memory card 98 Language Choose a language for camera menus and mes sages 99 USB Choose USB setting used when copying pictures to computer or printing on PictBridge printer 54 Video mode Select video mode from NTSC and PAL 99 Reset all Restore camera settings to...

Page 102: ...40 480 pixels or larger Replace current image WELCOME IMAGE SELECT WELCOME IMAGE SELECT No Yes WELCOME IMAGE SELECT WELCOME IMAGE SELECT 1 2 1 2 Disable welcome Nikon Animation Welcome Screen Choose the welcome screen displayed when the cam era is turned on Option Disable welcome No welcome screen is displayed when camera is turned on Description Nikon Image shown at right is displayed when cam er...

Page 103: ...to the right then select a location DATE DATE Date Time zone Madrid Paris Berlin HOME TIME ZONE HOME TIME ZONE Back Set 2 Choose time zone HOME TIME ZONE HOME TIME ZONE London Casablanca Back Set 1 Select time zone DaylightSaving Madrid Paris Berlin London Casablanca TIME ZONE TIME ZONE 08 01 2004 15 00 DaylightSaving 3 Return to time zone menu Travel destination time zone can not be same as home ...

Page 104: ...nd press the center of the multi selector While the travel destination time zone selected a icon will be displayed when the camera is in shooting mode see illustration at right To choose a new travel destination highlight and press the multi selector to the right then choose a location as described on the previous page DaylightSaving Daylight Saving Time To turn daylight saving time on or off high...

Page 105: ...ck is set to the correct time and date The date is recorded in the order selected in the DATE menu Date imprint can not be selected if the camera clock has not been set 13 14 Print Set The Print set option can be used to print the date and time of recording on images taken with Off selected for Date imprint 58 59 Date Imprint The date imprint option is used to imprint the date or the date and time...

Page 106: ...are displayed for about one second af ter shooting Description Review Off Pictures are not displayed after shooting REVIEW OPTIONS REVIEW OPTIONS Review On Review Off Brightness Press the multi selector up or down to increase or de crease the brightness of the monitor or electronic view finder by moving the arrow to the left of the display up or down Press the center of the multi selector to put t...

Page 107: ... released BUTTON SOUND BUTTON SOUND On Off Shutter sound Choose sound played when shutter is released If Off is selected no sound will be played when shutter is released Regardless of setting chosen no sound is played in Sports mode 30 at Continuous set tings other than Single 69 when flash fires or when BSS is enabled 70 2 1 3 Off SHUTTER SOUND SHUTTER SOUND Sel start sound START UP SOUND START U...

Page 108: ...played while formatting is in progress Do not turn camera off remove batteries or memo ry card or unplug AC adapter available separately while message is displayed FORMATTING Option No Exit without formatting internal memory or memory card Description Format Card Memory card performance drops as pictures are recorded and deleted For best performance format memory cards regularly Auto Off When powe...

Page 109: ... such as a television or VCR 52 choose a video mode setting that matches the video standard used in the de vice The camera supports NTSC and PAL standards 日本語 Deutsch English Español Français Italiano Nederlands Svenska Back Set The following settings are affected Setting Default Flash mode Auto Setting Default Self timer Off Macro close up Off Exposure compensation 0 AE BSS Off Landscape assist L...

Page 110: ...s Standard color White balance Auto Image mode Normal 2288 Sensitivity Auto Night portrait assist NIGHT PORTRAIT Firmware version Choosing Reset also clears the current file number 23 from memory Numbering will continue from the lowest number available All other settings are unaffected Resetting File Numbering to 0001 To reset file numbering to 0001 select Reset all after either deleting all pic t...

Page 111: ... distances of less than 1m 3 3 Approved Memory Cards The following cards have been tested and approved for use with the COOLPIX 4800 These cards are rated for 10MB s or more Operation is not guaranteed with other makes of card For more details on the above cards please contact the manufacturer SanDisk Panasonic Toshiba 16MB 32MB 64MB 128MB 128MB 256MB 256MB 512MB 16MB 32MB 64MB 128MB 256MB 512MB 1...

Page 112: ...r deleted Forcibly cutting power in these circumstances could result in loss of data or in damage to product memory or internal circuitry To prevent an ac cidental interruption of power avoid carrying the product from one place to another while the AC adapter available separately is connected Do not drop The product may malfunction if sub jected to strong shocks or vibration Keep away from strong ...

Page 113: ...hing the skin or entering the eyes or mouth Body Use a blower to remove dust and lint then wipe gently with a soft dry cloth After using the camera at the beach or seaside wipe off any sand or salt with a cloth lightly dampened with fresh water then dry thoroughly Do not use alcohol thinner or other volatile chemicals Notes on the Monitor and Electronic Viewfinder The monitor and electronic viewfi...

Page 114: ...icle on a sunny day are subject to humidities of over 60 To prevent mold or mildew take the camera out of storage at least once a month Turn the camera on and release the shutter a few times before put ting the camera away again Store the battery in a cool dry place Batteries When turning the camera on check that the battery is charged The monitor will display a warning when batteries are low Carr...

Page 115: ...ra in both hands with elbows against torso 33 39 WARNING Please wait for camera to finish recording Camera turned off or button pressed during re cording Message clears from display automatically when recording is complete 19 MEMORY CARD IS WRITE PROTECTED Write protect switch is in lock position Slide write protect to write position 11 THIS CARD CANNOT BE USED Error accessing memory card Use appr...

Page 116: ...File created by computer or different make of camera View file on computer or cor rect make of camera CANNOT RECORD MOVIE Time out error while re cording movie Choose memory card with better performance 101 NEW CITY IS INTHE CURRENTTIME ZONE Travel destination is in same time zone as home location No need to specify new time zone if travel destination is in same time zone as home location 94 WARNI...

Page 117: ...tup menu and reconnect cam era If error persists use Transfer button in Picture Project to transfer pictures 53 56 53 NO IMAGES ARE MARKED FOR TRANSFER No pictures selected for transfer when center of multi selector pressed to transfer pictures to com puter Disconnect camera and select at least one picture for trans fer then begin transfer again 53 83 SYSTEM ERROR Error has occurred in cam era s i...

Page 118: ...ve Note that disconnecting the power source as de scribed above may result in the loss of any data not recorded to the memory card at the time the problem occurred Data already recorded to the memory card will not be affected Problem Solution Monitor is blank Camera is off Batteries are not correctly inserted or battery chamber cover is not properly latched Batteries are exhausted AC adapter avail...

Page 119: ...ensation is too high 42 Pictures are out of focus Camera can not focus on selected subject using auto focus Use focus lock 20 Pictures are blurred Camera shook during shot Blurring caused by camera shake can be reduced by Using the flash Using the Best Shot Selector BSS Using the self timer with a tripod 38 70 40 Randomly spaced bright pixels noise appear in image Shutter speed too slow Noise can ...

Page 120: ...en cropped to below 320 240 43 85 50 PictureProject does not start when cam era is connected or memory card insert ed in card reader or card slot Camera is off AC adapter available separately is not properly connected or batteries are exhausted USB cable is not correctly connected or card not properly inserted in card reader or card slot USB item in setup menu set to PTP when camera connected to c...

Page 121: ...sign Rule for Camera File System DCF Exif 2 2 and Digital Print Order Format DPOF Exposure Metering 256 segment matrix metering linked to AF area Range ISO 100 equivalent W 2 9 14 8EV T 4 3 14 3EV Exposure control Programmed auto exposure with exposure compensation 2 0 2 0EV in steps of 1 3 EV Autofocus AF Focus range 40cm 1 4 macro mode 1cm 0 4 W Focus area selection Five area multi AF with autom...

Page 122: ... Built in Speedlight Range approx 0 4 4 3m 1 4 14 1 W 1 0 2 6m 3 3 8 6 T Flash control Sensor flash system Interface USB 2 0 full speed Video output Can be selected from NTSC and PAL I O terminals DC in audio video A V out with digital I O Power sources One rechargeable Nikon EN EL1 lithium ion battery supplied One 2CR5 lithium battery EH 54 AC adapter Approximate battery life based on CIPA standa...

Page 123: ...tures 81 during shooting 19 in full frame playback 21 selected pictures 80 Design rule for Camera File system 112 Digital Print Order Format 57 Direct Print see USB Direct DPOF see Digital Print Order Format Dusk Dawn 34 E E mail 65 Electronic viewfinder 3 4 6 16 EN EL1 see Batteries Error messages 105 107 Exif 2 2 112 Exif Print see Exif 2 2 Exposure BSS 29 70 Exposure compensation 42 F File numb...

Page 124: ...0 Sensitivity 27 39 71 Sepia 75 Setup menu 91 100 setup mode 7 91 SHOOTING menu 64 75 Shutter release button 6 18 Size see Image mode Slide show 77 79 Small pic 85 Smear 103 Sort by date 88 Sound 97 Sound settings 97 Speedlight see Flash Standard color 75 Standby mode see Auto off Strap camera 2 Sunset 33 Support information viii T Telephoto see Zoom Television 43 52 connecting to 52 Thumbnail pla...

Page 125: ...pan SB4H02500301 11 6MA03111 No reproduction in any form of this manual in whole or in part except for brief quotation in critical articles or reviews may be made without written authorization from NIKON CORPORATION ...

Reviews: