background image

6

(2) Focusing

(1) 

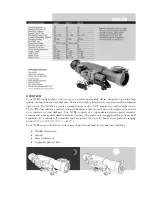
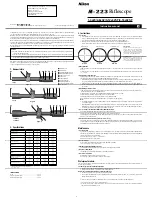
Look through the eyepiece with your eye positioned about 10cm (4 in) away from the eyepiece lens (Fig. 3-1), and you will see the Nikoplex reticle (Fig. 3-2) or Milliradian Dot
reticle (Fig. 3-3). 

(1) 

Be sure your eye is positioned within proper alignment and proper eye relief otherwise the view will "black out".

(1) 

Point the objective end of the scope at the sky (Do not point at the sun) or at a plain unpatterned wall.

(1) 

Loosen the lock ring. (Non-illuminated Reticle model)

(1) 

Turn the eyepiece adjustment counter-clockwise and then turn it clockwise until the reticle appears sharp.

(1) 

(Non-illuminated Reticle model)

(1) 

Finally, without moving the eyepiece adjustment, turn the eyepiece lock ring as Fig. 3-4 to end so that the eyepiece adjustment will be firmly locked.

The lock ring must be firmly tightened to ensure an air-tight seal.

7

Fig. 3-2

Fig. 3-3

Nikoplex Reticle

Miliradian Dot Reticle


Lock Ring    


Eyepiece Adjustment    


Eye Relief

Non illuminated Reticle model


Eyepiece Adjustment    


Eye Relief

Illuminated Reticle model


Fig. 3-1

Fig. 3-4

Lock Ring

Eeypiece Adiustment

Summary of Contents for 10x44 SF

Page 1: ...t you should require service for your Nikon RIFLESCOPE in case of U S A market please send it directly to Nikon Scope Service 841 Apollo Street Suite 100 El Segundo CA 90245 4721 1 800 Nikon SV In case of outside U S A please bring it to dealer from which you purchased it Riflescope MONARCH X 2 5 10x44 SF 2 5 10x44 SF IL 4 16x50 SF Instruction manual E ...

Page 2: ...r many years to come Enjoy using it and above all always follow safe shooting procedures Caution 1 Do not look at the sun through the riflescope It will permanently damage your eye This precaution applies to all optical devices such as cameras and binoculars 2 The riflescope is effectively sealed against moisture and dust You may use your scope safely either in the rain or in dusty climates To pre...

Page 3: ... Specifications Actual Magnification Objective Diameter mm in Exit Pupil mm in Eye Relief mm in Battery Reticle Intensity Adjustment Field of View at 100yds m ft Tube Diameter mm in 2 5 10X 44 1 73 4 4 0 17 88 8 93 9 3 5 3 7 12 19 3 05 40 10 30 1 18 4 16X 50 1 97 3 1 0 12 88 8 93 9 3 5 3 7 7 62 1 92 25 6 3 30 1 18 Objective Tube Diameter mm in Length mm in Weight g oz Adjustment Graduation moa Max...

Page 4: ...ng Non illuminated Reticle model 1 Turn the eyepiece adjustment counter clockwise and then turn it clockwise until the reticle appears sharp 1 Non illuminated Reticle model 1 笳Finally without moving the eyepiece adjustment turn the eyepiece lock ring as Fig 3 4 to end so that the eyepiece adjustment will be firmly locked The lock ring must be firmly tightened to ensure an air tight seal 7 Fig 3 2 ...

Page 5: ...the bullet hits high turn adjustment clockwise in the opposite direction of the arrow marked UP for down 1 If the bullet hits to the right of the aiming point turn the windage adjustment clockwise in the opposite direction of the arrow marked R for left as in Fig 3 5 If the bullet hits to the left of the aiming point turn adjustment counter clockwise in the direction of the arrow marked R for righ...

Page 6: ...3 Parallax can be eliminated and sight alignment will be accurate 11 Maintenance 1 Lens cleaning 1 To remove dirt of fingerprint soak gauze of lens cleaning paper silicon free paper sold at camera shop with a small quantity of absolute alcohol available from drugstore and lightly wipe off Wiping with handkerchief of leather is not recommended as it is likely to damage the lens surface 1 Dust may s...

Reviews: