


2
Congratulations on your choice of a Nikon RIFLESCOPE. Your new scope is the finest example of Nikon's rugged and durable construction and precision bright optics; important
qualities for a serious shooter's riflescope.
Whether you use your scope for hunting or for target shooting, the procedure for mounting is identical. You should acquire a set of high quality steel mounting rings which have a
diameter of 30 mm. Follow the ring manufacturer's instructions for mounting procedures. After mounting the scope on your rifle, follow the procedures for reticle alignment.
When setting the reticle for hunting, you should determine your standard range and then adjust the reticle based upon that target distance. For targets which vary from that standard
distance you may simply adjust the position of the reticle in relation to your target, or you may wish to use the procedure for trajectory compensation. It's up to your personal prefer-
ence.
We hope that you will enjoy your new Nikon RIFLESCOPE for many years to come. Enjoy using it, and above all, always follow safe shooting procedures!
Caution
(1) Do not look at the sun through the riflescope. It will permanently damage your eye. This precaution applies to all optical devices such as cameras and binoculars.
(2) The riflescope is effectively sealed against moisture and dust. You may use your scope safely either in the rain or in dusty climates. To preserve the appearance of the scope,
we suggest that it be dried and cleaned prior to storage. Use a soft cloth for cleaning metal surfaces and use photographic lens tissue to clean the scope's lenses.
ITEM SUPPLIED
Hood ...........................................................1pc.
Battery (3V Lithium battery : CR2032)..........1pc.
(Dual illuminated Reticle model only)
Allen wrench ...............................................1pc.
Body............................................................1pc.
Eyepiece cap
Objective cap
.......................................1pair.
3
笆
筍
笋
笶
笨
笵
笆
笞
笋
筍
笶
笨
笵
笆
笞
笙
笶
笨
笵
笘
笳
笘
笳
笊
笊
筌
筌
笄
筺
筐
笄
筺
筐
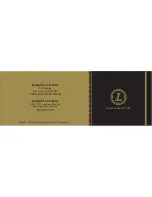
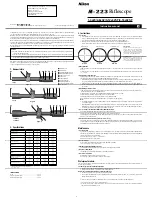
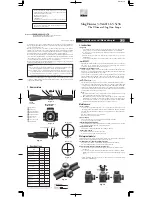
Fig. 1-1
Fig. 1-2
2.5-10x44 SF IL
2.5-10x44 SF
4-16x50 SF
笊
Objective Lens
笆
Eyepiece Lens
笳
Elevation Adjustment
笘
Windage Adjustment
笙
Eyepiece Lock Ring
笞
Eyepiece Adjustment
笵
Power Index Dot
笨
Power Scale
笶
Power Selector Ring
筐
Side Focus Adjustment Ring
筺
Side Focus Distance Mark
笄
Distance Scale Index
筍
Rheostat Intensity Dial
笋
Battery Compartment Cover
筌
Hood