15
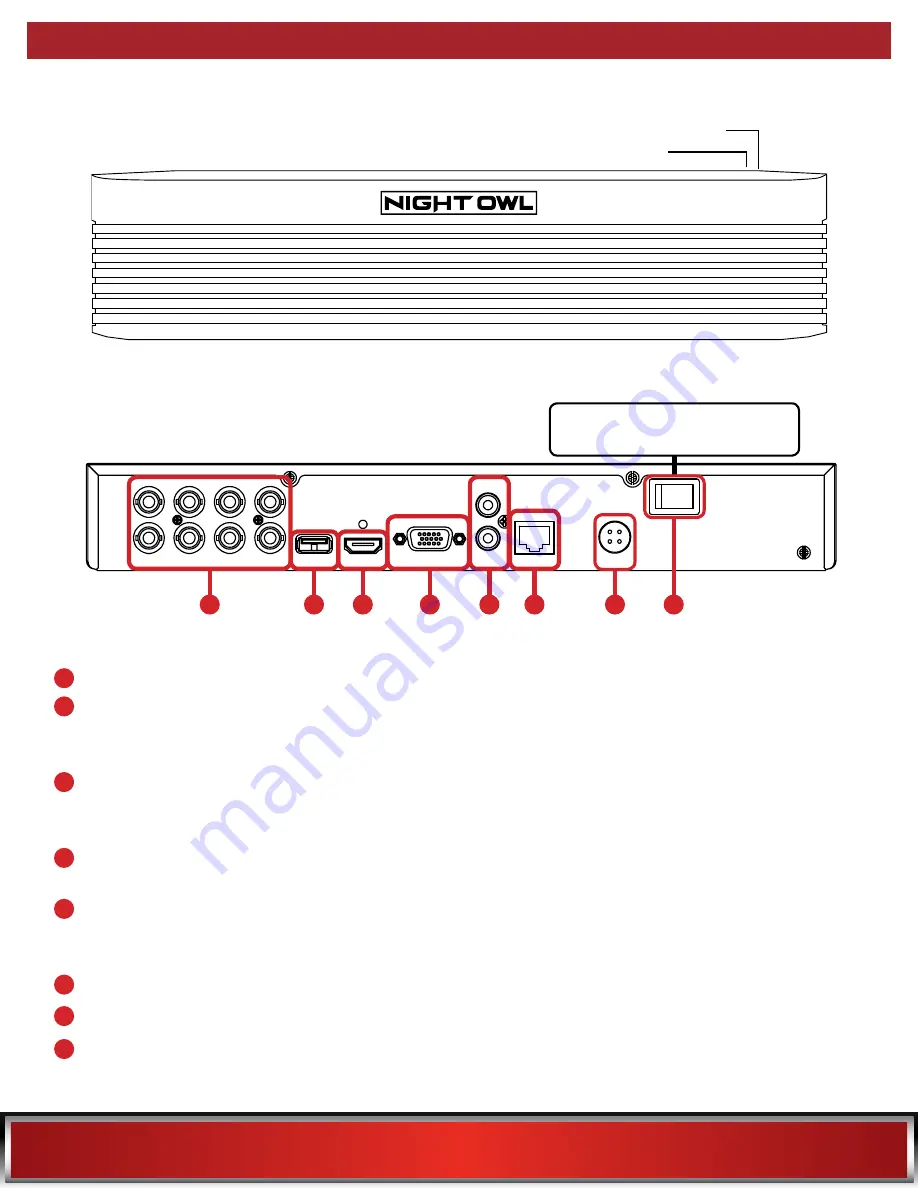
VIDEO IN
USB
HDMI
VGA
AUDIO OUT
AUDIO IN
LAN
12V / 2A
GROUND
POWER
ON / OFF
Once you have downloaded Night Owl X or Night Owl X HD and connected your DVR to your router, you can
network your DVR by scanning the QR code which is located on the top of the DVR.
4.2.1 DVR Diagram
FRONT VIEW
Model #
QR Code
Video Inputs
– Allow for the connection of BNC cameras.
VGA Output
– Allows for the video connection. If the TV/Monitor has a VGA input, connect the VGA cable
from the VGA output port on the DVR to the VGA input port on your TV/Monitor.
(VGA Cable not included)
Audio Inputs & Outputs
– Allows for the connection of audio enabled cameras by connecting the white
RCA plug to one of the audio inputs. After making the audio input connection, be sure to enable the audio
function in the DVR’s menu interface.
(Audio enabled camera, microphone and speaker not included)
USB Ports
– Allows for the connections of a USB mouse and/or a USB flash drive. You will connect the
included USB mouse to assist you in navigating the DVRs menu interface. You will connect a USB flash
drive to download video files from the DVR and save them to your USB flash drive.
HDMI Output
– Allows for the video connection. If the TV/Monitor has an HDMI input, connect the
HDMI cable from the HDMI output port on the DVR to the HDMI input port on your TV/Monitor.
NOTE:
Preferred method.
RJ-45 (Ethernet) Port
– Used to connect the DVR to your router/modem via the included Ethernet cable.
Power Input
– Used to connect the included 12V DC power supply.
Power Switch
– Use this switch to power ON/OFF the DVR. Make sure the power switch is in the ON
position before attempting to use the DVR.
Images used are for reference only. Your product may vary slightly. An 8 channel model is displayed above.
CHECK OUT MY REAR!
2
2
4
4
5
5
7
7
8
8
NOTE:
Not all models have a
power switch on the DVR.
3
3
6
6
1
1
Summary of Contents for THD Series
Page 3: ...3 TABLE OF CONTENTS...
Page 7: ...7 CHAPTER 1 FCC WARNINGS...
Page 9: ...9 CHAPTER 2 SAFETY INSTRUCTIONS...
Page 11: ...11 CHAPTER 3 APP OVERVIEW...
Page 13: ...13 CHAPTER 4 SPECIFICATIONS...
Page 17: ...17 CHAPTER 5 CAMERA INSTALLATION...
Page 22: ...22 CHAPTER 6 DVR INSTALLATION...
Page 25: ...25 CHAPTER 7 GETTING STARTED...
Page 46: ...46 CHAPTER 8 MENUS AND SETTINGS...
Page 80: ...80 CHAPTER 9 GLOSSARY...
Page 82: ...82 CHAPTER 10 WARRANTY...
Page 85: ...85 CHAPTER 11 TROUBLESHOOTING...
Page 88: ...88 CHAPTER 12 USER INFORMATION...


