Do not install in excessively dusty, dirty or greasy areas such as
kitchens, garages and furnace rooms. Dust grease or household
chemicals can contaminate or coat the alarm’s sensors, causing the
alarm not to operate properly.
Do not obstruct the vents located at the top and bottom of the
alarm. Place the alarm where drapes, furniture or other objects do
not block the flow of air to the vents.
Do not install in dead air spaces, such as peaks of vaulted ceilings
or gabled roofs, where carbon monoxide or Gas may not reach the
sensor in time to provide early warning.
Do not install in turbulent air from ceiling fans. Do not install near
doors and windows that open to the outside, near fresh air vents,
or anywhere that is drafty. Rapid air circulation from fans or fresh
air from outside may cause the sensors to display an inaccurate
readings.
Do not install this alarm in a switch- or dimmer-controlled outlet.
Do not install in areas where the temperature is colder than 40˚F
(4.4˚C) or hotter than 100˚F (37.8˚C). These areas include uncondi-
tioned crawl spaces, attics, porches and garages. Extreme tempera-
tures will affect the sensitivity of the alarm.
Do not install this unit near deep cell large batteries. Large batter-
ies have emissions that can cause the alarm to perform at less than
optimum performance.
Avoid the following:
• Excessive spillage or reverse venting of fuel burning
appliances caused by outdoor ambient conditions, such as:
1) Wind direction and/or velocity, including high gusts
of wind. Heavy air in the vent pipes (cold/humid air with
extended periods between cycles). 2) Negative pressure
differential resulting from the use of exhaust fans.
3) Simultaneous operation of several fuel burning appliances
competing for limited internal air. 4) Vent pipe connections
vibrating loose from clothes dryers, furnaces or water heaters.
5) Obstructions in or unconventional vent pipe designs which
can amplify the above situations.
• Extended operation of unvented fuel burning devices (range,
oven, fireplace, etc.).
• Temperature inversions which can trap exhaust Gasses near
the ground.
• Car idling in an open or closed attached garage, or near
a home.
How to Install Your Alarm
Your Nighthawk CO and Gas alarm with its removable adapter
allows you to install the alarm as a wall mounted unit (for nat-
ural Gas detection and CO), a direct plug unit (for propane and
CO), or as a table top unit.
To install the battery,
open the back door and snap battery
connector onto battery. You will hear the alarm sound briefly to
indicate the unit is receiving power. Place
battery into battery compartment and replace
back door.
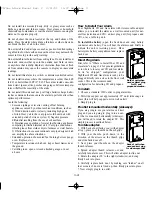
Direct Plug Alarm
First, refer to “Where to Install Your CO and
Gas alarm” on page 1-3 for general guidelines
as to where to locate your CO and Gas alarm.
In its “as shipped” configuration, your
Nighthawk CO and Gas alarm is ready to be
plugged directly into a close to the floor wall
socket. This is the recommended
configuration for detecting CO and propane.
To install:
1. Choose a standard 120V outlet to plug alarm into.
2. Pull slide support out approximately .25” until slide snaps in
place (this will help support unit in wall outlet).
3. Simply plug in.
If outlet is mounted horizontally (sideways):
If you are going to use your alarm as a direct
plug and you are going to plug in to an out-
let that is mounted horizontally (sideways),
you will need to rotate the adapter 90˚. This
simple process is outlined below.
To rotate adapter:
1. With back of unit facing you (with adapter
at top), place your thumbs on thumb grips.
2. With your thumbs, push down in the
direction of the arrows on the thumb grips
and slide back door off.
3. Next, place your thumbs on the adapter
thumb releases.
4. Spread adapter thumb releases out and
carefully turn alarm over. This will allow adapter to slide out.
5. Rotate the adapter 90˚ to the right (clockwise), and snap
firmly back into place.
6. Carefully replace back door by making sure “latches” on all
four corners of door are lined up, then firmly press into place.
7. Now simply plug in to outlet.
Back of unit when
used as direct plug
for CO and
propane detection.
Back of unit when
used as direct plug
for sideways outlet
1-4
CO/Gas Alarm Manual Rev. C 3/21/01 11:37 AM Page 9


