Night Owl AHD7 SERIES User Manual Download Page 11

20

21

AHD7 DVR Series

 Users Manual

Chapter


4:

 Camera Installation

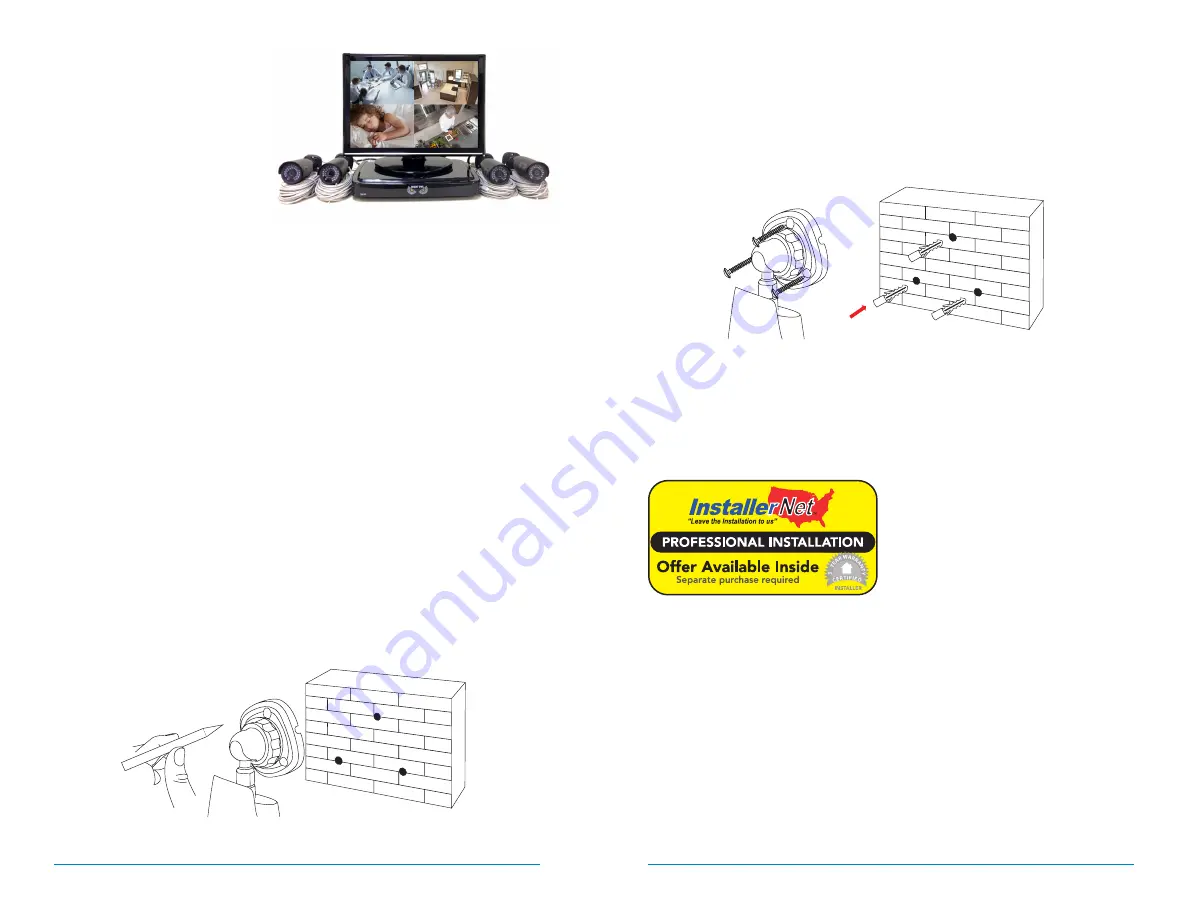
3.  Using a drill bit slightly smaller than the included screw anchors, drill into the 

mounting surface using the guide marks you placed in the previous step. 

4.  Insert the screw anchors. 
5.  Line up the camera base holes with the screw anchors. Holding the base in 

place, insert screws and tighten until secure.

6.  Once the base is screwed in place, make sure that the camera is securely 

mounted by placing gentle pressure on the mount. 

7.  Adjust the camera housing to point in the direction of the area you would like 

to monitor. 

Don’t feel like installing the  
system yourself? Let InstallerNet


do the work for you! Contact us at  
1-800-806-5513 or visit us at 

www.NightOwlSP.com

.

4.3 

Mounting the Cameras

Camera distance from viewing/recording device.  

The further the camera is from the DVR  
or monitor, the higher the chances  
of signal degradation. The camera’s  
power supply should be located  
as near to the camera as possible  
when the distance exceeds 200’  
as the power level will drop over  
extended distances resulting in video degradation. 

Do not place near high voltage wires or other sources of electrical interference. 

Electrical interference will degrade the quality of the signal. 

Place camera out of reach to avoid vandalism. 

Avoid direct exposure to weather. 

Do not place the camera where rain or snow will 

hit the lens directly nor should the camera be placed so that the sun or bright 
light shines directly into the lens. Your camera is weatherproof, but it will not work 
when submerged in water. Ensure that all power and video connections are not 
directly exposed to water and are protected from the elements.

Mounting surface.

 The mounting surface must hold at least four times the 

camera’s total weight.

1.  Locate a camera and choose a location where you would like to mount the 

camera. 

2.  Indicate screw positions by marking three holes on the surface where you plan 

to mount the camera, using the holes in the camera base as a guide.

Connect all cameras locally before final placement to 

ensure that all components function properly.

Summary of Contents for AHD7 SERIES

Page 1: ...www NightOwlSP com USER MANUAL AHD7 SERIES 4 8 16 CHANNEL...

Page 2: ...block top to bottom on the DVR For example a 900TVL camera will not display an image if it is connected to the same channel block top to bottom as an AHD 720p camera Please refer to the image below fo...

Page 3: ...6 3 1 Login Screen 29 6 3 2 Live View All Channels 30 6 3 3 Live View Single Channel 31 6 3 4 Menu Screen 32 CHAPTER 7 MENUS AND SETTINGS 33 7 1 General Menu 35 7 1 1 Display 35 a Output 35 b Privacy...

Page 4: ...CC WARNINGS For your reference we have created an instructional video that explains the menu structure and functionality of your Night Owl recorder in detail Click on the icon at any time to view Nigh...

Page 5: ...ommunication However there is no guarantee that interference will not occur in television reception which can be determined by turning the equipment off and on The user is encouraged to try and correc...

Page 6: ...move it When moving this device be sure to handle it with care Make sure there is good air circulation around the DVR This DVR uses an internal hard drive which generates heat during operation for vi...

Page 7: ...t port on the DVR to the HDMI input port on your TV Monitor Chapter 3 Specifications 3 1 System Requirements Please be sure that your PC MAC complies with the following specifications PC Operating Sys...

Page 8: ...ble from the VGA output port on the DVR to the VGA input port on your TV Monitor 6 RJ 45 Ethernet Port RJ 45 port will be used to connect the DVR to your router modem via the included Ethernet cable K...

Page 9: ...17 Chapter 4 Camera Installation 16 AHD7 DVR Series Users Manual CHAPTER 4 CAMERA INSTALLATION REMOTE SUPPORT VIDEOS...

Page 10: ...rking prior to mounting by connecting them as described in the section above Once all cameras are confirmed to be fully operational you can run the cables and mount the cameras at their final location...

Page 11: ...s near to the camera as possible when the distance exceeds 200 as the power level will drop over extended distances resulting in video degradation Do not place near high voltage wires or other sources...

Page 12: ...23 Chapter 5 DVR Installation 22 AHD7 DVR Series Users Manual CHAPTER 5 DVR INSTALLATION SUPPORT VIDEOS...

Page 13: ...attach the yellow RCA video connector of the cable to a yellow Video Input port on your TV The opposite BNC video connector on the cable should then connect to the Video Out V OUT port on the back of...

Page 14: ...r supply UPS plug the adapter cable into one of its output sockets Keep in mind Night Owl always recommends utilizing a surge protector to minimize the risk of damage caused to your DVR in the event o...

Page 15: ...ile app lets you access your DVR remotely with live viewing from your tablet or smartphone Download our free Night Owl HD application from the iTunes App or Google Play store Scan or click the QR code...

Page 16: ...nu to control pan tilt speed of rotation zoom focus and the iris if the camera is equipped with PTZ functionality Device ID the value in the field should match the value in the parentheses on the righ...

Page 17: ...configure display network and alarm settings 2 Cameras Menu access channel display and color settings 3 Record Menu setup or modify general recording triggered events and recording settings 4 Device...

Page 18: ...seconds per channel To begin the auto sequence feature click on the Auto Sequence icon which is located on the quick access bar VGA HDMI Resolution optimize the display resolution to best fit your TV...

Page 19: ...f 2049 or 2051 will provide the most optimal connectivity IP Address network address of the connected DVR Subnet Mask the range of IP addresses that can be found in the network This should always be s...

Page 20: ...uring the DDNS registration process Password the password created during the DDNS registration process b Substream configure or optimize the video quality of your Live View Video Enable or Disable vid...

Page 21: ...ion alarm settings for your DVR system Channel select the channel to configure motion alarm settings Enable activate motion alarms Sensitivity adjust the level of motion detection A lower setting will...

Page 22: ...ime choose a start and end time that the event happened Channel pick the channel s with the desired video Type select from All Normal or Motion video Search once the parameters are set click this butt...

Page 23: ...led Audio enabled cameras are only included in certain kit models Audio enabled cameras will have a white RCA plug to transmit the audio signal 7 3 3 Settings Recordings View or modify general recordi...

Page 24: ...Cruise Enable or Disable the PTZ cruise function which allows the camera to automatically scan the area periodically with no manual input Address enter an ID number for the PTZ camera greater than 0...

Page 25: ...th America Menu Timeouts select the duration of time for an inactive menu to be displayed on screen Support Overscan when this option is enabled the DVR will automatically resize the viewing window to...

Page 26: ...a access control address on the network HDD Capacity the max capacity of installed hard drives Video Format your current video recording format Media Port By default should be left at 9000 Web Port By...

Page 27: ...Shutdown reboot the DVR 7 6 2 Events Configure notification settings for other triggered events not related to motion detection such as disk error disk full or and or video loss Event Type choose the...

Page 28: ...automatically when this feature is enabled The default selection for the auto upgrade feature is enable Check For Updates check this tick box to periodically check for updated software versions Detect...

Page 29: ...r 8 3 Network Configuration 8 3 1 Windows Operating Systems Make sure that the DVR is properly connected to the router modem and that you have a computer that works with Windows and connected to the s...

Page 30: ...s if they are not they need to be set as follows DNS1 Gateway DNS2 8 8 8 8 5 Click the Save button to apply all changes 6 Reboot or power cycle the DVR NOTE Write these addresses down in the User Info...

Page 31: ...on to apply all changes 6 Reboot or power cycle the DVR NOTE Write these addresses down in the User Information section at the end of the manual for future reference 8 3 3 Port Configuration After you...

Page 32: ...rts on your router you should check to make sure they have been correctly forwarded 1 Go to http www yougetsignal com tools open ports 2 Type in port 9000 and select the Check button to see if the por...

Page 33: ...s Go to the General menu and then to the Network settings and the DDNS section 1 Set the DDNS field to Enable 2 Verify that the Server field is still set to NIGHTOWL 3 In the Domain field input the do...

Page 34: ...nization that provides services for accessing or using the Internet IP Internet Protocol Protocol for standard communications across the Internet PPPOE Point to Point Protocol Over Ethernet Specificat...

Page 35: ...any person to assume for it any other obligation or liability in connection with the sale or service of the Product In no event shall Night Owl be liable for any special or consequential damages arisi...

Page 36: ...71 Chapter 11 Troubleshooting 70 AHD7 DVR Series Users Manual CHAPTER 11 TROUBLESHOOTING SUPPORT VIDEOS...

Page 37: ...led Go to the Device Menu HDD and ensure that Overwrite is set to Auto Mouse not detected by system Mouse cable is not firmly connected to the system Firmly connect the mouse cable to the USB Mouse po...

Page 38: ...74 75 AHD7 DVR Series Users Manual Chapter 12 Customer Suppport CHAPTER 12 CUSTOMER SUPPORT SUPPORT VIDEOS...

Page 39: ...OwlSP com 24 7 Product Support How To Videos Manuals Firmware Updates etc EMAIL Technical Support support NightOwlSP com Sales Support sales NightOwlSP com PHONE English Spanish Technical Support regi...

Page 40: ...mber ___________________________________________________________ Internet Login Information Internal IP Address _______________________________________________________ Public IP Address ______________...

Page 41: ...www NightOwlSP com...

Reviews: