doc.000 012018 3/7
2. Introduction
Before attempting to assemble your Nibotechnics Autolift electric thoroughly read and understand
these installation instructions.
Installation, examination and testing should be carried out by competent, fully trained personnel.
The simplest, safest and most effective way to install your product is to have it professionally installed
and load tested by a Nibotechnics approved engineer using Nibotechnics approved tools and test
equipment.
For information on installation, servicing and maintenance contracts please contact your local
Nibotechnics distributor.
Before installation, always thoroughly check the construction of the floor where the Autolift electric is to
be positioned. Also check that the flooring is of adequate strength, this will include, the material
specification and the soundness and/or deterioration of the material. If in any doubt as to the strength
of the floor or if the flooring type does not coincide with the categories mentioned below, then do not
install the Autolift electric but contact Nibotechnics nv or their approved distributor for more technical
information.
If possible, scan the floor with a metal detector in order to detect and avoid any underfloor services.
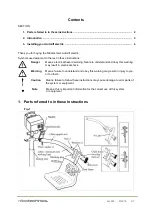
The Autolift electric is assembled as shown in Fig. 1. The chair may have to be attached to the chair
frame (by using the two screws provided).
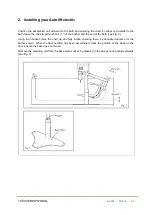
The choice of position (upper or lower) for the chair and frame on the end of the curved support arm
will depend on the height of the bather using the equipment and the relative position of the bottom of
the bath to the level of the floor.
The lower position is preferred for persons of average height, (unless the bath height is a problem).
Shorter self operators should have the chair mounted in the lowest position.
If the operation of the equipment is to be carried out by a person other than the bather then this chair
position will not be of any consequence.
Ensure the chair frame securing bolts are well tightened before using the equipment.
Note:- Blanking plugs are provided to seal the un-used adjustment holes.
If the seat height needs to be raised or lowered more than the amount of adjustment on the standard
unit, then an extension plate can be supplied by Nibotechnics upon request.
The curved chair support arm in Fig. 1 may be mounted either for left or right handed operation,
simply by rotating the curved arm through 180º.
Care should be taken when lifting components to avoid injury.
Eye protection should be worn when drilling holes.
Some information contained in these instructions may become outdated, due to improvements made
to this product in the future. If you have any questions regarding these instructions or your hoist,
please contact Nibotechnics or their approved distributor.
Nibotechnics policy is one of continuous development, and therefore reserve the right to change
specifications without notice.
Summary of Contents for Autolift electric
Page 1: ...Installation instructions...

