Nexxt Xpy Series User Manual Download Page 6

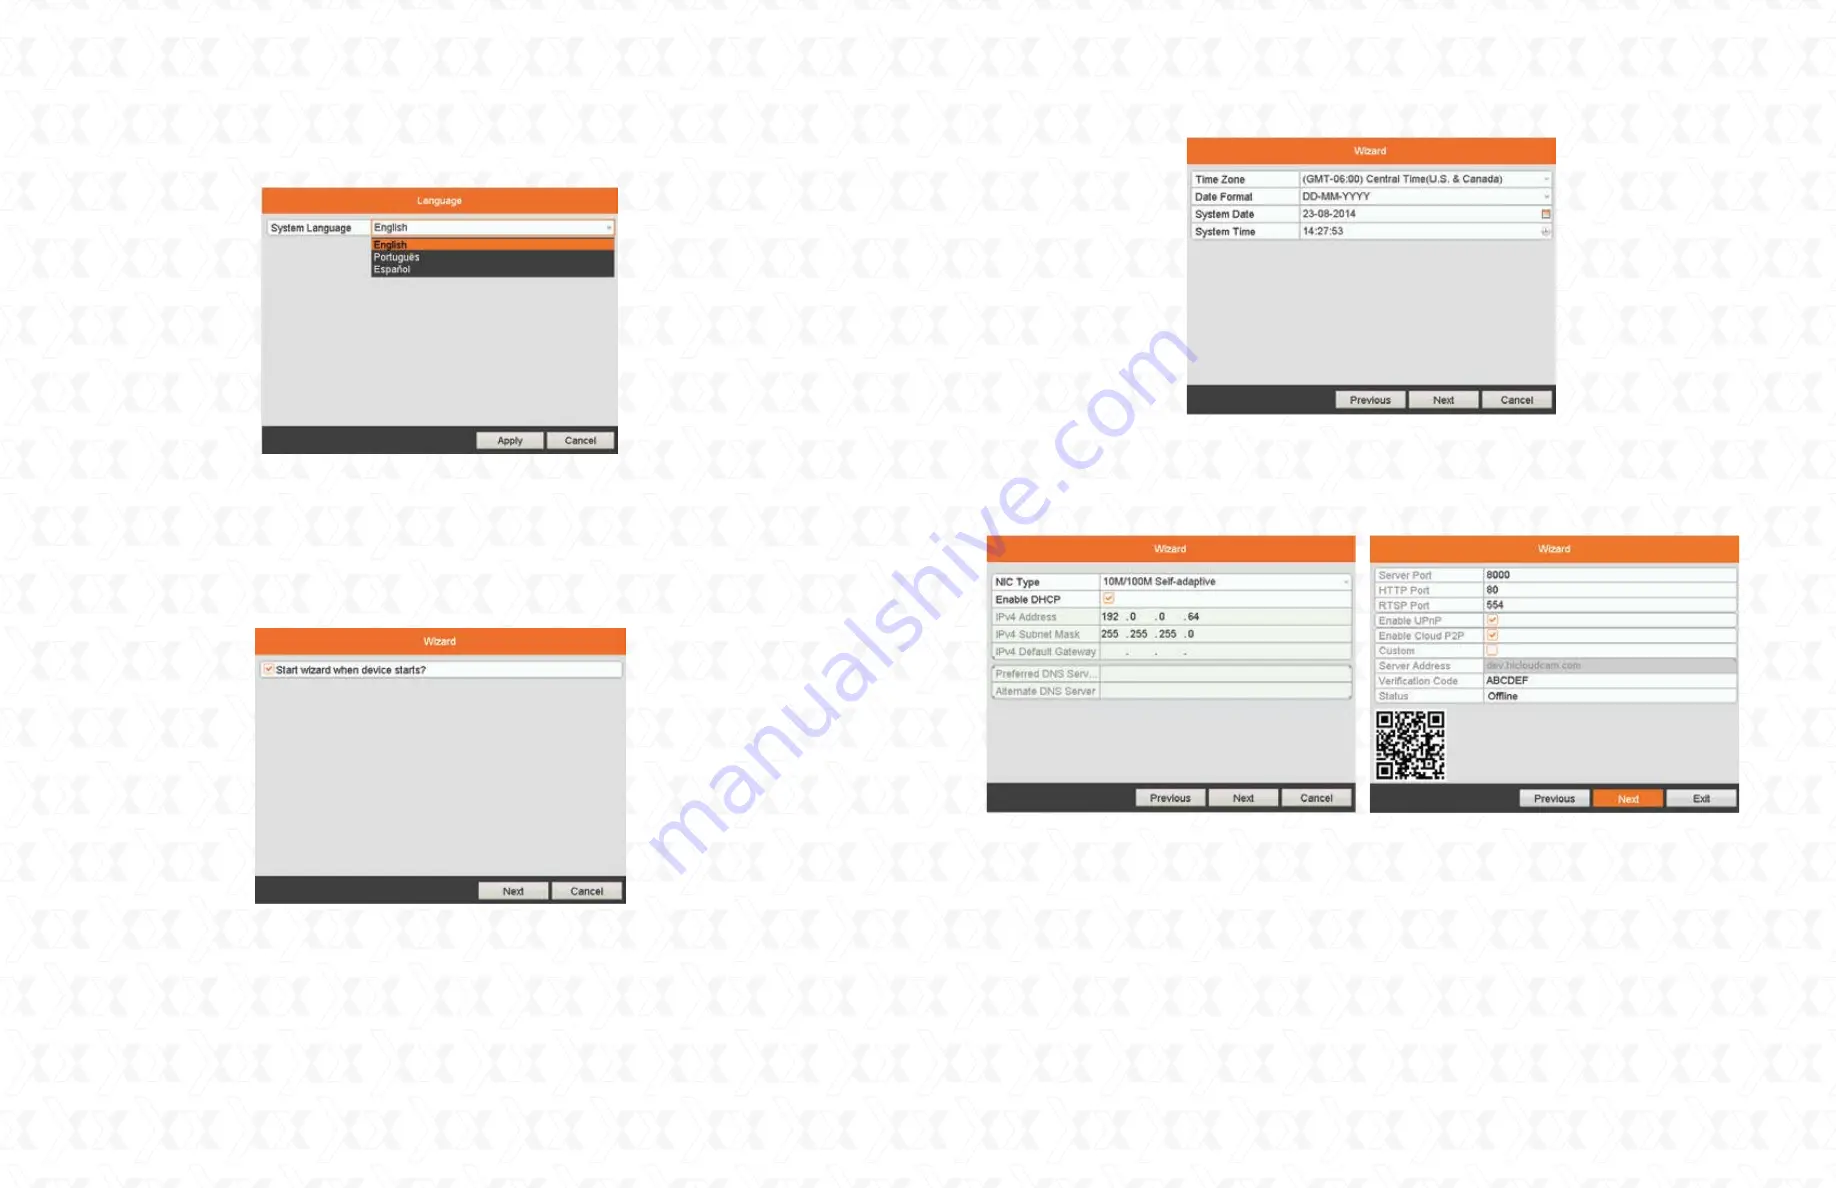
Network configuration: 

Defines network parameters, including the NIC type, IPv4 address, 

IPv4 subnet mask, default gateway, server port, etc. By default, this is set to DHCP, to 

automatically obtain an IP address and other network settings from that server. Follow the 

onscreen dialog boxes and click 

Next

 in both instances to enter the HDD Management window.

HDD management: 

When using a hard drive for the first time, the system will prompt you to

initialize the disk. Please note that initialization will remove all the data stored in the hard drive.

To proceed, select the hard drive from the list, click 

Init

, followed by 

OK

, as shown below.

5.

6.

6.1

Please note that if you select other language different from the default, the system will prompt you 

to reboot in order to apply the correct language package.

Date and time: 

Use this window to set the time zone based on your current location, date

format, system date and time. Once done, click 

Next 

to configure the network settings.  

Start wizard interface: 

This box is checked by default, and it is designed to enable the setup

wizard when the device starts. If you would like to disable this option, uncheck this box.

It is recommended to leave the default configuration unchanged the first time to set the

proper settings. Click 

Next 

to continue with the setup.

4.


2. 

Language: 

There are three languages available in the system: English, Portuguese and Spanish.

English is the language by default. Click 

Apply

 to continue.

3.

Nexxt Solutions  -  Surveillance systems user guide

11

Nexxt Solutions  -  Surveillance systems user guide

10

Summary of Contents for Xpy Series

Page 1: ...HIGH DEFINITION MULTI CHANNEL SURVEILLANCE SYSTEMS XPY 8004 HD XPY 4004 HD XPY 4002 HD XpySeries www nexxtsolutions com ...

Page 2: ...ckup devices 7 8 GND Ground needs to be connected when DVR starts up 9 Nexxt Solutions Surveillance systems user guide 2 I Introduction Thanks for purchasing the Nexxt Solutions standalone video surveillance system with the latest in HD TVI technology This multi channel security DVR is an easy to install easy to setup and easy to use monitoring kit Upon opening the box make sure all the items list...

Page 3: ...ve it 3 Locate the HDD rack in the DVR motherboard 4 Next insert the SATA interface plug into the corresponding connector on the hard drive Then attach the SATA power plug with the terminal on the HDD unit Use the supplied four mounting screws to secure the drive to the DVR chassis To do that align the drive with the holes on the base of the DVR and screw them from the bottom Be careful not to exe...

Page 4: ...ltaneously as long as channels are used in pairs For instance channel 1 and 2 must be fitted with TVI cameras while 3 and 4 with analog and so forth DVR connections power video audio and network Diagram based on the 8 channel version 6 7 8 IV HDD storage calculation chart V Hardware installation The following chart shows an estimation of storage space used based on recording at one channel for an ...

Page 5: ...ilitate the search for events based on when they occurred as well as avoiding confusion by having several recorded files bearing the same date 9 10 1 1 VI Preliminary steps 1 Activation window VII Using the setup wizard AC adaptor and splitter This option will require you to create your own password for privacy considerations As with all devices of this type it is important to set a customized pas...

Page 6: ... language different from the default the system will prompt you to reboot in order to apply the correct language package Date and time Use this window to set the time zone based on your current location date format system date and time Once done click Next to configure the network settings Start wizard interface This box is checked by default and it is designed to enable the setup wizard when the ...

Page 7: ...the images captured by the cameras the DVR displays icons that represent the status of each device connected to the network In this mode the menu bar will be displayed in the lower edge of the screen To bring it up you can scroll down the cursor or simply click on the mouse right button 7 7 1 7 2 8 Icon Description An alarm event has been triggered video loss tampering or motion detection Alarm an...

Page 8: ...e DVR 10 Start stop auto switch Displays the system date and time information in the selected format 11 Date and time Use it to pin the tool bar on the screen for quick access to menus 12 Pin 6 Aux monitor 2x2 Five channel grid view plus one enlarged frame 8 channel version only 1x5 Seven channel grid view plus one enlarged frame 8 channel version only 1x7 Nine channel grid view 8 channel version ...

Page 9: ... click Yes as seen in the illustration below Proper startup and shutdown procedures are crucial for expanding the life of the DVR 4 3 5 1 5 2 5 3 5 4 5 5 Select the recorded files and click Export 4 2 4 Backup In addition by moving the cursor to the right side of the screen the complete list of channels will be displayed From this window the user can select the videos recorded by each particular c...

Page 10: ...At this final stage you can safely unplug the DVR from the power source 5 6 19 Nexxt Solutions Surveillance systems user guide 18 Notes ...

Reviews: