Nexvac RoboVac 200 User Manual Download Page 8

Preparing for use

1. Make sure you have completely charged the battery  before using it 

for the first time.

2. Room preparation:
  A. Pick up all large items off of the floor that could  get stuck in the 

brushes or the vacuum intake.

  B. Pick up/hide all cords that could get tangled in the unit.
  C. Move all items that could be easily knocked over.
  D. Roll under loose edges of rugs with any type of stringy fringe.  
3. DO NOT use the RoboVac on plush or long pile carpet or rugs.
4. When using the RoboVac in a room for the first time, watch how it 

operates in the room. Watch for areas that the unit has troubles 
operating in, and either block these areas of the room or move objects 
around so that the unit can clean effectively and not get stuck or hung 
up before it has had an opportunity to clean the entire room. 


Starting Operation

1. Clean out the dust bin before use.

2. Place the RoboVac on the floor in a relatively open space near the 

middle of the room to be cleaned.


3. Press the power button on the main unit to turn it on.
4. Set the timer of the unit to the desired cleaning time by pressing the 

Timer button on the control panel of the unit or on the remote 
control.


 For Reference: Use 10 minutes of cleaning time for every 54-72 

square feet of floor space.

  Cleaning time may vary depending on the type of floor being 

cleaned.
5. Press the Start button on the control panel or the remote control. After 

a short delay, the RoboVac will begin


to automatically clean the 

floor. 

6

.

 At the end of the cleaning cycle, the RoboVac will emit a long beep 

and will stop moving.

 If the power light on the unit is still blue, then the unit still has battery 

power and can be used again.

 If the low


battery light on the unit is flashing red, then the battery is 

low and needs to be recharged before the unit can be used again. 

13

Clean Mate 365

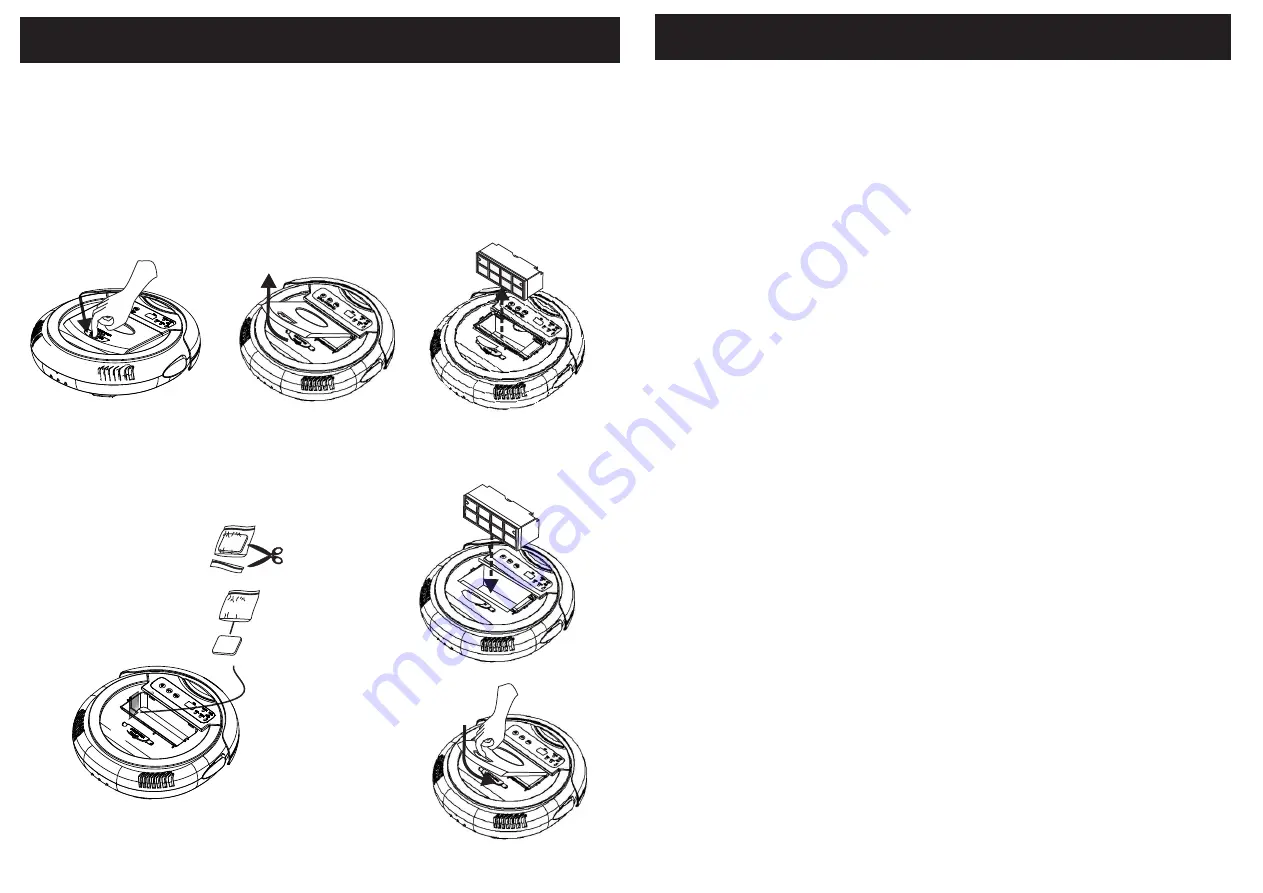
Installing Accessories

General Operation

Illustration 2

Illustration 1

Fragrance Installation and Removal

This robotic vacuum cleaner has a compartment built into it for adding 

fragrance to the air as the unit cleans. 

Any solid scent packet, insert, or dryer sheet can be used. 
DO NOT use any type of Liquid or Oil Fragrance with this unit.
1.Press the "Dust


Bin


Release


Button

to


release the dust bin


cover. See


the arrow in Illustration 1.

2.Remove the dust bin cover as shown in Illustration 2

.

3

.Remove the dust bin from its compartment as shown in Illustration 3.


4.Open the fragrance package and place it in the small compartment as 

shown in Illustration 4.


5. Replace the dust bin as shown in Illustration 5.
6. Replace the dust bin cover as shown in Illustration 6.

12

Illustration 4

Illustration 3

Illustration 2

Illustration 5

Illustration 6

RoboVac 200

RoboVac 200

Summary of Contents for RoboVac 200

Page 1: ...Clean Mate 365 RoboVac 200 IntelligentAutomatic Robotic Vacuum Cleaner USERMANUAL Robotic Vacuum Cleaner REV A 120813I NEXVAC NEXVAC RoboVac 200 RoboVac 200 RoboVac 200...

Page 2: ...uld pull over a lamp table or chair for examples and cause damage to the unit floor object or person 5 Please do not sit or stand on this product Pay special attention to toddlers or pets in the house...

Page 3: ...t a specific pattern in the following sequence 1 Spiral 2 Special Bounce 3 Along Wall 4 S Shape 5 Polygonal Spiral and back to A Automatic Note when mode 4 S shape in use if the RoboVac in 45 degree a...

Page 4: ...Charger 1 6 User Manual 1 7 Hand Brush 1 8 Fragrance not included Main Unit andAccessories 2 Ultraviolet Light Battery Cover Auxiliary Wheel Vacuum Entry Side Brush Drive Wheel Handle Dust Bin Releas...

Page 5: ...eration time The numerical panel will display the operation time When power is first turned on the default setting is 80 minutes The timer settings are from 10 to 80 minutes in 10 minute increments 3...

Page 6: ...play will show A for one minute 6 UV Button Allows you to turn on or off the ultraviolet light as needed 7 Vacuum Motor Off Button Press this button to turn On Off the vacuum motor This allows you to...

Page 7: ...arging the Battery InstallingAccessories Side Brush Installation and Removal To remove the Side Brush use a Philips head screwdriver to remove the screw in the center of the Side Brush Assembly by tur...

Page 8: ...oor space Cleaning time may vary depending on the type of floor being cleaned 5 Press the Start button on the control panel or the remote control After a short delay the RoboVac will begin to automati...

Page 9: ...the control panel of the unit or press the Stop button on the remote control The operation and maintenance of the RoboVac is very simple To maintain top performance of the unit it is recommended that...

Page 10: ...f the compartment then slide the Roller Brush to the left freeing it from the flexible insert 5 Remove any hair string or other debris from the roller brush to ensure proper performance of the unit 6...

Page 11: ...vent it from working properly Immediately turn the unit off clear the object causing the jam and resume normal use Tip 4 When something is jammed inside the RoboVac it will emit a beeping sound Turn t...

Page 12: ...battery CleanMate is lifted off ground over 3 seconds while running Put the CleanMate back on to the ground CleanMate is stuck Remove deris hairs from brushes and wheels LOW BATT indicator on Battery...

Page 13: ...r a period of six months This warranty is only valid if the product has been properly installed and is used in the way of which it is intended and has received only factory authorized repairs servicin...

Reviews: